HTTPS Certificate Configuration (Version 3.x and earlier): Difference between revisions
(added screenshot) |
No edit summary |
||
| (13 intermediate revisions by 6 users not shown) | |||
| Line 1: | Line 1: | ||
[[ | {{Note|Article about the old stable Proxmox VE 3.x releases. For the current version see [[HTTPS Certificate Configuration (Version 4.x and newer)]]}} | ||
== Introduction == | |||
=Introduction= | |||
This is a mini-howto for changing the web server certificate in Proxmox, so that you can have a certificate created with a custom CA. | This is a mini-howto for changing the web server certificate in Proxmox, so that you can have a certificate created with a custom CA. | ||
It has been tested on a Proxmox VE 3.0 installation, using certificates from https://www.cacert.org/. | It has been tested on a Proxmox VE 3.0 installation, using certificates from https://www.cacert.org/. | ||
=HTTPS Certificate Configuration= | == HTTPS Certificate Configuration == | ||
[[Image:screen-custom-ssl-with-java-shell.png|thumb]] | |||
3 files are needed: | 3 files are needed: | ||
* ca. | * ca.pem : CA certificate file in PEM format | ||
* server.key : non-password protected private key | * server.key : non-password protected private key | ||
* server.pem : server certificate from CA in PEM format | * server.pem : server certificate from CA in PEM format | ||
| Line 15: | Line 14: | ||
You can create the previous files following any standard openssl certificate generation HOWTO. | You can create the previous files following any standard openssl certificate generation HOWTO. | ||
=== Backup PVE created files === | |||
cp /etc/pve/pve-root-ca.pem /etc/pve/pve-root-ca.pem.orig | cp /etc/pve/pve-root-ca.pem /etc/pve/pve-root-ca.pem.orig | ||
cp /etc/pve/local/pve-ssl.key /etc/pve/local/pve-ssl.key.orig | cp /etc/pve/local/pve-ssl.key /etc/pve/local/pve-ssl.key.orig | ||
cp /etc/pve/local/pve-ssl.pem /etc/pve/local/pve-ssl.pem.orig | cp /etc/pve/local/pve-ssl.pem /etc/pve/local/pve-ssl.pem.orig | ||
=== Copy your own certificates === | |||
cp server.key /etc/pve/local/pve-ssl.key | cp server.key /etc/pve/local/pve-ssl.key | ||
cp server.pem /etc/pve/local/pve-ssl.pem | cp server.pem /etc/pve/local/pve-ssl.pem | ||
cp ca. | cp ca.pem /etc/pve/pve-root-ca.pem | ||
=== Using intermediate certificates === | |||
[[Image:Intermediate_certificate_test.png|thumb]] | |||
Using intermediate certificates requires a special pve-ssl.pem which has to contain both | |||
your server.pem and the intermediate_certificate.pem. This must be created this way: | |||
cat server.pem intermediate_certificate.pem > /etc/pve/local/pve-ssl.pem | |||
cat intermediate_certificate.pem ca.pem > /etc/pve/pve-root-ca.pem | |||
After restarting pveproxy and pvedaemon you can verify that pve-ssl.pem is created the | |||
proper way by visiting this URL [http://www.digicert.com/help/ SSL Certificate Tester] | |||
If everything is properly configured you will be rewarded with something similarly as | |||
can be seen in the image. | |||
=== Restart the API server and pvedaemon === | |||
service pveproxy restart | service pveproxy restart | ||
service pvedaemon restart | service pvedaemon restart | ||
| Line 33: | Line 46: | ||
If you have a Proxmox cluster, this has to be done on all nodes (only the /etc/pve/local part). To test the changes in one node before changing configuration in other nodes, please make sure you log in the web interface in the correct node. | If you have a Proxmox cluster, this has to be done on all nodes (only the /etc/pve/local part). To test the changes in one node before changing configuration in other nodes, please make sure you log in the web interface in the correct node. | ||
[[Category: | [[Category: Archive]] | ||
[[Category: Proxmox VE 3.x]] | |||
Latest revision as of 15:44, 18 July 2019
| Note: Article about the old stable Proxmox VE 3.x releases. For the current version see HTTPS Certificate Configuration (Version 4.x and newer) |
Introduction
This is a mini-howto for changing the web server certificate in Proxmox, so that you can have a certificate created with a custom CA. It has been tested on a Proxmox VE 3.0 installation, using certificates from https://www.cacert.org/.
HTTPS Certificate Configuration
3 files are needed:
- ca.pem : CA certificate file in PEM format
- server.key : non-password protected private key
- server.pem : server certificate from CA in PEM format
You can create the previous files following any standard openssl certificate generation HOWTO.
Backup PVE created files
cp /etc/pve/pve-root-ca.pem   /etc/pve/pve-root-ca.pem.orig
cp /etc/pve/local/pve-ssl.key /etc/pve/local/pve-ssl.key.orig
cp /etc/pve/local/pve-ssl.pem /etc/pve/local/pve-ssl.pem.orig
Copy your own certificates
cp server.key /etc/pve/local/pve-ssl.key
cp server.pem /etc/pve/local/pve-ssl.pem
cp ca.pem     /etc/pve/pve-root-ca.pem
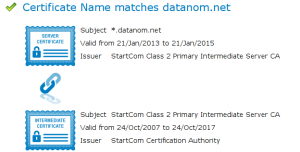
Using intermediate certificates
Using intermediate certificates requires a special pve-ssl.pem which has to contain both your server.pem and the intermediate_certificate.pem. This must be created this way:
cat server.pem intermediate_certificate.pem > /etc/pve/local/pve-ssl.pem
cat intermediate_certificate.pem ca.pem > /etc/pve/pve-root-ca.pem
After restarting pveproxy and pvedaemon you can verify that pve-ssl.pem is created the proper way by visiting this URL SSL Certificate Tester
If everything is properly configured you will be rewarded with something similarly as can be seen in the image.
Restart the API server and pvedaemon
service pveproxy restart
service pvedaemon restart
That's it.
If you have a Proxmox cluster, this has to be done on all nodes (only the /etc/pve/local part). To test the changes in one node before changing configuration in other nodes, please make sure you log in the web interface in the correct node.

