Proxmox VE Mobile: Difference between revisions
(page created) |
m (→Introduction) |
||
| (10 intermediate revisions by 4 users not shown) | |||
| Line 1: | Line 1: | ||
= Introduction | = Introduction = | ||
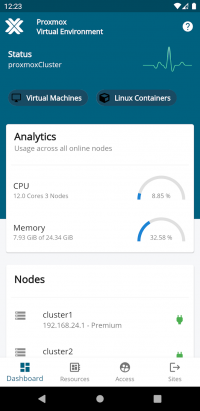
Proxmox VE can be accessed on mobile devices either through the HTML5-based mobile version of the web interface, or a modern App - currently available for Android. | |||
[[File:Proxmox VE Android App - Overview.png|200px|thumb]] | |||
Currently VM and CT handling and showing of their configuration (but | = Proxmox VE Android App = | ||
Log in to your Proxmox Virtual Environment (VE) server and manage virtual machines, containers, hosts, and clusters. Based on the cutting edge Flutter framework you will get a beautiful and blazing fast experience. | |||
== Key Features == | |||
* Overview dashboard of Proxmox VE cluster or node status | |||
* Login manager to connect to different Proxmox VE clusters or nodes | |||
* Search and filter functionality for guest, storage, and nodes | |||
* Overview of users, API token, groups, roles, domains | |||
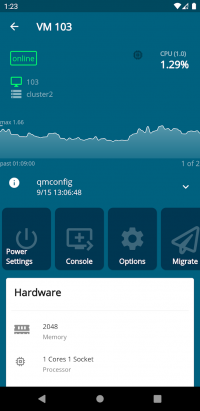
* Manage VM/container power settings (Start, Stop, Reboot, etc.) | |||
* RRD diagrams for nodes and guests | |||
* Migration of guests (offline, online) between cluster nodes | |||
* Back up data to different storages including Proxmox Backup Server | |||
* Storage view to access and or search content | |||
* Task history and current task overview | |||
== Download == | |||
[[File:Proxmox VE Android App - VM View.png|thumb|200px|Proxmox VE Android App - VM View]] | |||
Currently, the Proxmox VE Mobile App is available through the Google Play Store: | |||
https://play.google.com/store/apps/details?id=com.proxmox.app.pve_flutter_frontend | |||
== SPICE console == | |||
You can use [[SPICE]] to get console access. | |||
In order to get this running, you need to purchase the [https://play.google.com/store/apps/details?id=com.undatech.opaque Opaque] App. | |||
The Proxmox VE Android app is able to open the Opaque SPICE console viewer directly when using the "Console" button. | |||
= Proxmox VE HTML5 Mobile Client = | |||
[[Image:Screen-ProxmoxVE-Mobile-Login.png|thumb|200px|HTML5 - Login Form]] | |||
In addition to the full featured web interface, Proxmox VE Mobile (introduced in Proxmox VE 3.3 as technology preview) is designed specifically for the use on mobile devices (phones and tablets). It is not a complete replacement for the full admin web interface but it has already a lot of key functionality to manage Proxmox VE on the go, including the SPICE and HTML5 console. | |||
Currently, VM and CT handling and showing of their configuration (but no editing) is supported. | |||
[[Image:Screen-ProxmoxVE-Mobile-Datacenter.png|thumb|200px|HTML5 - Datacenter Overview]] | |||
As Proxmox VE Mobile is a HTML5 app (build with [http://www.sencha.com/products/touch/ Sencha Touch]), there is no installation or configuration needed. | As Proxmox VE Mobile is a HTML5 app (build with [http://www.sencha.com/products/touch/ Sencha Touch]), there is no installation or configuration needed. | ||
| Line 17: | Line 56: | ||
*Task log | *Task log | ||
=Usage= | == Usage == | ||
Just point your browser on your mobile device to the main URL, e.g. < | Just point your browser on your mobile device to the main URL, e.g. <code>https://youripaddress:8006</code> | ||
If the auto-detection works correctly (phone browsers works most times, tablets not always), you will see the mobile interface directly. If not, just add the following to your URL: | If the auto-detection works correctly (phone browsers works most times, tablets not always), you will see the mobile interface directly. If not, just add the following to your URL: | ||
* <code>https://youripaddress:8006/?mobile=1</code> | |||
* < | |||
This is also a good way to test the mobile interface via your desktop browser. If your browser can simulate a mobile device screen, this will help to test the application just from your desktop. | This is also a good way to test the mobile interface via your desktop browser. If your browser can simulate a mobile device screen, this will help to test the application just from your desktop. | ||
If you want to switch to standard view (e.g. in order to change some configuration) specify | If you want to switch to standard view (e.g. in order to change some configuration) specify | ||
* <nowiki>https://youripaddress:8006/?mobile=0</nowiki> | |||
=== How to control a VM === | |||
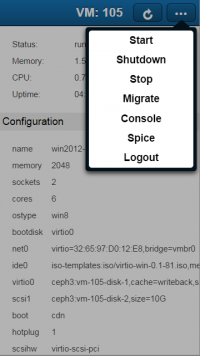
[[Image:Screen-ProxmoxVE-Mobile-VM-Details.png|thumb|200px|HTML5 - VM Details]] | |||
After connecting to server the Log In form is shown (fig. 1) | After connecting to server the Log In form is shown (fig. 1) | ||
* Enter User name and Password into the provided fields | * Enter User name and Password into the provided fields | ||
* If necessary select "Proxmox VE authentication server" by activating the pull down menu "Linux PAM standard authentication" | * If necessary select "Proxmox VE authentication server" by activating the pull down menu "Linux PAM standard authentication" | ||
* Select the "Log In" bar | * Select the "Log In" bar | ||
| Line 51: | Line 88: | ||
* Select from menu top right what you want to to: | * Select from menu top right what you want to to: | ||
:: - Start: starts the VM | :: - Start: starts the VM | ||
:: - Shutdown: performs an ACPI shutdown of the VM | :: - Shutdown: performs an ACPI shutdown of the VM | ||
:: - Stop: stops (power off) of the VM | :: - Stop: stops (power off) of the VM | ||
:: - Migrate: migrates the VM to another node (note: after migration the VM disappeared from that node where you were connected to - therefore an error message is shown when try to return to VM - that´s not a fault: the machine belongs now to another node than before) | :: - Migrate: migrates the VM to another node (note: after migration the VM disappeared from that node where you were connected to - therefore an error message is shown when try to return to VM - that´s not a fault: the machine belongs now to another node than before) | ||
:: - Console: tries to open a HTML5 console | :: - Console: tries to open a HTML5 console | ||
:: - Spice: opens a SPICE terminal (see below) | :: - Spice: opens a SPICE terminal (see below) | ||
:: - Logout: ends the Proxmox session and returns to Log In form | :: - Logout: ends the Proxmox session and returns to Log In form | ||
=SPICE console= | == SPICE console == | ||
For Android devices (preferred), you can use [[SPICE]] to get console access. | For Android devices (preferred), you can use [[SPICE]] to get console access. | ||
In order to get this running, you need to purchase [https://play.google.com/store/apps/details?id=com.undatech.opaque Opaque] | In order to get this running, you need to purchase [https://play.google.com/store/apps/details?id=com.undatech.opaque Opaque] | ||
=== How to use Opaque on Android === | |||
==How to use Opaque on Android== | |||
* Purchase and install "Opaque" from Google Play | * Purchase and install "Opaque" from Google Play | ||
* Make sure that your VM has a SPICE monitor configured (if not yet configured switch to standard view and change the VM configuration "Hardware" -> "Display" accordingly) | * Make sure that your VM has a SPICE monitor configured (if not yet configured switch to standard view and change the VM configuration "Hardware" -> "Display" accordingly) | ||
* In web-browser: | * In web-browser: | ||
:: - select the machine | :: - select the machine | ||
:: - activate context menu (top right of VM´s window, see fig. 3) | :: - activate context menu (top right of VM´s window, see fig. 3) | ||
:: - select "Spice" => file with access data will be downloaded (named pve-spice[-n].vv where "n" is a sequence number, starting with 1 if there are more than one file) | :: - select "Spice" => file with access data will be downloaded (named pve-spice[-n].vv where "n" is a sequence number, starting with 1 if there are more than one file) | ||
* Open a file browser and select the just downloaded file and open it with "Opaque" | * Open a file browser and select the just downloaded file and open it with "Opaque" | ||
Note: | Note: | ||
* Each access file can can only be used once - it will immediately be deleted after start of Opaque | * Each access file can can only be used once - it will immediately be deleted after start of Opaque | ||
* On some devices opaque task has to be cancelled before starting a new session | * On some devices opaque task has to be cancelled before starting a new session | ||
=HTML5 Console= | == HTML5 Console == | ||
If SPICE is not an option you can use an ordinary VNC client. In this case the VM configuration has to be adapted, look [https://pve.proxmox.com/wiki/Vnc_2.0#Enabling_Vnc_2.0_for_use_with_old_vnc_clients_.28Including_iOS_and_Android.29 here] for details. | If SPICE is not an option you can use an ordinary VNC client. In this case the VM configuration has to be adapted, look [https://pve.proxmox.com/wiki/Vnc_2.0#Enabling_Vnc_2.0_for_use_with_old_vnc_clients_.28Including_iOS_and_Android.29 here] for details. | ||
=Security Consideration= | == Security Consideration == | ||
If you want to access Proxmox VE Mobile outside your LAN, you should use VPN and TFA to get maximum security. | If you want to access Proxmox VE Mobile outside your LAN, you should use VPN and TFA to get maximum security. | ||
==VPN== | === VPN === | ||
To prevent unauthorized access, you should use a VPN to connect to your Proxmox VE hosts. | To prevent unauthorized access, you should use a VPN to connect to your Proxmox VE hosts. | ||
==Two-Factor Authentication== | === Two-Factor Authentication === | ||
Use [[Two-Factor Authentication]] for secure login procedure. If your phone supports NFC, just use a Yubikey with NFC - easy to use and a quite secure one time password. | Use [[Two-Factor Authentication]] for secure login procedure. If your phone supports NFC, just use a Yubikey with NFC - easy to use and a quite secure one time password. | ||
[[Category: | [[Category:HOWTO]] | ||
Latest revision as of 08:30, 6 May 2022
Introduction
Proxmox VE can be accessed on mobile devices either through the HTML5-based mobile version of the web interface, or a modern App - currently available for Android.
Proxmox VE Android App
Log in to your Proxmox Virtual Environment (VE) server and manage virtual machines, containers, hosts, and clusters. Based on the cutting edge Flutter framework you will get a beautiful and blazing fast experience.
Key Features
- Overview dashboard of Proxmox VE cluster or node status
- Login manager to connect to different Proxmox VE clusters or nodes
- Search and filter functionality for guest, storage, and nodes
- Overview of users, API token, groups, roles, domains
- Manage VM/container power settings (Start, Stop, Reboot, etc.)
- RRD diagrams for nodes and guests
- Migration of guests (offline, online) between cluster nodes
- Back up data to different storages including Proxmox Backup Server
- Storage view to access and or search content
- Task history and current task overview
Download
Currently, the Proxmox VE Mobile App is available through the Google Play Store: https://play.google.com/store/apps/details?id=com.proxmox.app.pve_flutter_frontend
SPICE console
You can use SPICE to get console access. In order to get this running, you need to purchase the Opaque App.
The Proxmox VE Android app is able to open the Opaque SPICE console viewer directly when using the "Console" button.
Proxmox VE HTML5 Mobile Client
In addition to the full featured web interface, Proxmox VE Mobile (introduced in Proxmox VE 3.3 as technology preview) is designed specifically for the use on mobile devices (phones and tablets). It is not a complete replacement for the full admin web interface but it has already a lot of key functionality to manage Proxmox VE on the go, including the SPICE and HTML5 console.
Currently, VM and CT handling and showing of their configuration (but no editing) is supported.
As Proxmox VE Mobile is a HTML5 app (build with Sencha Touch), there is no installation or configuration needed.
Main features
- Supports Two-Factor Authentication
- Manage all nodes inside your cluster with one login
- View status and config of host, containers and VM
- Start/Stop/Shutdown/Migrate
- HTML5 Console (works on all browsers)
- SPICE Console, for best user experience (Android only, third party APP needed)
- Task log
Usage
Just point your browser on your mobile device to the main URL, e.g. https://youripaddress:8006
If the auto-detection works correctly (phone browsers works most times, tablets not always), you will see the mobile interface directly. If not, just add the following to your URL:
This is also a good way to test the mobile interface via your desktop browser. If your browser can simulate a mobile device screen, this will help to test the application just from your desktop.
If you want to switch to standard view (e.g. in order to change some configuration) specify
- https://youripaddress:8006/?mobile=0
How to control a VM
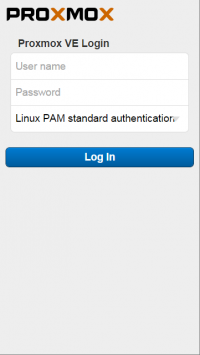
After connecting to server the Log In form is shown (fig. 1)
- Enter User name and Password into the provided fields
- If necessary select "Proxmox VE authentication server" by activating the pull down menu "Linux PAM standard authentication"
- Select the "Log In" bar
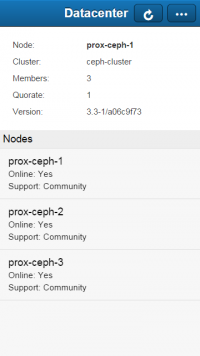
Now you are at "Datacenter" level, all cluster nodes are shown (fig. 2)
- Select the node where the VM is located
Now you are at node level, all VMs in that node are shown
- Select the VM
Now you see all data of the selected VM (fig. 3)
- Select from menu top right what you want to to:
- - Start: starts the VM
- - Shutdown: performs an ACPI shutdown of the VM
- - Stop: stops (power off) of the VM
- - Migrate: migrates the VM to another node (note: after migration the VM disappeared from that node where you were connected to - therefore an error message is shown when try to return to VM - that´s not a fault: the machine belongs now to another node than before)
- - Console: tries to open a HTML5 console
- - Spice: opens a SPICE terminal (see below)
- - Logout: ends the Proxmox session and returns to Log In form
SPICE console
For Android devices (preferred), you can use SPICE to get console access.
In order to get this running, you need to purchase Opaque
How to use Opaque on Android
- Purchase and install "Opaque" from Google Play
- Make sure that your VM has a SPICE monitor configured (if not yet configured switch to standard view and change the VM configuration "Hardware" -> "Display" accordingly)
- In web-browser:
- - select the machine
- - activate context menu (top right of VM´s window, see fig. 3)
- - select "Spice" => file with access data will be downloaded (named pve-spice[-n].vv where "n" is a sequence number, starting with 1 if there are more than one file)
- Open a file browser and select the just downloaded file and open it with "Opaque"
Note:
- Each access file can can only be used once - it will immediately be deleted after start of Opaque
- On some devices opaque task has to be cancelled before starting a new session
HTML5 Console
If SPICE is not an option you can use an ordinary VNC client. In this case the VM configuration has to be adapted, look here for details.
Security Consideration
If you want to access Proxmox VE Mobile outside your LAN, you should use VPN and TFA to get maximum security.
VPN
To prevent unauthorized access, you should use a VPN to connect to your Proxmox VE hosts.
Two-Factor Authentication
Use Two-Factor Authentication for secure login procedure. If your phone supports NFC, just use a Yubikey with NFC - easy to use and a quite secure one time password.
