Import certificate in browser: Difference between revisions
mNo edit summary |
|||
| (6 intermediate revisions by 2 users not shown) | |||
| Line 1: | Line 1: | ||
== Introduction == | == Introduction == | ||
Proxmox VE | Some browsers, like the new standard browser Edge in Windows 10, are denying custom SSL certificates, sometimes without an option to add them. As the Proxmox VE generates unique and secure certificates to ensure the integrity of the communication between the web interface and users, this "security feature" raises some issues for Proxmox VE users. Here is a step by step manual to add CA's to your Windows system. | ||
Browsers like Chrome or Opera relies on the Certificate Authority (CA) pool from the System, but give an option to visit the site nonetheless. Adding your Proxmox VE CA with this method gets rid of SSL security warnings permanently. | |||
== Windows Systems == | |||
== | === Extracting the Certificate === | ||
You find your Proxmox SSL certificate on any cluster under <code>/etc/pve/pve-root-ca.pem</code>. Copy it to the Windows machine via USB stick, Dropbox/drive/..., ssh, or your own favorite way. | |||
=== Installing the Certificate === | |||
On the Windows system (tested with win7 and win10) search for "Internet Options" in the start menu or the settings window. | |||
Open it and select the content tab, there click the certificates button. The certificates window opens, there select the "Trusted Root Certification Authorities" Tab and click on import. | |||
and | |||
[[File:Install proxmox cert 1 internet options.png|450px|center|thumb]] | |||
== | |||
The certification import wizard starts, continue to the file import, here browse to the <code>pve-root-ca.pem</code> file which you copied from the Proxmox VE server. | |||
'''Attention:''' you need to select to show "All Files" in the filter to see the Proxmox certificate. Open it and continue in the wizard until completion. | |||
[[File:Install proxmox cert 3 selected cert.png|450px|center|thumb]] | |||
A new window pops up asking if you trust the imported certificate, answer it with yes and you're finished. | |||
<div style="width: 800px; height: 360px; margin: 0 auto;"> | |||
[[File:Install proxmox cert 4 finish.png|x350px]] | |||
[[File:Install proxmox cert 5 trust screen.png|x350px]] | |||
</div> | |||
Now Edge, and also Internet Explorer can load the Proxmox VE Web Interface, indifferent whatever cluster you access it without complaints. If you manage different Proxmox VE instances you have to apply these steps also for them, as we generate an unique certificate for browser compatibility. | |||
== OS X System == | |||
On a macOS System launch Safari and enter the address of your Proxmox VE Web Interface, don't forget to begin with " ''http'''s'''://'' ". | |||
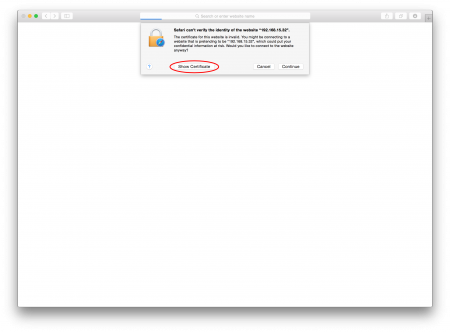
A message should pop up, informing that the identity from the site couldn't be verified. Click the "Show Certificate" button. | |||
[[File:Pve cert mac os display cert file1.png|center|450px]] | |||
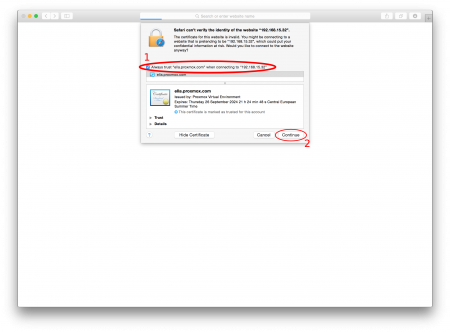
Check the "Always trust ''certificate name here'' ..." box and click on "Continue" | |||
[[File:Pve cert mac os accept cert file2.png|center|450px]] | |||
Now the certificated is white listed, also for other browser (again, Firefox is an exception as it has its own certificate pool) and you should see the Proxmox VE Web Interface. | |||
If not, reenter your address and again, don't forget "''http'''s'''://''"! | |||
== Other Browsers == | |||
=== Chrome / IE / Opera === | |||
Opera (tested version 30.0), Chrome (tested version 43) and Internet Explorer uses the system certificate pool but also gives you an option to continue to the interface, even if it is not yet added to the system. Use the steps described above to get rid of security warnings. | |||
=== Firefox === | |||
Firefox uses its own build in pool of CA's and gives you the option to add an SSL CA when you load the interface (tested with version 38.0.1). | |||
[[Category: HOWTO]] | [[Category: HOWTO]] | ||
Latest revision as of 16:06, 1 March 2023
Introduction
Some browsers, like the new standard browser Edge in Windows 10, are denying custom SSL certificates, sometimes without an option to add them. As the Proxmox VE generates unique and secure certificates to ensure the integrity of the communication between the web interface and users, this "security feature" raises some issues for Proxmox VE users. Here is a step by step manual to add CA's to your Windows system.
Browsers like Chrome or Opera relies on the Certificate Authority (CA) pool from the System, but give an option to visit the site nonetheless. Adding your Proxmox VE CA with this method gets rid of SSL security warnings permanently.
Windows Systems
Extracting the Certificate
You find your Proxmox SSL certificate on any cluster under /etc/pve/pve-root-ca.pem. Copy it to the Windows machine via USB stick, Dropbox/drive/..., ssh, or your own favorite way.
Installing the Certificate
On the Windows system (tested with win7 and win10) search for "Internet Options" in the start menu or the settings window.
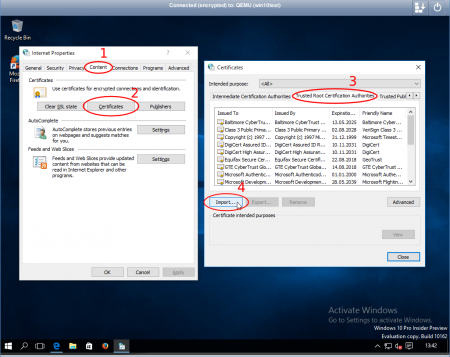
Open it and select the content tab, there click the certificates button. The certificates window opens, there select the "Trusted Root Certification Authorities" Tab and click on import.
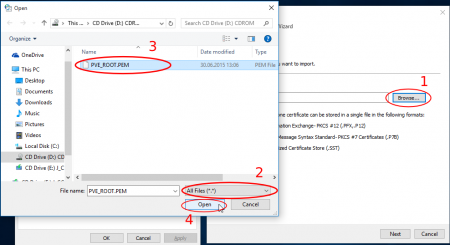
The certification import wizard starts, continue to the file import, here browse to the pve-root-ca.pem file which you copied from the Proxmox VE server.
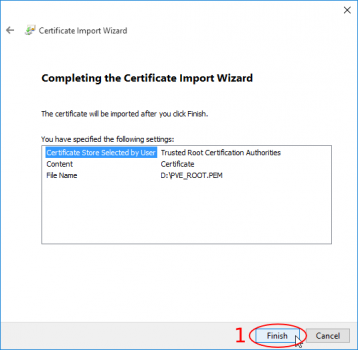
Attention: you need to select to show "All Files" in the filter to see the Proxmox certificate. Open it and continue in the wizard until completion.
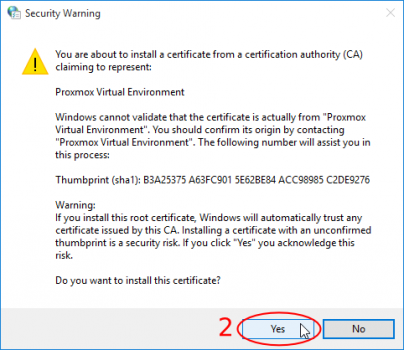
A new window pops up asking if you trust the imported certificate, answer it with yes and you're finished.
Now Edge, and also Internet Explorer can load the Proxmox VE Web Interface, indifferent whatever cluster you access it without complaints. If you manage different Proxmox VE instances you have to apply these steps also for them, as we generate an unique certificate for browser compatibility.
OS X System
On a macOS System launch Safari and enter the address of your Proxmox VE Web Interface, don't forget to begin with " https:// ".
A message should pop up, informing that the identity from the site couldn't be verified. Click the "Show Certificate" button.
Check the "Always trust certificate name here ..." box and click on "Continue"
Now the certificated is white listed, also for other browser (again, Firefox is an exception as it has its own certificate pool) and you should see the Proxmox VE Web Interface. If not, reenter your address and again, don't forget "https://"!
Other Browsers
Chrome / IE / Opera
Opera (tested version 30.0), Chrome (tested version 43) and Internet Explorer uses the system certificate pool but also gives you an option to continue to the interface, even if it is not yet added to the system. Use the steps described above to get rid of security warnings.
Firefox
Firefox uses its own build in pool of CA's and gives you the option to add an SSL CA when you load the interface (tested with version 38.0.1).
