YubiKey: Difference between revisions
m (image fixup) |
No edit summary |
||
| (One intermediate revision by one other user not shown) | |||
| Line 197: | Line 197: | ||
Now add the Public Identity (in this case `cccccccccccb`) into the user' | Now add the Public Identity (in this case `cccccccccccb`) into the user' | ||
[[Category: HOWTO]] | |||
Latest revision as of 13:34, 24 May 2017
YubiKeys
In order to use YubiKeys in Proxmox VE you need access to a YubiKey validation server. You can either use the YubiCloud or host your own validation server. Below is a short introduction to setting up such a server for demonstration purposes.
If you've setup your server and simply wish to start using the YubiKeys, skip the server setup and go straight to your preferred method of managing keys below.
Demo: Hosting your own Verification Servers
When using Yubikey OTP there are two servers involved: a validation server and a key storage server. For security reasons it is recommended to separate the two and restrict access to the key servers.
The validation servers need to access the key server via a REST API. And PVE needs access to the validation server's API.
For demonstration purposes the Debian provided `yubikey-ksm` and `yubkey-val` packages can be installed on a single local host - for simplicity this can be a fresh Debian or PVE machine - to test the functionality. For a complete setup it is recommended to read through the whole documentation of both packages found here:
- https://github.com/Yubico/yubikey-ksm/blob/master/doc/
- https://github.com/Yubico/yubikey-val/blob/master/doc/
The Key Server
Install the `yubikey-ksm` package. Note that it'll pull in mysql as a dependency, and for demonstration purposes we'll choose the simplest setup and let APT perform default setups of mysql as well as the `yubikey-ksm` package via `dbconfig-common`.
In other words: tell apt the mysql root password as well as the KSM password you want to use. You then have
- a mysql database with a db named `ykksm` up and running
- apache2 providing the YubiKey KSM API at http://localhost/wsapi/decrypt
For manual deployment refer to: https://github.com/Yubico/yubikey-ksm/blob/master/doc/Installation.adoc
The Validation Server
Install the `yubikey-val` package. If you follow the instructions the same way as with the key server above, you'll have
- a mysql database named `ykval`
- an apache2 configured to provide the validation API at http://localhost/wsapi/verify
Connecting PVE to the Validation Server
You can now use `ykval-gen-clients` to create an API key to be added to Proxmox:
root@yubitest # ykval-gen-clients 1
2,6Xlxb5iNALPKN7Rf9jqTYPisqXo=
The above output is your API ID and Key separated by a comma. This means after selecting 'Yubico' in the `TFA` combo box in the dialog used to add an authentication realm, you write `2` in the ID field, and `6Xlxb5iNALPKN7Rf9jqTYPisqXo=` in the Key field. As URL, assuming you performed the above steps on the PVE host itself, you write: `http://localhost/wsapi/2.0/verify`. (Otherwise replace `localhost` with the IP address of your validation server. If you've gone through the manual setup and the recommended steps to secure the server with HTTPS you'll obviously want to replace the `http` part by `https`.)
Securing a realm with Yubico Two-Factor Authentication
Make sure that are logged into the GUI as `root@pam`. In the Datacenter section select Authentication, select a realm you want to secure and click Edit (or double-click the realm).
Select `Yubico` as in the `TFA` dropdown box. Three more fields will appear. In our example you'll fill in the following values:
- Yubico API Id: 2 as API Id
- Yubico API Key: 6Xlxb5iNALPKN7Rf9jqTYPisqXo=
- Yubico URL: http://localhost/wsapi/2.0/verify
Preparing YubiKeys
In order to use YubiKeys you need to be able to either get a server generated key to the client to configure their YubiKey with, or get a user-generated key to the server to import. Either way you'll want to secure the key while it is travelling instead of sending it plaintext or obscured.
The import utilities provided by the `yubikey-ksm` package will want to decrypt and verify files before importing the contained keys into the database.
To get started read through the following documentation links (you can skip the first one if you already have a GPG key setup for use on the key server):
- https://github.com/Yubico/yubikey-ksm/blob/master/doc/Generate_KSM_Key.adoc
- https://github.com/Yubico/yubikey-ksm/blob/master/doc/Key_Provisioning_Format.adoc
The rest of this howto will assume you created a GPG key with the name 'YK-KSM Importer'.
Generating a Key as a User
First read through:
- https://github.com/Yubico/yubikey-ksm/blob/master/doc/Import_Keys_To_KSM.adoc
- https://github.com/Yubico/yubikey-ksm/blob/master/doc/Key_Provisioning_Format.adoc
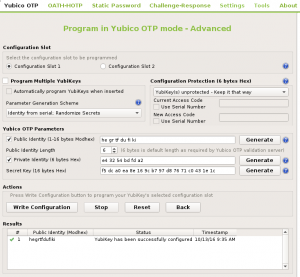
To create a key as a user, simply connect your YubiKey and fireup the `yubikey-personalization-gui` program. Select `Yubico OTP`, click `Advanced` and hit the three `Generate` buttons while leaving the default settings.
Also make sure you hit the `Write Configuration` button in order to write this key onto the YubiKey.
Now it the GUI should look similar to the screenshot on the right. You need to copy the 3 values (Public Identity, Private Identity and Secret Key) and get them to onto the server over a secure channel. Since this is just a demonstration we'll prepare the file to be imported via `ykksm-import` right away. (Make sure you read through the link about the Key Provisioning Format above). The following is a working example file containing the data from the screenshot on the right. Make sure you fill in the data in the right order. We'll leave the lockpw field blank here. Create the file 'keys-plain.txt':
# ykksm 1
# serialnr,identity,internaluid,aeskey,lockpw,created,accessed[,progflags]
1,hegrtfdufiki,e43254bdfda2,f5dca0ea8e169cb797d87671c0431e1c,000000000000,2016-10-13T09:30:25,
# the end
We now sign and encryt this file with the ykksm server administrator as a recipient.
# gpg -a --encrypt -r 'YK-KSM Importer' -s < keys-plain.txt > keys.gpg
Now we transfer this file to the server and import it:
# ykksm-import --verbose --database='dbi:mysql:ykksm' --db-user=pv-yubi --creator='YK-KSM Importer' < keys.gpg
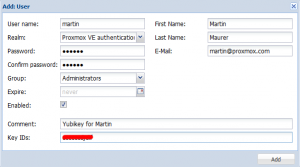
The next step is to associate the PVE user with the Public Identity of this key. In our example the Public Identity is `hegrtfdufiki`. We add this to the user's Key IDs field via the PVE GUI.
Generating a Key on the Server
First read through:
- https://github.com/Yubico/yubikey-ksm/blob/master/doc/Generate_Keys.adoc
- https://github.com/Yubico/yubikey-ksm/blob/master/doc/Import_Keys_To_KSM.adoc
We start by creating a single key. The following command will show the key via stderr on the terminal, and a second later ask you for the GPG passphraze to sign and encrypt the file into `keys.txt`.
bash # ykksm-gen-keys --urandom 1 1 | tee /dev/stderr | (sleep 1 && gpg -a  --encrypt -r 'YK-KSM Importer' -s > keys.txt)
# ykksm 1
# serialnr,identity,internaluid,aeskey,lockpw,created,accessed[,progflags]
1,cccccccccccb,6f966145cd8e,0ef19f49b1bb52e5bfcd11ad3d50d1ec,86aad678e350,2016-10-21T12:33:43,
# the end

You need a passphrase to unlock the secret key for
user: "YK-KSM pv-yubi Import Key"
2048-bit RSA key, ID 40FC7068, created 2016-10-13

bash #
Here you see that the Public Identity (`cccccccccccb`) in this case depends on the serial number which is passed via command line parameters. In this case '1'.
As you can gather from the second link, importing works like in the previous example where we generated the key file manually:
# ykksm-import --verbose --database='dbi:mysql:ykksm' --db-user=pv-yubi < keys.txt
We now have to upload the key onto a YubiKey. We can do this with the `yubikey-personalization-gui`. Similarly to when generating the keys via this UI, select Yubikey OTP, hit Advanced, leave the default settings, but this time instead of hitting the `Generate` buttons, copy the three fields after the serial number from the `ykksm-gen-keys` output into the fields in the YubiKey UI. The order is Public Identity, Private Identity, then Secret Key. Then press the `Write Configuration` button.
Now add the Public Identity (in this case `cccccccccccb`) into the user'


