OATH(TOTP) Authentication: Difference between revisions
No edit summary |
|||
| Line 1: | Line 1: | ||
= Proxmox PVE OATH (TOTP) authentication = | = Proxmox PVE OATH (TOTP) authentication = | ||
Revision as of 12:04, 5 April 2019
Proxmox PVE OATH (TOTP) authentication
In order to use OATH (TOTP) two-factor authentication (2FA) in Proxmox VE you need to (in this order):
- Ensure you have root or administrative access to your server and to editing the `/etc/pve/domains.cfg` file in case you need to revert back to PAM-only authentication
- Open a shell session and generate an OATH (TOTP) key ID for each user
- Add the user's key ID to its profile in the Proxmox GUI
- Enable OATH (OTP) 2FA to secure a realm
WARNING: Do NOT enable 2FA authentication until you have completed the first 3 steps or you risk locking yourself out of your PVE server. At this time there is no way to enable 2FA on a per-user basis.
Below is a short procedure to set this up.
Generating a user key ID
In order to configure your 2FA clients and the PVE user account, a key ID is needed for each user. It doesn't matter which user on which host generates their key ID.
Either generate it for them and send them out, or have them send you one. This will then be needed to finish configuration in each user's profile (see below).
You'll want to secure the key while it is traveling instead of sending it in plaintext or obscured.
Text-only key ID generation for manual configuration
The easiest way to generate the OATH key is via PVE's oathkeygen utility:
$ oathkeygen
P6NDPDL6QDS7YFP4
The resulting key IDs can be used for PVE user account configuration and 2FA client configuration (mobile or else), see below.
Graphical (ANSI) QR code key ID generation for automatic configuration
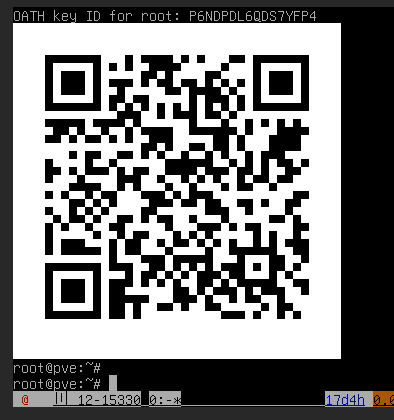
You can generate the key ID with the oathkeygen utility and generate a QR code in ANSI which will show up on your terminal by using this command (available when the qrencode package is installed):
clear && OATHKEYID=$(oathkeygen) && echo -e OATH key ID for $USER: $OATHKEYID && qrencode -t ANSIUTF8 -o - $(echo "otpauth://totp/PVE:$USER@"$(hostname --fqdn)"?secret=$OATHKEYID")
The resulting key ID (P6NDPDL6QDS7YFP4 in this example) will be used for PVE user account configuration and 2FA client configuration (mobile or else), see below.
You can also make this into a script for future use and save it under /opt/oath-qrencode.sh :
#!/bin/bash

clear

USERNAME=$USER
HOSTNAME=$(hostname --fqdn)
OATHKEY=$(oathkeygen)

echo -e  "OATH key ID for user $USERNAME@$HOSTNAME: $OATHKEY\r\r"

qrencode -t ANSIUTF8 -o - $(echo otpauth://totp/PVE:$USERNAME@$HOSTNAME?secret=$OATHKEY)
Finalizing 2FA configuration in your Proxmox user accounts and 2FA clients (mobile or else)
The next step is to associate the PVE user with the key ID generated.
- Go to Server View > Datacenter > Users > (click the user) > Edit
- Add the key ID to the `Key IDs` field. Several IDs can be added to this fiels, separated by spaces
- Click `OK` to save the user information
For 2FA client configuration on a mobile device (for example using AndOTP on Android), simply scan the QR code shown.
The key ID can also be used by itself to manually configure any compatible 2FA application.
Enabling or disabling OATH (OTP) 2FA to secure a realm
This example shows how to secure the PAM realm but any realm can have 2FA enabled.
Configuring PVE to enforce 2FA
Make sure that you are logged into the GUI as root@pam.
- Go to Datacenter > Authentication, select a realm you want to secure and click Edit (or double-click the realm).
- Select `OATH` in the `TFA` dropdown box. Three more fields will appear. The default values should be fine unless your client 2FA applications require other parameters.
Don't logout just yet unless you have completed users setup above first. OTP keys need to be configured for each user in Proxmox and in their 2FA clients. If you haven't done this for the root account you will effectively be locked-out from the web GUI. Acces can be restored by disabling 2FA (see below).
Disabling OATH 2FA authentication
If for any reason you wish to disable OATH TOTP 2FA authentication, you can do so by logging into your PVE server and editing the `/etc/pve/domains.cfg` file and removing this line:
tfa type=oath
