OVH: Difference between revisions
(page created) |
mNo edit summary |
||
| Line 86: | Line 86: | ||
=Links= | =Links= | ||
*TBD (e.g. links to the official OVH network setup guide for Proxmox VE 4.x). | *TBD (e.g. links to the official OVH network setup guide for Proxmox VE 4.x). | ||
[[Category:HOWTO]] | |||
Revision as of 07:58, 4 November 2015
Introduction
This article describes the OVH specific network settings for Proxmox VE 4.x.
OVH is one of the main Proxmox VE hosting partners and provides ready-to-use Proxmox VE images which allows you to start immediately with the installation and configuration of your virtual machines and containers.
Network configuration
In the OVH network the gateway is usually outside the IP subnet. Therefore routes to the gateways have to be added in order for them to be accessible from within containers or VMs.
Proxmox VE host
If you use the OVH Proxmox VE template the network is preconfigured in a working condition.
The IPv6 network is configured in a similar fashion as described in this article's LXC Container section, and the IPv4 network is configured the way you'd expect, with a /24 subnet. Note, that you should not copy this kind of configuration into a container. OVH suggests using a single addresses with a netmask of 255.255.255.255.
In order to enable IPv6 networking if the firewall is enabled you need to allow the neighbor discovery protocol. For this there's a firewall macro called NeighborDiscovery available. Add and enable it on the datacenter level (note that due to the way NDP addresses machines it is not enough to use this macro on a per-VM basis).
LXC container
IPv4
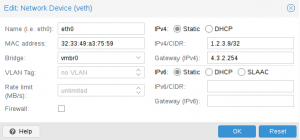
If you have a block of IPv4 addresses you can add the IPv4 address just via GUI. But first you need to use the OVH manager to create a virtual OVH mac address for the IPv4 address you want to assign. As soon as the OVH virtual mac is created, you can add this virtual OVH mac and the IPv4 address via the Proxmox VE GUI.
The GUI will add the required route to make the gateway reachable.
Let's for instance assume you have the IPv4 block 1.2.3.8/30. Then your addresses range from 1.2.3.8 to 1.2.3.11. In the OVH network your gateway will always end with an octet of 254, so if your Proxmox VE host main IPv4 is 4.3.2.1, the gateway is 4.3.2.254
Assume we want to assign address 1.2.3.9 to a container, you will get the following. Please note, this is shown in the screenshot.
Inside a Debian container, this creates automatically the following '/etc/network/interfaces file:
auto lo
iface lo inet loopback
auto eth0
iface eth0 inet static
       address 1.2.3.9
       netmask 255.255.255.255
       post-up ip route add 4.3.2.254 dev eth0
       post-up ip route add default via 4.3.2.254
       pre-down ip route del default via 4.3.2.254
       pre-down ip route del 4.3.2.254 dev eth0
Some background info. This is because Debian would refuse to use a gateway that is not part of the network, and with the above configuration the network is assumed to be 1.2.3.9/32, consisting of only this one address. Therefore we need to use post-up commands to first add a route to the gateway via the same interface we're configuring (eth0), then we add the gateway (default route).
IPv6
With IPv6 the situation is similar, and actually a little easier. On the one hand you do not need to assign any virtual mac addresses via the OVH GUI to IPv6 addresses. Also we can use the assigned prefix length directly. So use the prefix length of 64 even inside containers, this means that we can configure the IP address via the GUI, but still we must leave out the gateway. (Note that if you configure IPv6 but leave IPv4 blank the IPv4 configuration will be removed on Debian systems. If you want to manually configure IPv4 the config above for IPv4 config can be entered into a file under /etc/network/interfaces.d. Proxmox VE generated interface configuration files will preserve any unknown lines such a source-directory lines, and by default ships with the common source-directory /etc/network/interfaces.d line.)
Then we continue like with IPv4: open up /etc/network/interfaces and add post-up and pre-down lines to the network interface as shown here:
iface vmbr0 inet6 static
        address 2001:1234:1234:0123::
        netmask 64
        post-up /sbin/ip -f inet6 route add 2001:1234:1234:01ff:ff:ff:ff:ff dev vmbr0
        post-up /sbin/ip -f inet6 route add default via 2001:1234:1234:01ff:ff:ff:ff:ff
        pre-down /sbin/ip -f inet6 route del default via 2001:1234:1234:01ff:ff:ff:ff:ff
        pre-down /sbin/ip -f inet6 route del 2001:1234:1234:01ff:ff:ff:ff:ff dev vmbr0
The IPv6 gateway address on OVH consists of the first 54 bits of your server's IP address filled it up with "XXff:ff:ff:ff:ff", with XX being the upper byte of the 4th group. (Note that this means that in the case of a number with fewer than 4 digits, for instance 1ab, you need to treat it as if it was padded with zeroes to 4 digits, in this case 01ab, so the XX would be 01.)
Virtual machines (QEMU)
IPv4
If you have a block of IPv4 addresses you can use them for your virtual machines.
First you need to use the OVH manager to create a virtual mac address for the address you want to assign. Then you can create the virtual machine in the Proxmox VE GUI and assign the generated mac address to your virtual network card.
The network configuration files inside your virtual machine (ie. /etc/network/interfaces on Debian/Ubuntu) are the same as in the above container examples.
Links
- TBD (e.g. links to the official OVH network setup guide for Proxmox VE 4.x).
