Installation
Introduction
Proxmox VE installs the complete operating system and management tools in 3 to 5 minutes (depends on the used hardware).
Including the following:
- Complete operating system (Debian 6 - Squeeze, 64-bit)
- Partition the hard drive with LVM2
- Proxmox VE Kernel with OpenVZ and KVM support
- Backup/Restore tools
- Web based management interface
Please note, the complete server is used and all existing data is removed.
Video tutorials
List of all official tutorials: Video Tutorials
Screen cast video demo of container installation (OUTDATED)
Note: These external videos are based on a beta version of Proxmox VE
System requirements
For production servers, high quality server equipment is needed. Keep in mind, if you run 10 Virtual Servers on one machine and you got a hardware failure, 10 services are lost. Proxmox VE supports clustering, means that multiple Proxmox VE installations can centrally managed via the included cluster functionality.
Proxmox VE can use local storage (DAS) and SAN. For details see Storage_Model
Minimum requirements for evaluation:
- CPU: 64bit (Intel EMT64 or AMD64), Intel VT/AMD-V capable CPU/Mainboard (for KVM Full Virtualization support)
- Minimum 1 GB RAM
- Hard drive
- One NIC
Recommended system requirements:
- CPU: 64bit (Intel EMT64 or AMD64), Multi core CPU recommended, Intel VT/AMD-V capable CPU/Mainboard (for KVM Full Virtualization support)
- 8 GB is good, more is better
- Hardware RAID with batteries protected write cache (BBU) or flash based protection
- Fast hard drives, best results with 15k rpm SAS, Raid10
- At least two NIC´s, depending on the used storage technology you need more
Certified hardware
Basically you can use all hardware supporting RHEL6, 64 bit. If you are unsure, post in the forum.
Steps to get your Proxmox VE up and running
Install Proxmox VE server
Proxmox VE installation (Video Tutorial)
Optional: Install Proxmox VE on existing Debian Squeeze(64 bit)
See Install Proxmox VE on Debian Squeeze
Optional: Install Proxmox VE over iSCSI
See Proxmox ISCSI installation
Proxmox VE web interface
Configuration is done via web interface, just point your browser to the given IP address during installation (https://youripaddress:8006). Please make sure that your browser has latest Oracle java browser plugin installed. Proxmox VE is tested for IE9, Firefox 10 and higher, Google Chrome (latest).
Default login is "root" and the root password is defined during the installation process.
Configure basic system setting
Please review the NIC setup, IP and hostname.
Note: changing IP or hostname after cluster creation is not possible (unless you know exactly what you do)
Get Appliance Templates
Download
Just go to your content tab of your storage (e.g. "local")and download pre-built Virtual Appliances directly to your server. This list is maintained by the Proxmox VE team and more and more Appliances will be available. This is the easiest way and a good place to start.
If you have a NFS server you can use a NFS share for storing ISO images. To start, configure the NFS ISO store on the web interface (Configuration/Storage).
Upload from your desktop
If you already got Virtually Appliances you can upload them via the upload button. To install a virtual machine from an ISO image (using KVM full virtualization) just upload the ISO file via the upload button (limited to 2 GB).
Directly to file system
Templates and ISO images are stored on the Proxmox VE server (see /var/lib/vz/template/cache for openvz templates and /var/lib/vz/template/iso for ISO images). You can also transfer templates and ISO images via secure copy (scp) to these directories. If you work on a windows desktop, you can use a graphical scp client like winscp.
Create Virtual Machines
Container (OpenVZ) Virtual Machines - Default
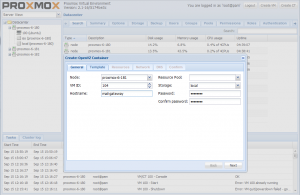
Just click "Create CT":
General:
- Node: If you have several Proxmox VE servers, select the node where you want to create the new container
- VM ID: choose a virtual machine identification number, just use the given ID or overwrite the suggested one
- Hostname: give a unique server name for the new container
- Resource Pool: select the previously resoucre pool (optional)
- Storage: select the storage for your container
- Password: set the root password for your container
Template:
- Storage: select your template data store (you need to download templates before you can select them here)
- Template: choose the template
Resources:
- Memory (MB): set the memory (RAM)
- Swap (MB): set the swap
- Disk size (GB): set the total disk size
- CPUs: set the number of CPUs (if you run java inside your container, choose at least 2 here)
Network:
- Routed mode (venet): default(venet) give a unique IP
- Briged mode
- in only some case you need Bridged Ethernet(veth) (see Differences_between_venet_and_veth on OpenVZ wiki for details) If you select Brigded Ethernet, the IP configuration has to be done in the container, like you would do it on a physical server.
- DNS Domain: e.g. yourdomain.com
- First/Second DNS Servers: enter DNS servers
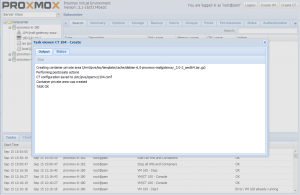
Now review your settings and create your first Virtual Machine. After you clicked "Create", all settings are applied - wait for completion (this process can take between a view seconds and up to a minute, depends on the used template and your hardware). Now, go to "VM Manager/Virtual Machines - List" to see the newly created Virtual Machine.
Video Tutorials
Fully virtualized Machines (KVM)
Go to "VM Manager/Virtual Machines - Create":
Configuration:
- Type: select "Fully virtualized (KVM)"
- Installation Media: select "cdrom device" (from the Proxmox VE server, or a previously uploaded ISO image)
- Name: give a unique name
- Disk space (GB): specify the size of the disk - will not pre-allocated - give enough as changing later is not possible without command line interactions and guest specific issues
- Memory (MB): specify memory as you would give on physical hardware (SWAP is handled within the guest)
- VMID: just use the given ID or overwrite the suggested one, start with (101 and higher)
- Cluster Node: If you have several Proxmox VE servers, select the node where you want to create the new virtual machine
- Start at boot: tick this if you want the Virtual Machine started on reboot of the Proxmox VE server
- Disk type: select IDE for windows guests, (optional VIRTIO, especially for Linux guests. For Windows you need an additional VIRTIO driver ISO image)
- Guest Type: select what you need (32 and 64 bit guests are possible)
Network:
- Network Type: Bridged Ethernet(tap)
- Bridge: select one (default only one is configured)
- Network Card: select the emulated hardware - rtl8139 is default (if you have VIRTIO drivers in your guest, use VIRTIO)
Now review your settings and create your first Virtual Machine. After you clicked "Create", all settings are applied - wait for completion. Now, go to "VM Manager/Virtual Machines - List" to see the newly created Virtual Machine.
Video Tutorials
- See Proxmox VE YouTube Channel
- Windows 2003 Server on KVM (Video)
- Hardware setup for KVM guests (Video)
Managing Virtual Machines
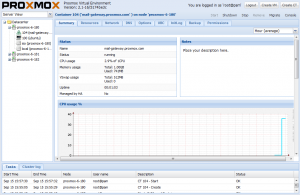
Go to "VM Manager/Virtual Machines" to see a list of your Virtual Machines.
Basic tasks can be done by clicking on the red arrow - drop down menu:
- start, restart, shutdown, stop
- migrate: migrate a Virtual Machine to another physical host (you need at least two Proxmox VE servers - see Proxmox VE Cluster
- console: using the VNC console for container virtualization automatically logs in via root. For managing KVM Virtual Machine, the console shows the screen of the full virtualized machine)
For a detailed view and configuration changes just click on a Virtual Machine row in the list of VMs.
"Logs" on a container Virtual Machine:
- Boot/Init: shows the Boot/Init logs generated during start or stop
- Command: see the current/last executed task
- Syslog: see the real time syslog of the Virtual Machine
Networking and Firewall
A detail guide on how to virtualize your VPS network infrastructure. [3]
On adding a second network card and enabling it on the Configuration -> System -> vmbr0 page and choosing the eth1 card as the the bridged interface, the /etc/network/interfaces file will look like:
# network interface settings
auto lo
iface lo inet loopback

iface eth0 inet manual

iface eth1 inet manual

auto vmbr0
iface vmbr0 inet static
        address  192.168.1.100
        netmask  255.255.255.0
        gateway  192.168.1.1
        bridge_ports eth1
        bridge_stp off
        bridge_fd 0
The D-Link DGE-530T Gigabit PCI Desktop Adapter is detected with e1000e Intel(R) PRO/1000 Network Driver during modprobe while bootup and works well. This card is one of a few that comes with a half height low profile bracket as well.


