Certificate Management
Certificates for Intra-Cluster Communication
Each Proxmox VE cluster creates by default its own (self-signed) Certificate Authority (CA) and generates a certificate for each node which gets signed by the aforementioned CA. These certificates are used for encrypted communication with the cluster’s pveproxy service and the Shell/Console feature if SPICE is used.
The CA certificate and key are stored in the Proxmox Cluster File System (pmxcfs).
Certificates for API and Web GUI
The REST API and web GUI are provided by the pveproxy service, which runs on each node.
You have the following options for the certificate used by pveproxy:
-
By default the node-specific certificate in /etc/pve/nodes/NODENAME/pve-ssl.pem is used. This certificate is signed by the cluster CA and therefore not automatically trusted by browsers and operating systems.
-
use an externally provided certificate (e.g. signed by a commercial CA).
-
use ACME (Let’s Encrypt) to get a trusted certificate with automatic renewal, this is also integrated in the Proxmox VE API and web interface.
For options 2 and 3 the file /etc/pve/local/pveproxy-ssl.pem (and /etc/pve/local/pveproxy-ssl.key, which needs to be without password) is used.

|
Keep in mind that /etc/pve/local is a node specific symlink to /etc/pve/nodes/NODENAME. |
Certificates are managed with the Proxmox VE Node management command (see the pvenode(1) manpage).

|
Do not replace or manually modify the automatically generated node certificate files in /etc/pve/local/pve-ssl.pem and /etc/pve/local/pve-ssl.key or the cluster CA files in /etc/pve/pve-root-ca.pem and /etc/pve/priv/pve-root-ca.key. |
Upload Custom Certificate
If you already have a certificate which you want to use for a Proxmox VE node you can upload that certificate simply over the web interface.
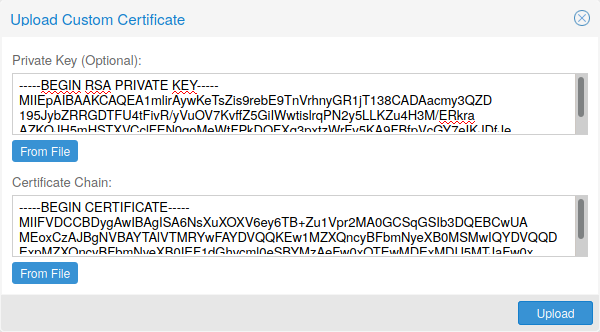
Note that the certificates key file, if provided, mustn’t be password protected.
Trusted certificates via Let’s Encrypt (ACME)
Proxmox VE includes an implementation of the Automatic Certificate Management Environment ACME protocol, allowing Proxmox VE admins to use an ACME provider like Let’s Encrypt for easy setup of TLS certificates which are accepted and trusted on modern operating systems and web browsers out of the box.
Currently, the two ACME endpoints implemented are the Let’s Encrypt (LE) production and its staging environment. Our ACME client supports validation of http-01 challenges using a built-in web server and validation of dns-01 challenges using a DNS plugin supporting all the DNS API endpoints acme.sh does.
ACME Account
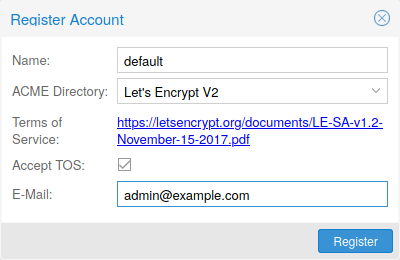
You need to register an ACME account per cluster with the endpoint you want to use. The email address used for that account will serve as contact point for renewal-due or similar notifications from the ACME endpoint.
You can register and deactivate ACME accounts over the web interface Datacenter -> ACME or using the pvenode command-line tool.
pvenode acme account register account-name mail@example.com

|
Because of rate-limits you should use LE staging for experiments or if you use ACME for the first time. |
ACME Plugins
The ACME plugins task is to provide automatic verification that you, and thus the Proxmox VE cluster under your operation, are the real owner of a domain. This is the basis building block for automatic certificate management.
The ACME protocol specifies different types of challenges, for example the http-01 where a web server provides a file with a certain content to prove that it controls a domain. Sometimes this isn’t possible, either because of technical limitations or if the address of a record to is not reachable from the public internet. The dns-01 challenge can be used in these cases. This challenge is fulfilled by creating a certain DNS record in the domain’s zone.
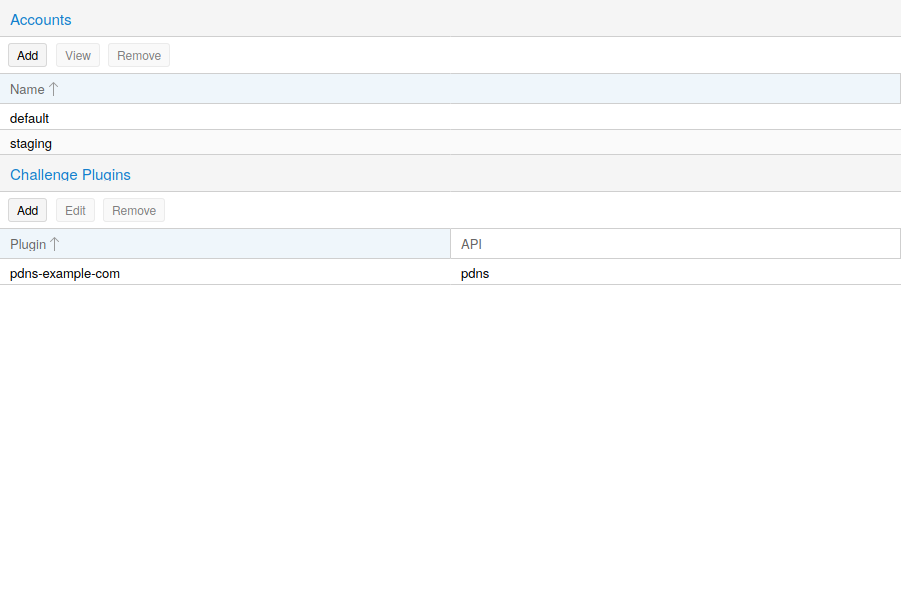
Proxmox VE supports both of those challenge types out of the box, you can configure plugins either over the web interface under Datacenter -> ACME, or using the pvenode acme plugin add command.
ACME Plugin configurations are stored in /etc/pve/priv/acme/plugins.cfg. A plugin is available for all nodes in the cluster.
Node Domains
Each domain is node specific. You can add new or manage existing domain entries under Node -> Certificates, or using the pvenode config command.
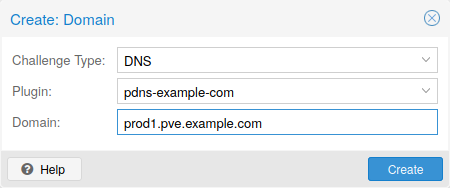
After configuring the desired domain(s) for a node and ensuring that the desired ACME account is selected, you can order your new certificate over the web interface. On success the interface will reload after 10 seconds.
Renewal will happen automatically.
ACME HTTP Challenge Plugin
There is always an implicitly configured standalone plugin for validating http-01 challenges via the built-in webserver spawned on port 80.
|
|
The name standalone means that it can provide the validation on it’s own, without any third party service. So, this plugin works also for cluster nodes. |
There are a few prerequisites to use it for certificate management with Let’s Encrypts ACME.
-
You have to accept the ToS of Let’s Encrypt to register an account.
-
Port 80 of the node needs to be reachable from the internet.
-
There must be no other listener on port 80.
-
The requested (sub)domain needs to resolve to a public IP of the Node.
ACME DNS API Challenge Plugin
On systems where external access for validation via the http-01 method is not possible or desired, it is possible to use the dns-01 validation method. This validation method requires a DNS server that allows provisioning of TXT records via an API.
Configuring ACME DNS APIs for validation
Proxmox VE re-uses the DNS plugins developed for the acme.sh
[acme.sh https://github.com/acmesh-official/acme.sh]
project, please
refer to its documentation for details on configuration of specific APIs.
The easiest way to configure a new plugin with the DNS API is using the web interface (Datacenter -> ACME).
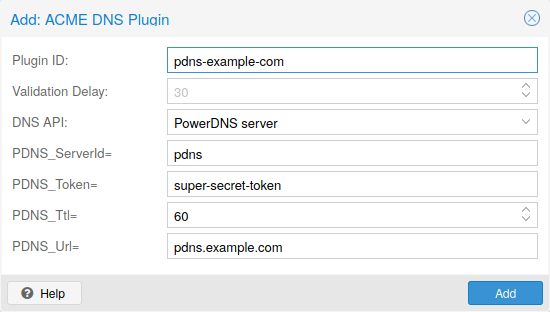
Choose DNS as challenge type. Then you can select your API provider, enter the credential data to access your account over their API.
|
|
See the acme.sh How to use DNS API wiki for more detailed information about getting API credentials for your provider. |
As there are many DNS providers and API endpoints Proxmox VE automatically generates the form for the credentials for some providers. For the others you will see a bigger text area, simply copy all the credentials KEY=VALUE pairs in there.
DNS Validation through CNAME Alias
A special alias mode can be used to handle the validation on a different domain/DNS server, in case your primary/real DNS does not support provisioning via an API. Manually set up a permanent CNAME record for _acme-challenge.domain1.example pointing to _acme-challenge.domain2.example and set the alias property in the Proxmox VE node configuration file to domain2.example to allow the DNS server of domain2.example to validate all challenges for domain1.example.
Combination of Plugins
Combining http-01 and dns-01 validation is possible in case your node is reachable via multiple domains with different requirements / DNS provisioning capabilities. Mixing DNS APIs from multiple providers or instances is also possible by specifying different plugin instances per domain.
|
|
Accessing the same service over multiple domains increases complexity and should be avoided if possible. |
Automatic renewal of ACME certificates
If a node has been successfully configured with an ACME-provided certificate (either via pvenode or via the GUI), the certificate will be automatically renewed by the pve-daily-update.service. Currently, renewal will be attempted if the certificate has expired already, or will expire in the next 30 days.
ACME Examples with pvenode
Example: Sample pvenode invocation for using Let’s Encrypt certificates
root@proxmox:~# pvenode acme account register default mail@example.invalid
Directory endpoints:
0) Let's Encrypt V2 (https://acme-v02.api.letsencrypt.org/directory)
1) Let's Encrypt V2 Staging (https://acme-staging-v02.api.letsencrypt.org/directory)
2) Custom
Enter selection: 1

Terms of Service: https://letsencrypt.org/documents/LE-SA-v1.2-November-15-2017.pdf
Do you agree to the above terms? [y|N]y
...
Task OK
root@proxmox:~# pvenode config set --acme domains=example.invalid
root@proxmox:~# pvenode acme cert order
Loading ACME account details
Placing ACME order
...
Status is 'valid'!

All domains validated!
...
Downloading certificate
Setting pveproxy certificate and key
Restarting pveproxy
Task OK
Example: Setting up the OVH API for validating a domain
|
|
the account registration steps are the same no matter which plugins are used, and are not repeated here. |
|
|
OVH_AK and OVH_AS need to be obtained from OVH according to the OVH API documentation |
First you need to get all information so you and Proxmox VE can access the API.
root@proxmox:~# cat /path/to/api-token
OVH_AK=XXXXXXXXXXXXXXXX
OVH_AS=YYYYYYYYYYYYYYYYYYYYYYYYYYYYYYYY
root@proxmox:~# source /path/to/api-token
root@proxmox:~# curl -XPOST -H"X-Ovh-Application: $OVH_AK" -H "Content-type: application/json" \
https://eu.api.ovh.com/1.0/auth/credential  -d '{
  "accessRules": [
    {"method": "GET","path": "/auth/time"},
    {"method": "GET","path": "/domain"},
    {"method": "GET","path": "/domain/zone/*"},
    {"method": "GET","path": "/domain/zone/*/record"},
    {"method": "POST","path": "/domain/zone/*/record"},
    {"method": "POST","path": "/domain/zone/*/refresh"},
    {"method": "PUT","path": "/domain/zone/*/record/"},
    {"method": "DELETE","path": "/domain/zone/*/record/*"}
]
}'
{"consumerKey":"ZZZZZZZZZZZZZZZZZZZZZZZZZZZZZZZZ","state":"pendingValidation","validationUrl":"https://eu.api.ovh.com/auth/?credentialToken=AAAAAAAAAAAAAAAAAAAAAAAAAAAAAAAAAAAAAAAAAAAAAAAAAAAAAAAAAAAAAAAA"}

(open validation URL and follow instructions to link Application Key with account/Consumer Key)

root@proxmox:~# echo "OVH_CK=ZZZZZZZZZZZZZZZZZZZZZZZZZZZZZZZZ" >> /path/to/api-token
Now you can setup the the ACME plugin:
root@proxmox:~# pvenode acme plugin add dns example_plugin --api ovh --data /path/to/api_token
root@proxmox:~# pvenode acme plugin config example_plugin
┌────────┬──────────────────────────────────────────┐
│ key    │ value                                    │
╞════════╪══════════════════════════════════════════╡
│ api    │ ovh                                      │
├────────┼──────────────────────────────────────────┤
│ data   │ OVH_AK=XXXXXXXXXXXXXXXX                  │
│        │ OVH_AS=YYYYYYYYYYYYYYYYYYYYYYYYYYYYYYYY  │
│        │ OVH_CK=ZZZZZZZZZZZZZZZZZZZZZZZZZZZZZZZZ  │
├────────┼──────────────────────────────────────────┤
│ digest │ 867fcf556363ca1bea866863093fcab83edf47a1 │
├────────┼──────────────────────────────────────────┤
│ plugin │ example_plugin                           │
├────────┼──────────────────────────────────────────┤
│ type   │ dns                                      │
└────────┴──────────────────────────────────────────┘
At last you can configure the domain you want to get certificates for and place the certificate order for it:
root@proxmox:~# pvenode config set -acmedomain0 example.proxmox.com,plugin=example_plugin
root@proxmox:~# pvenode acme cert order
Loading ACME account details
Placing ACME order
Order URL: https://acme-staging-v02.api.letsencrypt.org/acme/order/11111111/22222222

Getting authorization details from 'https://acme-staging-v02.api.letsencrypt.org/acme/authz-v3/33333333'
The validation for example.proxmox.com is pending!
[Wed Apr 22 09:25:30 CEST 2020] Using OVH endpoint: ovh-eu
[Wed Apr 22 09:25:30 CEST 2020] Checking authentication
[Wed Apr 22 09:25:30 CEST 2020] Consumer key is ok.
[Wed Apr 22 09:25:31 CEST 2020] Adding record
[Wed Apr 22 09:25:32 CEST 2020] Added, sleep 10 seconds.
Add TXT record: _acme-challenge.example.proxmox.com
Triggering validation
Sleeping for 5 seconds
Status is 'valid'!
[Wed Apr 22 09:25:48 CEST 2020] Using OVH endpoint: ovh-eu
[Wed Apr 22 09:25:48 CEST 2020] Checking authentication
[Wed Apr 22 09:25:48 CEST 2020] Consumer key is ok.
Remove TXT record: _acme-challenge.example.proxmox.com

All domains validated!

Creating CSR
Checking order status
Order is ready, finalizing order
valid!

Downloading certificate
Setting pveproxy certificate and key
Restarting pveproxy
Task OK
Example: Switching from the staging to the regular ACME directory
Changing the ACME directory for an account is unsupported, but as Proxmox VE supports more than one account you can just create a new one with the production (trusted) ACME directory as endpoint. You can also deactivate the staging account and recreate it.
root@proxmox:~# pvenode acme account deactivate default
Renaming account file from '/etc/pve/priv/acme/default' to '/etc/pve/priv/acme/_deactivated_default_4'
Task OK

root@proxmox:~# pvenode acme account register default example@proxmox.com
Directory endpoints:
0) Let's Encrypt V2 (https://acme-v02.api.letsencrypt.org/directory)
1) Let's Encrypt V2 Staging (https://acme-staging-v02.api.letsencrypt.org/directory)
2) Custom
Enter selection: 0

Terms of Service: https://letsencrypt.org/documents/LE-SA-v1.2-November-15-2017.pdf
Do you agree to the above terms? [y|N]y
...
Task OK