Cloud-Init Support: Difference between revisions
No edit summary |
No edit summary |
||
| Line 28: | Line 28: | ||
Proxmox VE generates an ISO image to pass the Cloud-Init data to the VM. For | Proxmox VE generates an ISO image to pass the Cloud-Init data to the VM. For | ||
that purpose, all Cloud-Init VMs need to have an assigned CD-ROM drive. | that purpose, all Cloud-Init VMs need to have an assigned CD-ROM drive. | ||
Usually, a serial console should be added and used as a display. Many Cloud-Init | |||
images rely on this, it is a requirement for OpenStack. However, other images | |||
might have problems with this configuration. Switch back to the default display | |||
configuration if using a serial console doesn’t work. | |||
Preparing Cloud-Init Templates | Preparing Cloud-Init Templates | ||
The first step is to prepare your VM. Basically you can use any VM. | The first step is to prepare your VM. Basically you can use any VM. | ||
| Line 35: | Line 37: | ||
prepare. On Debian/Ubuntu based systems this is as simple as: | prepare. On Debian/Ubuntu based systems this is as simple as: | ||
apt-get install cloud-init | apt-get install cloud-init | ||
This command is not intended to be executed on the Proxmox VE host, but | |||
only inside the VM. | |||
Already many distributions provide ready-to-use Cloud-Init images (provided | Already many distributions provide ready-to-use Cloud-Init images (provided | ||
as .qcow2 files), so alternatively you can simply download and | as .qcow2 files), so alternatively you can simply download and | ||
| Line 41: | Line 45: | ||
# download the image | # download the image | ||
wget https://cloud-images.ubuntu.com/bionic/current/bionic-server-cloudimg-amd64.img | wget https://cloud-images.ubuntu.com/bionic/current/bionic-server-cloudimg-amd64.img | ||
# create a new VM | # create a new VM with VirtIO SCSI controller | ||
qm create 9000 --memory 2048 --net0 virtio,bridge=vmbr0 | qm create 9000 --memory 2048 --net0 virtio,bridge=vmbr0 --scsihw virtio-scsi-pci | ||
# import the downloaded disk to local-lvm storage | # import the downloaded disk to the local-lvm storage, attaching it as a SCSI drive | ||
qm set 9000 --scsi0 local-lvm:0,import-from=/path/to/bionic-server-cloudimg-amd64.img | |||
qm set 9000 | |||
Ubuntu Cloud-Init images require the virtio-scsi-pci | Ubuntu Cloud-Init images require the virtio-scsi-pci | ||
controller type for SCSI drives. | controller type for SCSI drives. | ||
| Line 53: | Line 55: | ||
the Cloud-Init data to the VM. | the Cloud-Init data to the VM. | ||
qm set 9000 --ide2 local-lvm:cloudinit | qm set 9000 --ide2 local-lvm:cloudinit | ||
To be able to boot directly from the Cloud-Init image, set the | To be able to boot directly from the Cloud-Init image, set the boot parameter | ||
to order=scsi0 to restrict BIOS to boot from this disk only. This will speed | |||
only. This will speed up booting, because VM BIOS skips the testing for | up booting, because VM BIOS skips the testing for a bootable CD-ROM. | ||
a bootable CD-ROM. | qm set 9000 --boot order=scsi0 | ||
qm set 9000 --boot | For many Cloud-Init images, it is required to configure a serial console and use | ||
it as a display. If the configuration doesn’t work for a given image however, | |||
switch back to the default display instead. | |||
qm set 9000 --serial0 socket --vga serial0 | qm set 9000 --serial0 socket --vga serial0 | ||
In a last step, it is helpful to convert the VM into a template. From | In a last step, it is helpful to convert the VM into a template. From | ||
| Line 134: | Line 136: | ||
IPv6 address in CIDR format. | IPv6 address in CIDR format. | ||
nameserver: <string> | nameserver: <string> | ||
Sets DNS server IP address for a container. Create will | Sets DNS server IP address for a container. Create will automatically use the setting from the host if neither searchdomain nor nameserver are set. | ||
searchdomain: <string> | searchdomain: <string> | ||
Sets DNS search domains for a container. Create will | Sets DNS search domains for a container. Create will automatically use the setting from the host if neither searchdomain nor nameserver are set. | ||
sshkeys: <string> | sshkeys: <string> | ||
Setup public SSH keys (one key per line, OpenSSH format). | Setup public SSH keys (one key per line, OpenSSH format). | ||
Revision as of 12:46, 22 November 2022
Cloud-Init is the de facto multi-distribution package that handles early initialization of a virtual machine instance. Using Cloud-Init, configuration of network devices and ssh keys on the hypervisor side is possible. When the VM starts for the first time, the Cloud-Init software inside the VM will apply those settings.
Many Linux distributions provide ready-to-use Cloud-Init images, mostly designed for OpenStack. These images will also work with Proxmox VE. While it may seem convenient to get such ready-to-use images, we usually recommended to prepare the images by yourself. The advantage is that you will know exactly what you have installed, and this helps you later to easily customize the image for your needs.
Once you have created such a Cloud-Init image we recommend to convert it into a VM template. From a VM template you can quickly create linked clones, so this is a fast method to roll out new VM instances. You just need to configure the network (and maybe the ssh keys) before you start the new VM.
We recommend using SSH key-based authentication to login to the VMs provisioned by Cloud-Init. It is also possible to set a password, but this is not as safe as using SSH key-based authentication because Proxmox VE needs to store an encrypted version of that password inside the Cloud-Init data.
Proxmox VE generates an ISO image to pass the Cloud-Init data to the VM. For that purpose, all Cloud-Init VMs need to have an assigned CD-ROM drive. Usually, a serial console should be added and used as a display. Many Cloud-Init images rely on this, it is a requirement for OpenStack. However, other images might have problems with this configuration. Switch back to the default display configuration if using a serial console doesn’t work.
Preparing Cloud-Init Templates
The first step is to prepare your VM. Basically you can use any VM. Simply install the Cloud-Init packages inside the VM that you want to prepare. On Debian/Ubuntu based systems this is as simple as:
apt-get install cloud-init

|
This command is not intended to be executed on the Proxmox VE host, but only inside the VM. |
Already many distributions provide ready-to-use Cloud-Init images (provided as .qcow2 files), so alternatively you can simply download and import such images. For the following example, we will use the cloud image provided by Ubuntu at https://cloud-images.ubuntu.com.
# download the image
wget https://cloud-images.ubuntu.com/bionic/current/bionic-server-cloudimg-amd64.img

# create a new VM with VirtIO SCSI controller
qm create 9000 --memory 2048 --net0 virtio,bridge=vmbr0 --scsihw virtio-scsi-pci

# import the downloaded disk to the local-lvm storage, attaching it as a SCSI drive
qm set 9000 --scsi0 local-lvm:0,import-from=/path/to/bionic-server-cloudimg-amd64.img

|
Ubuntu Cloud-Init images require the virtio-scsi-pci controller type for SCSI drives. |
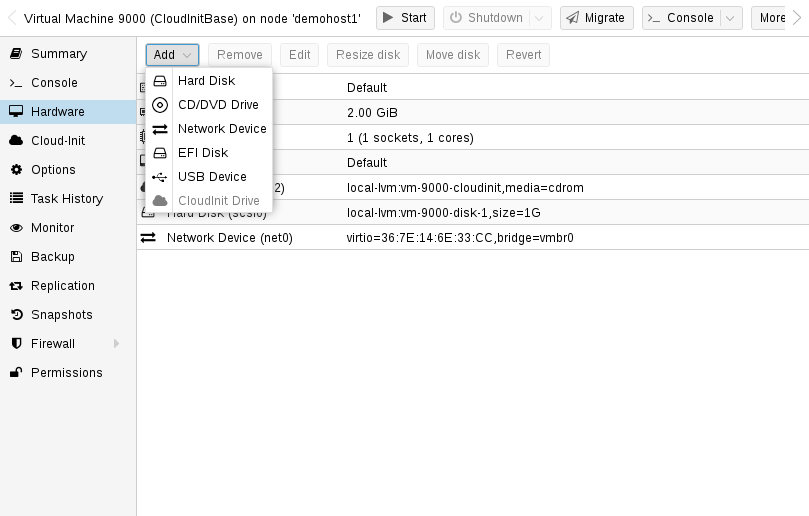
Add Cloud-Init CD-ROM drive
The next step is to configure a CD-ROM drive, which will be used to pass the Cloud-Init data to the VM.
qm set 9000 --ide2 local-lvm:cloudinit
To be able to boot directly from the Cloud-Init image, set the boot parameter to order=scsi0 to restrict BIOS to boot from this disk only. This will speed up booting, because VM BIOS skips the testing for a bootable CD-ROM.
qm set 9000 --boot order=scsi0
For many Cloud-Init images, it is required to configure a serial console and use it as a display. If the configuration doesn’t work for a given image however, switch back to the default display instead.
qm set 9000 --serial0 socket --vga serial0
In a last step, it is helpful to convert the VM into a template. From this template you can then quickly create linked clones. The deployment from VM templates is much faster than creating a full clone (copy).
qm template 9000
Deploying Cloud-Init Templates
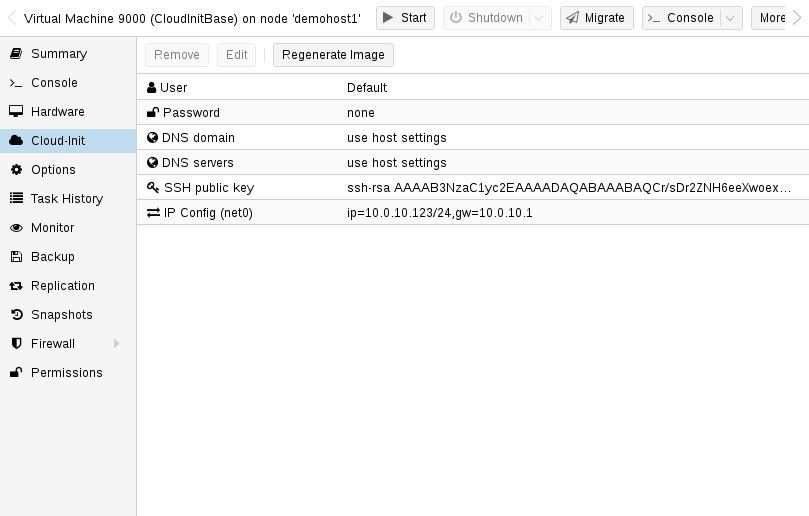
You can easily deploy such a template by cloning:
qm clone 9000 123 --name ubuntu2
Then configure the SSH public key used for authentication, and configure the IP setup:
qm set 123 --sshkey ~/.ssh/id_rsa.pub
qm set 123 --ipconfig0 ip=10.0.10.123/24,gw=10.0.10.1
You can also configure all the Cloud-Init options using a single command only. We have simply split the above example to separate the commands for reducing the line length. Also make sure to adopt the IP setup for your specific environment.
Custom Cloud-Init Configuration
The Cloud-Init integration also allows custom config files to be used instead of the automatically generated configs. This is done via the cicustom option on the command line:
qm set 9000 --cicustom "user=<volume>,network=<volume>,meta=<volume>"
The custom config files have to be on a storage that supports snippets and have to be available on all nodes the VM is going to be migrated to. Otherwise the VM won’t be able to start. For example:
qm set 9000 --cicustom "user=local:snippets/userconfig.yaml"
There are three kinds of configs for Cloud-Init. The first one is the user config as seen in the example above. The second is the network config and the third the meta config. They can all be specified together or mixed and matched however needed. The automatically generated config will be used for any that don’t have a custom config file specified.
The generated config can be dumped to serve as a base for custom configs:
qm cloudinit dump 9000 user
The same command exists for network and meta.
Cloud-Init specific Options
- cicustom: [meta=<volume>] [,network=<volume>] [,user=<volume>] [,vendor=<volume>]
-
Specify custom files to replace the automatically generated ones at start.
- meta=<volume>
-
Specify a custom file containing all meta data passed to the VM via" ." cloud-init. This is provider specific meaning configdrive2 and nocloud differ.
- network=<volume>
-
To pass a custom file containing all network data to the VM via cloud-init.
- user=<volume>
-
To pass a custom file containing all user data to the VM via cloud-init.
- vendor=<volume>
-
To pass a custom file containing all vendor data to the VM via cloud-init.
- cipassword: <string>
-
Password to assign the user. Using this is generally not recommended. Use ssh keys instead. Also note that older cloud-init versions do not support hashed passwords.
- citype: <configdrive2 | nocloud | opennebula>
-
Specifies the cloud-init configuration format. The default depends on the configured operating system type (ostype. We use the nocloud format for Linux, and configdrive2 for windows.
- ciupgrade: <boolean> (default = 1)
-
do an automatic package upgrade after the first boot.
- ciuser: <string>
-
User name to change ssh keys and password for instead of the image’s configured default user.
- ipconfig[n]: [gw=<GatewayIPv4>] [,gw6=<GatewayIPv6>] [,ip=<IPv4Format/CIDR>] [,ip6=<IPv6Format/CIDR>]
-
Specify IP addresses and gateways for the corresponding interface.
IP addresses use CIDR notation, gateways are optional but need an IP of the same type specified.
The special string dhcp can be used for IP addresses to use DHCP, in which case no explicit gateway should be provided. For IPv6 the special string auto can be used to use stateless autoconfiguration. This requires cloud-init 19.4 or newer.
If cloud-init is enabled and neither an IPv4 nor an IPv6 address is specified, it defaults to using dhcp on IPv4.
- gw=<GatewayIPv4>
-
Default gateway for IPv4 traffic.
Requires option(s): ip - gw6=<GatewayIPv6>
-
Default gateway for IPv6 traffic.
Requires option(s): ip6 - ip=<IPv4Format/CIDR> (default = dhcp)
-
IPv4 address in CIDR format.
- ip6=<IPv6Format/CIDR> (default = dhcp)
-
IPv6 address in CIDR format.
- nameserver: <string>
-
Sets DNS server IP address for a container. Create will automatically use the setting from the host if neither searchdomain nor nameserver are set.
- searchdomain: <string>
-
Sets DNS search domains for a container. Create will automatically use the setting from the host if neither searchdomain nor nameserver are set.
- sshkeys: <string>
-
Setup public SSH keys (one key per line, OpenSSH format).