Difference between revisions of "Cluster Manager"
| Line 54: | Line 54: | ||
To check the state of your cluster use: | To check the state of your cluster use: | ||
hp1# pvecm status | hp1# pvecm status | ||
| + | Multiple Clusters In Same Network | ||
| + | It is possible to create multiple clusters in the same physical or logical | ||
| + | network. Each cluster must have a unique name, which is used to generate the | ||
| + | cluster’s multicast group address. As long as no duplicate cluster names are | ||
| + | configured in one network segment, the different clusters won’t interfere with | ||
| + | each other. | ||
| + | If multiple clusters operate in a single network it may be beneficial to setup | ||
| + | an IGMP querier and enable IGMP Snooping in said network. This may reduce the | ||
| + | load of the network significantly because multicast packets are only delivered | ||
| + | to endpoints of the respective member nodes. | ||
Adding Nodes to the Cluster | Adding Nodes to the Cluster | ||
Login via ssh to the node you want to add. | Login via ssh to the node you want to add. | ||
| Line 265: | Line 275: | ||
This is possible through the ring0_addr and bindnet0_addr parameter of | This is possible through the ring0_addr and bindnet0_addr parameter of | ||
the pvecm create command used for creating a new cluster. | the pvecm create command used for creating a new cluster. | ||
| − | If you have setup | + | If you have setup an additional NIC with a static address on 10.10.10.1/25 |
and want to send and receive all cluster communication over this interface | and want to send and receive all cluster communication over this interface | ||
you would execute: | you would execute: | ||
| Line 271: | Line 281: | ||
To check if everything is working properly execute: | To check if everything is working properly execute: | ||
systemctl status corosync | systemctl status corosync | ||
| + | Afterwards, proceed as descripted in the section to | ||
| + | add nodes with a separated cluster network. | ||
Separate After Cluster Creation | Separate After Cluster Creation | ||
You can do this also if you have already created a cluster and want to switch | You can do this also if you have already created a cluster and want to switch | ||
| Line 322: | Line 334: | ||
hostnames ensure that they are resolvable from all nodes. | hostnames ensure that they are resolvable from all nodes. | ||
In my example I want to switch my cluster communication to the 10.10.10.1/25 | In my example I want to switch my cluster communication to the 10.10.10.1/25 | ||
| − | network. So I replace all ring0_addr respectively. I also set the | + | network. So I replace all ring0_addr respectively. I also set the bindnetaddr |
in the totem section of the config to an address of the new network. It can be | in the totem section of the config to an address of the new network. It can be | ||
any address from the subnet configured on the new network interface. | any address from the subnet configured on the new network interface. | ||
| Line 445: | Line 457: | ||
stopped on all nodes start it one after the other again. | stopped on all nodes start it one after the other again. | ||
Corosync Configuration | Corosync Configuration | ||
| − | The / | + | The /etc/pve/corosync.conf file plays a central role in Proxmox VE cluster. It |
controls the cluster member ship and its network. | controls the cluster member ship and its network. | ||
For reading more about it check the corosync.conf man page: | For reading more about it check the corosync.conf man page: | ||
| Line 519: | Line 531: | ||
(“UPS”, also called “battery backup”) to avoid this state, especially if | (“UPS”, also called “battery backup”) to avoid this state, especially if | ||
you want HA. | you want HA. | ||
| − | On node startup, | + | On node startup, the pve-guests service is started and waits for |
quorum. Once quorate, it starts all guests which have the onboot | quorum. Once quorate, it starts all guests which have the onboot | ||
flag set. | flag set. | ||
| Line 538: | Line 550: | ||
Container Migration Chapter | Container Migration Chapter | ||
Migration Type | Migration Type | ||
| − | The migration type defines if the migration data should be sent over | + | The migration type defines if the migration data should be sent over an |
encrypted (secure) channel or an unencrypted (insecure) one. | encrypted (secure) channel or an unencrypted (insecure) one. | ||
Setting the migration type to insecure means that the RAM content of a | Setting the migration type to insecure means that the RAM content of a | ||
| − | virtual guest gets also | + | virtual guest gets also transferred unencrypted, which can lead to |
information disclosure of critical data from inside the guest (for | information disclosure of critical data from inside the guest (for | ||
example passwords or encryption keys). | example passwords or encryption keys). | ||
Revision as of 10:07, 16 May 2018
The Proxmox VE cluster manager pvecm is a tool to create a group of physical servers. Such a group is called a cluster. We use the Corosync Cluster Engine for reliable group communication. There’s no explicit limit for the number of nodes in a cluster. In practice, the actual possible node count may be limited by the host and network performance. Currently (2021), there are reports of clusters (using high-end enterprise hardware) with over 50 nodes in production.
pvecm can be used to create a new cluster, join nodes to a cluster, leave the cluster, get status information, and do various other cluster-related tasks. The Proxmox Cluster File System (“pmxcfs”) is used to transparently distribute the cluster configuration to all cluster nodes.
Grouping nodes into a cluster has the following advantages:
-
Centralized, web-based management
-
Multi-master clusters: each node can do all management tasks
-
Use of pmxcfs, a database-driven file system, for storing configuration files, replicated in real-time on all nodes using corosync
-
Easy migration of virtual machines and containers between physical hosts
-
Fast deployment
-
Cluster-wide services like firewall and HA
Requirements
-
All nodes must be able to connect to each other via UDP ports 5405-5412 for corosync to work.
-
Date and time must be synchronized.
-
An SSH tunnel on TCP port 22 between nodes is required.
-
If you are interested in High Availability, you need to have at least three nodes for reliable quorum. All nodes should have the same version.
-
We recommend a dedicated NIC for the cluster traffic, especially if you use shared storage.
-
The root password of a cluster node is required for adding nodes.
-
Online migration of virtual machines is only supported when nodes have CPUs from the same vendor. It might work otherwise, but this is never guaranteed.

|
It is not possible to mix Proxmox VE 3.x and earlier with Proxmox VE 4.X cluster nodes. |
|
|
While it’s possible to mix Proxmox VE 4.4 and Proxmox VE 5.0 nodes, doing so is not supported as a production configuration and should only be done temporarily, during an upgrade of the whole cluster from one major version to another. |
|
|
Running a cluster of Proxmox VE 6.x with earlier versions is not possible. The cluster protocol (corosync) between Proxmox VE 6.x and earlier versions changed fundamentally. The corosync 3 packages for Proxmox VE 5.4 are only intended for the upgrade procedure to Proxmox VE 6.0. |
Preparing Nodes
First, install Proxmox VE on all nodes. Make sure that each node is installed with the final hostname and IP configuration. Changing the hostname and IP is not possible after cluster creation.
While it’s common to reference all node names and their IPs in /etc/hosts (or make their names resolvable through other means), this is not necessary for a cluster to work. It may be useful however, as you can then connect from one node to another via SSH, using the easier to remember node name (see also Link Address Types). Note that we always recommend referencing nodes by their IP addresses in the cluster configuration.
Create a Cluster
You can either create a cluster on the console (login via ssh), or through the API using the Proxmox VE web interface (Datacenter → Cluster).
|
|
Use a unique name for your cluster. This name cannot be changed later. The cluster name follows the same rules as node names. |
Create via Web GUI
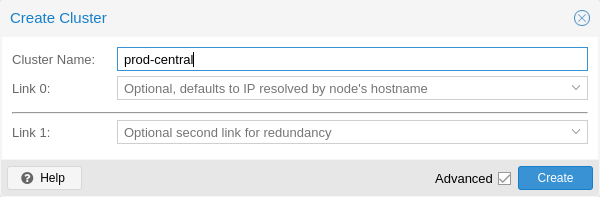
Under Datacenter → Cluster, click on Create Cluster. Enter the cluster name and select a network connection from the drop-down list to serve as the main cluster network (Link 0). It defaults to the IP resolved via the node’s hostname.
As of Proxmox VE 6.2, up to 8 fallback links can be added to a cluster. To add a redundant link, click the Add button and select a link number and IP address from the respective fields. Prior to Proxmox VE 6.2, to add a second link as fallback, you can select the Advanced checkbox and choose an additional network interface (Link 1, see also Corosync Redundancy).
|
|
Ensure that the network selected for cluster communication is not used for any high traffic purposes, like network storage or live-migration. While the cluster network itself produces small amounts of data, it is very sensitive to latency. Check out full cluster network requirements. |
Create via the Command Line
Login via ssh to the first Proxmox VE node and run the following command:
hp1# pvecm create CLUSTERNAME
To check the state of the new cluster use:
hp1# pvecm status
Multiple Clusters in the Same Network
It is possible to create multiple clusters in the same physical or logical network. In this case, each cluster must have a unique name to avoid possible clashes in the cluster communication stack. Furthermore, this helps avoid human confusion by making clusters clearly distinguishable.
While the bandwidth requirement of a corosync cluster is relatively low, the latency of packages and the package per second (PPS) rate is the limiting factor. Different clusters in the same network can compete with each other for these resources, so it may still make sense to use separate physical network infrastructure for bigger clusters.
Adding Nodes to the Cluster

|
All existing configuration in /etc/pve is overwritten when joining a cluster. In particular, a joining node cannot hold any guests, since guest IDs could otherwise conflict, and the node will inherit the cluster’s storage configuration. To join a node with existing guest, as a workaround, you can create a backup of each guest (using vzdump) and restore it under a different ID after joining. If the node’s storage layout differs, you will need to re-add the node’s storages, and adapt each storage’s node restriction to reflect on which nodes the storage is actually available. |
Join Node to Cluster via GUI
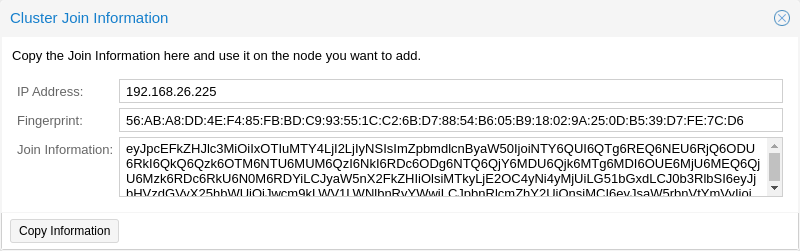
Log in to the web interface on an existing cluster node. Under Datacenter → Cluster, click the Join Information button at the top. Then, click on the button Copy Information. Alternatively, copy the string from the Information field manually.
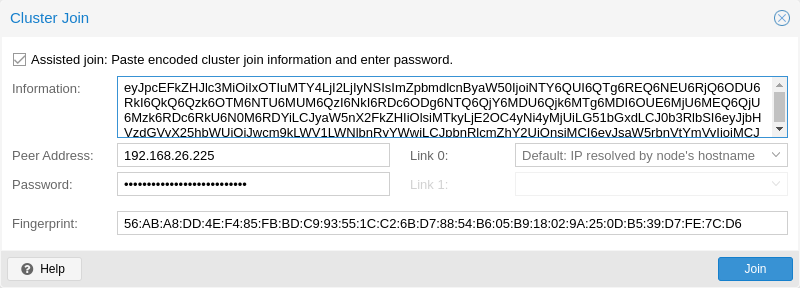
Next, log in to the web interface on the node you want to add. Under Datacenter → Cluster, click on Join Cluster. Fill in the Information field with the Join Information text you copied earlier. Most settings required for joining the cluster will be filled out automatically. For security reasons, the cluster password has to be entered manually.
|
|
To enter all required data manually, you can disable the Assisted Join checkbox. |
After clicking the Join button, the cluster join process will start immediately. After the node has joined the cluster, its current node certificate will be replaced by one signed from the cluster certificate authority (CA). This means that the current session will stop working after a few seconds. You then might need to force-reload the web interface and log in again with the cluster credentials.
Now your node should be visible under Datacenter → Cluster.
Join Node to Cluster via Command Line
Log in to the node you want to join into an existing cluster via ssh.
# pvecm add IP-ADDRESS-CLUSTER
For IP-ADDRESS-CLUSTER, use the IP or hostname of an existing cluster node. An IP address is recommended (see Link Address Types).
To check the state of the cluster use:
# pvecm status
 # pvecm status
Cluster information
~~~~~~~~~~~~~~~~~~~
Name:             prod-central
Config Version:   3
Transport:        knet
Secure auth:      on

Quorum information
~~~~~~~~~~~~~~~~~~
Date:             Tue Sep 14 11:06:47 2021
Quorum provider:  corosync_votequorum
Nodes:            4
Node ID:          0x00000001
Ring ID:          1.1a8
Quorate:          Yes

Votequorum information
~~~~~~~~~~~~~~~~~~~~~~
Expected votes:   4
Highest expected: 4
Total votes:      4
Quorum:           3
Flags:            Quorate

Membership information
~~~~~~~~~~~~~~~~~~~~~~
    Nodeid      Votes Name
0x00000001          1 192.168.15.91
0x00000002          1 192.168.15.92 (local)
0x00000003          1 192.168.15.93
0x00000004          1 192.168.15.94
If you only want a list of all nodes, use:
# pvecm nodes
 # pvecm nodes

Membership information
~~~~~~~~~~~~~~~~~~~~~~
    Nodeid      Votes Name
         1          1 hp1
         2          1 hp2 (local)
         3          1 hp3
         4          1 hp4
Adding Nodes with Separated Cluster Network
When adding a node to a cluster with a separated cluster network, you need to use the link0 parameter to set the nodes address on that network:
# pvecm add IP-ADDRESS-CLUSTER --link0 LOCAL-IP-ADDRESS-LINK0If you want to use the built-in redundancy of the Kronosnet transport layer, also use the link1 parameter.
Using the GUI, you can select the correct interface from the corresponding Link X fields in the Cluster Join dialog.
Remove a Cluster Node
|
|
Read the procedure carefully before proceeding, as it may not be what you want or need. |
Move all virtual machines from the node. Ensure that you have made copies of any local data or backups that you want to keep. In addition, make sure to remove any scheduled replication jobs to the node to be removed.
|
|
Failure to remove replication jobs to a node before removing said node will result in the replication job becoming irremovable. Especially note that replication automatically switches direction if a replicated VM is migrated, so by migrating a replicated VM from a node to be deleted, replication jobs will be set up to that node automatically. |
In the following example, we will remove the node hp4 from the cluster.
Log in to a different cluster node (not hp4), and issue a pvecm nodes command to identify the node ID to remove:
 hp1# pvecm nodes

Membership information
~~~~~~~~~~~~~~~~~~~~~~
    Nodeid      Votes Name
         1          1 hp1 (local)
         2          1 hp2
         3          1 hp3
         4          1 hp4
At this point, you must power off hp4 and ensure that it will not power on again (in the network) with its current configuration.

|
As mentioned above, it is critical to power off the node before removal, and make sure that it will not power on again (in the existing cluster network) with its current configuration. If you power on the node as it is, the cluster could end up broken, and it could be difficult to restore it to a functioning state. |
After powering off the node hp4, we can safely remove it from the cluster.
 hp1# pvecm delnode hp4
 Killing node 4
|
|
At this point, it is possible that you will receive an error message stating Could not kill node (error = CS_ERR_NOT_EXIST). This does not signify an actual failure in the deletion of the node, but rather a failure in corosync trying to kill an offline node. Thus, it can be safely ignored. |
Use pvecm nodes or pvecm status to check the node list again. It should look something like:
hp1# pvecm status

...

Votequorum information
~~~~~~~~~~~~~~~~~~~~~~
Expected votes:   3
Highest expected: 3
Total votes:      3
Quorum:           2
Flags:            Quorate

Membership information
~~~~~~~~~~~~~~~~~~~~~~
    Nodeid      Votes Name
0x00000001          1 192.168.15.90 (local)
0x00000002          1 192.168.15.91
0x00000003          1 192.168.15.92
If, for whatever reason, you want this server to join the same cluster again, you have to:
-
do a fresh install of Proxmox VE on it,
-
then join it, as explained in the previous section.
The configuration files for the removed node will still reside in /etc/pve/nodes/hp4. Recover any configuration you still need and remove the directory afterwards.
|
|
After removal of the node, its SSH fingerprint will still reside in the known_hosts of the other nodes. If you receive an SSH error after rejoining a node with the same IP or hostname, run pvecm updatecerts once on the re-added node to update its fingerprint cluster wide. |
Separate a Node Without Reinstalling
|
|
This is not the recommended method, proceed with caution. Use the previous method if you’re unsure. |
You can also separate a node from a cluster without reinstalling it from scratch. But after removing the node from the cluster, it will still have access to any shared storage. This must be resolved before you start removing the node from the cluster. A Proxmox VE cluster cannot share the exact same storage with another cluster, as storage locking doesn’t work over the cluster boundary. Furthermore, it may also lead to VMID conflicts.
It’s suggested that you create a new storage, where only the node which you want to separate has access. This can be a new export on your NFS or a new Ceph pool, to name a few examples. It’s just important that the exact same storage does not get accessed by multiple clusters. After setting up this storage, move all data and VMs from the node to it. Then you are ready to separate the node from the cluster.

|
Ensure that all shared resources are cleanly separated! Otherwise you will run into conflicts and problems. |
First, stop the corosync and pve-cluster services on the node:
systemctl stop pve-cluster
systemctl stop corosync
Start the cluster file system again in local mode:
pmxcfs -l
Delete the corosync configuration files:
rm /etc/pve/corosync.conf
rm -r /etc/corosync/*
You can now start the file system again as a normal service:
killall pmxcfs
systemctl start pve-cluster
The node is now separated from the cluster. You can deleted it from any remaining node of the cluster with:
pvecm delnode oldnode
If the command fails due to a loss of quorum in the remaining node, you can set the expected votes to 1 as a workaround:
pvecm expected 1And then repeat the pvecm delnode command.
Now switch back to the separated node and delete all the remaining cluster files on it. This ensures that the node can be added to another cluster again without problems.
rm /var/lib/corosync/*As the configuration files from the other nodes are still in the cluster file system, you may want to clean those up too. After making absolutely sure that you have the correct node name, you can simply remove the entire directory recursively from /etc/pve/nodes/NODENAME.
|
|
The node’s SSH keys will remain in the authorized_key file. This means that the nodes can still connect to each other with public key authentication. You should fix this by removing the respective keys from the /etc/pve/priv/authorized_keys file. |
Quorum
Proxmox VE use a quorum-based technique to provide a consistent state among all cluster nodes.
A quorum is the minimum number of votes that a distributed transaction has to obtain in order to be allowed to perform an operation in a distributed system.
— from Wikipedia
In case of network partitioning, state changes requires that a majority of nodes are online. The cluster switches to read-only mode if it loses quorum.
|
|
Proxmox VE assigns a single vote to each node by default. |
Cluster Network
The cluster network is the core of a cluster. All messages sent over it have to be delivered reliably to all nodes in their respective order. In Proxmox VE this part is done by corosync, an implementation of a high performance, low overhead, high availability development toolkit. It serves our decentralized configuration file system (pmxcfs).
Network Requirements
The Proxmox VE cluster stack requires a reliable network with latencies under 5 milliseconds (LAN performance) between all nodes to operate stably. While on setups with a small node count a network with higher latencies may work, this is not guaranteed and gets rather unlikely with more than three nodes and latencies above around 10 ms.
The network should not be used heavily by other members, as while corosync does not uses much bandwidth it is sensitive to latency jitters; ideally corosync runs on its own physically separated network. Especially do not use a shared network for corosync and storage (except as a potential low-priority fallback in a redundant configuration).
Before setting up a cluster, it is good practice to check if the network is fit for that purpose. To ensure that the nodes can connect to each other on the cluster network, you can test the connectivity between them with the ping tool.
If the Proxmox VE firewall is enabled, ACCEPT rules for corosync will automatically be generated - no manual action is required.
|
|
Corosync used Multicast before version 3.0 (introduced in Proxmox VE 6.0). Modern versions rely on Kronosnet for cluster communication, which, for now, only supports regular UDP unicast. |
|
|
You can still enable Multicast or legacy unicast by setting your transport to udp or udpu in your corosync.conf, but keep in mind that this will disable all cryptography and redundancy support. This is therefore not recommended. |
Separate Cluster Network
When creating a cluster without any parameters, the corosync cluster network is generally shared with the web interface and the VMs' network. Depending on your setup, even storage traffic may get sent over the same network. It’s recommended to change that, as corosync is a time-critical, real-time application.
Setting Up a New Network
First, you have to set up a new network interface. It should be on a physically separate network. Ensure that your network fulfills the cluster network requirements.
Separate On Cluster Creation
This is possible via the linkX parameters of the pvecm create command, used for creating a new cluster.
If you have set up an additional NIC with a static address on 10.10.10.1/25, and want to send and receive all cluster communication over this interface, you would execute:
pvecm create test --link0 10.10.10.1
To check if everything is working properly, execute:
systemctl status corosync
Afterwards, proceed as described above to add nodes with a separated cluster network.
Separate After Cluster Creation
You can do this if you have already created a cluster and want to switch its communication to another network, without rebuilding the whole cluster. This change may lead to short periods of quorum loss in the cluster, as nodes have to restart corosync and come up one after the other on the new network.
Check how to edit the corosync.conf file first. Then, open it and you should see a file similar to:
logging {
  debug: off
  to_syslog: yes
}

nodelist {

  node {
    name: due
    nodeid: 2
    quorum_votes: 1
    ring0_addr: due
  }

  node {
    name: tre
    nodeid: 3
    quorum_votes: 1
    ring0_addr: tre
  }

  node {
    name: uno
    nodeid: 1
    quorum_votes: 1
    ring0_addr: uno
  }

}

quorum {
  provider: corosync_votequorum
}

totem {
  cluster_name: testcluster
  config_version: 3
  ip_version: ipv4-6
  secauth: on
  version: 2
  interface {
    linknumber: 0
  }

}
|
|
ringX_addr actually specifies a corosync link address. The name "ring" is a remnant of older corosync versions that is kept for backwards compatibility. |
The first thing you want to do is add the name properties in the node entries, if you do not see them already. Those must match the node name.
Then replace all addresses from the ring0_addr properties of all nodes with the new addresses. You may use plain IP addresses or hostnames here. If you use hostnames, ensure that they are resolvable from all nodes (see also Link Address Types).
In this example, we want to switch cluster communication to the 10.10.10.0/25 network, so we change the ring0_addr of each node respectively.
|
|
The exact same procedure can be used to change other ringX_addr values as well. However, we recommend only changing one link address at a time, so that it’s easier to recover if something goes wrong. |
After we increase the config_version property, the new configuration file should look like:
logging {
  debug: off
  to_syslog: yes
}

nodelist {

  node {
    name: due
    nodeid: 2
    quorum_votes: 1
    ring0_addr: 10.10.10.2
  }

  node {
    name: tre
    nodeid: 3
    quorum_votes: 1
    ring0_addr: 10.10.10.3
  }

  node {
    name: uno
    nodeid: 1
    quorum_votes: 1
    ring0_addr: 10.10.10.1
  }

}

quorum {
  provider: corosync_votequorum
}

totem {
  cluster_name: testcluster
  config_version: 4
  ip_version: ipv4-6
  secauth: on
  version: 2
  interface {
    linknumber: 0
  }

}
Then, after a final check to see that all changed information is correct, we save it and once again follow the edit corosync.conf file section to bring it into effect.
The changes will be applied live, so restarting corosync is not strictly necessary. If you changed other settings as well, or notice corosync complaining, you can optionally trigger a restart.
On a single node execute:
systemctl restart corosync
Now check if everything is okay:
systemctl status corosync
If corosync begins to work again, restart it on all other nodes too. They will then join the cluster membership one by one on the new network.
Corosync Addresses
A corosync link address (for backwards compatibility denoted by ringX_addr in corosync.conf) can be specified in two ways:
-
IPv4/v6 addresses can be used directly. They are recommended, since they are static and usually not changed carelessly.
-
Hostnames will be resolved using getaddrinfo, which means that by default, IPv6 addresses will be used first, if available (see also man gai.conf). Keep this in mind, especially when upgrading an existing cluster to IPv6.
|
|
Hostnames should be used with care, since the addresses they resolve to can be changed without touching corosync or the node it runs on - which may lead to a situation where an address is changed without thinking about implications for corosync. |
A separate, static hostname specifically for corosync is recommended, if hostnames are preferred. Also, make sure that every node in the cluster can resolve all hostnames correctly.
Since Proxmox VE 5.1, while supported, hostnames will be resolved at the time of entry. Only the resolved IP is saved to the configuration.
Nodes that joined the cluster on earlier versions likely still use their unresolved hostname in corosync.conf. It might be a good idea to replace them with IPs or a separate hostname, as mentioned above.
Corosync Redundancy
Corosync supports redundant networking via its integrated Kronosnet layer by default (it is not supported on the legacy udp/udpu transports). It can be enabled by specifying more than one link address, either via the --linkX parameters of pvecm, in the GUI as Link 1 (while creating a cluster or adding a new node) or by specifying more than one ringX_addr in corosync.conf.
|
|
To provide useful failover, every link should be on its own physical network connection. |
Links are used according to a priority setting. You can configure this priority by setting knet_link_priority in the corresponding interface section in corosync.conf, or, preferably, using the priority parameter when creating your cluster with pvecm:
# pvecm create CLUSTERNAME --link0 10.10.10.1,priority=15 --link1 10.20.20.1,priority=20
This would cause link1 to be used first, since it has the higher priority.
If no priorities are configured manually (or two links have the same priority), links will be used in order of their number, with the lower number having higher priority.
Even if all links are working, only the one with the highest priority will see corosync traffic. Link priorities cannot be mixed, meaning that links with different priorities will not be able to communicate with each other.
Since lower priority links will not see traffic unless all higher priorities have failed, it becomes a useful strategy to specify networks used for other tasks (VMs, storage, etc.) as low-priority links. If worst comes to worst, a higher latency or more congested connection might be better than no connection at all.
Adding Redundant Links To An Existing Cluster
To add a new link to a running configuration, first check how to edit the corosync.conf file.
Then, add a new ringX_addr to every node in the nodelist section. Make sure that your X is the same for every node you add it to, and that it is unique for each node.
Lastly, add a new interface, as shown below, to your totem section, replacing X with the link number chosen above.
Assuming you added a link with number 1, the new configuration file could look like this:
logging {
  debug: off
  to_syslog: yes
}

nodelist {

  node {
    name: due
    nodeid: 2
    quorum_votes: 1
    ring0_addr: 10.10.10.2
    ring1_addr: 10.20.20.2
  }

  node {
    name: tre
    nodeid: 3
    quorum_votes: 1
    ring0_addr: 10.10.10.3
    ring1_addr: 10.20.20.3
  }

  node {
    name: uno
    nodeid: 1
    quorum_votes: 1
    ring0_addr: 10.10.10.1
    ring1_addr: 10.20.20.1
  }

}

quorum {
  provider: corosync_votequorum
}

totem {
  cluster_name: testcluster
  config_version: 4
  ip_version: ipv4-6
  secauth: on
  version: 2
  interface {
    linknumber: 0
  }
  interface {
    linknumber: 1
  }
}
The new link will be enabled as soon as you follow the last steps to edit the corosync.conf file. A restart should not be necessary. You can check that corosync loaded the new link using:
journalctl -b -u corosync
It might be a good idea to test the new link by temporarily disconnecting the old link on one node and making sure that its status remains online while disconnected:
pvecm status
If you see a healthy cluster state, it means that your new link is being used.
Role of SSH in Proxmox VE Clusters
Proxmox VE utilizes SSH tunnels for various features.
-
Proxying console/shell sessions (node and guests)
When using the shell for node B while being connected to node A, connects to a terminal proxy on node A, which is in turn connected to the login shell on node B via a non-interactive SSH tunnel.
-
VM and CT memory and local-storage migration in secure mode.
During the migration, one or more SSH tunnel(s) are established between the source and target nodes, in order to exchange migration information and transfer memory and disk contents.
-
Storage replication
|
|
Pitfalls due to automatic execution of .bashrc and siblings
In case you have a custom .bashrc, or similar files that get executed on login by the configured shell, ssh will automatically run it once the session is established successfully. This can cause some unexpected behavior, as those commands may be executed with root permissions on any of the operations described above. This can cause possible problematic side-effects! In order to avoid such complications, it’s recommended to add a check in /root/.bashrc to make sure the session is interactive, and only then run .bashrc commands. You can add this snippet at the beginning of your .bashrc file: # Early exit if not running interactively to avoid side-effects!
case $- in
*i*) ;;
*) return;;
esac
|
Corosync External Vote Support
This section describes a way to deploy an external voter in a Proxmox VE cluster. When configured, the cluster can sustain more node failures without violating safety properties of the cluster communication.
For this to work, there are two services involved:
-
A QDevice daemon which runs on each Proxmox VE node
-
An external vote daemon which runs on an independent server
As a result, you can achieve higher availability, even in smaller setups (for example 2+1 nodes).
QDevice Technical Overview
The Corosync Quorum Device (QDevice) is a daemon which runs on each cluster node. It provides a configured number of votes to the cluster’s quorum subsystem, based on an externally running third-party arbitrator’s decision. Its primary use is to allow a cluster to sustain more node failures than standard quorum rules allow. This can be done safely as the external device can see all nodes and thus choose only one set of nodes to give its vote. This will only be done if said set of nodes can have quorum (again) after receiving the third-party vote.
Currently, only QDevice Net is supported as a third-party arbitrator. This is a daemon which provides a vote to a cluster partition, if it can reach the partition members over the network. It will only give votes to one partition of a cluster at any time. It’s designed to support multiple clusters and is almost configuration and state free. New clusters are handled dynamically and no configuration file is needed on the host running a QDevice.
The only requirements for the external host are that it needs network access to the cluster and to have a corosync-qnetd package available. We provide a package for Debian based hosts, and other Linux distributions should also have a package available through their respective package manager.
|
|
Unlike corosync itself, a QDevice connects to the cluster over TCP/IP. The daemon can also run outside the LAN of the cluster and isn’t limited to the low latencies requirements of corosync. |
Supported Setups
We support QDevices for clusters with an even number of nodes and recommend it for 2 node clusters, if they should provide higher availability. For clusters with an odd node count, we currently discourage the use of QDevices. The reason for this is the difference in the votes which the QDevice provides for each cluster type. Even numbered clusters get a single additional vote, which only increases availability, because if the QDevice itself fails, you are in the same position as with no QDevice at all.
On the other hand, with an odd numbered cluster size, the QDevice provides (N-1) votes — where N corresponds to the cluster node count. This alternative behavior makes sense; if it had only one additional vote, the cluster could get into a split-brain situation. This algorithm allows for all nodes but one (and naturally the QDevice itself) to fail. However, there are two drawbacks to this:
-
If the QNet daemon itself fails, no other node may fail or the cluster immediately loses quorum. For example, in a cluster with 15 nodes, 7 could fail before the cluster becomes inquorate. But, if a QDevice is configured here and it itself fails, no single node of the 15 may fail. The QDevice acts almost as a single point of failure in this case.
-
The fact that all but one node plus QDevice may fail sounds promising at first, but this may result in a mass recovery of HA services, which could overload the single remaining node. Furthermore, a Ceph server will stop providing services if only ((N-1)/2) nodes or less remain online.
If you understand the drawbacks and implications, you can decide yourself if you want to use this technology in an odd numbered cluster setup.
QDevice-Net Setup
We recommend running any daemon which provides votes to corosync-qdevice as an unprivileged user. Proxmox VE and Debian provide a package which is already configured to do so. The traffic between the daemon and the cluster must be encrypted to ensure a safe and secure integration of the QDevice in Proxmox VE.
First, install the corosync-qnetd package on your external server
external# apt install corosync-qnetd
and the corosync-qdevice package on all cluster nodes
pve# apt install corosync-qdevice
After doing this, ensure that all the nodes in the cluster are online.
You can now set up your QDevice by running the following command on one of the Proxmox VE nodes:
pve# pvecm qdevice setup <QDEVICE-IP>
The SSH key from the cluster will be automatically copied to the QDevice.
|
|
Make sure to setup key-based access for the root user on your external server, or temporarily allow root login with password during the setup phase. If you receive an error such as Host key verification failed. at this stage, running pvecm updatecerts could fix the issue. |
After all the steps have successfully completed, you will see "Done". You can verify that the QDevice has been set up with:
pve# pvecm status

...

Votequorum information
~~~~~~~~~~~~~~~~~~~~~
Expected votes:   3
Highest expected: 3
Total votes:      3
Quorum:           2
Flags:            Quorate Qdevice

Membership information
~~~~~~~~~~~~~~~~~~~~~~
    Nodeid      Votes    Qdevice Name
    0x00000001      1    A,V,NMW 192.168.22.180 (local)
    0x00000002      1    A,V,NMW 192.168.22.181
    0x00000000      1            Qdevice
QDevice Status Flags
The status output of the QDevice, as seen above, will usually contain three columns:
-
A / NA: Alive or Not Alive. Indicates if the communication to the external corosync-qnetd daemon works.
-
V / NV: If the QDevice will cast a vote for the node. In a split-brain situation, where the corosync connection between the nodes is down, but they both can still communicate with the external corosync-qnetd daemon, only one node will get the vote.
-
MW / NMW: Master wins (MV) or not (NMW). Default is NMW, see
[votequorum_qdevice_master_wins manual page https://manpages.debian.org/bookworm/libvotequorum-dev/votequorum_qdevice_master_wins.3.en.html]
. -
NR: QDevice is not registered.
|
|
If your QDevice is listed as Not Alive (NA in the output above), ensure that port 5403 (the default port of the qnetd server) of your external server is reachable via TCP/IP! |
Frequently Asked Questions
Tie Breaking
In case of a tie, where two same-sized cluster partitions cannot see each other but can see the QDevice, the QDevice chooses one of those partitions randomly and provides a vote to it.
Possible Negative Implications
For clusters with an even node count, there are no negative implications when using a QDevice. If it fails to work, it is the same as not having a QDevice at all.
Adding/Deleting Nodes After QDevice Setup
If you want to add a new node or remove an existing one from a cluster with a QDevice setup, you need to remove the QDevice first. After that, you can add or remove nodes normally. Once you have a cluster with an even node count again, you can set up the QDevice again as described previously.
Removing the QDevice
If you used the official pvecm tool to add the QDevice, you can remove it by running:
pve# pvecm qdevice remove
Corosync Configuration
The /etc/pve/corosync.conf file plays a central role in a Proxmox VE cluster. It controls the cluster membership and its network. For further information about it, check the corosync.conf man page:
man corosync.confFor node membership, you should always use the pvecm tool provided by Proxmox VE. You may have to edit the configuration file manually for other changes. Here are a few best practice tips for doing this.
Edit corosync.conf
Editing the corosync.conf file is not always very straightforward. There are two on each cluster node, one in /etc/pve/corosync.conf and the other in /etc/corosync/corosync.conf. Editing the one in our cluster file system will propagate the changes to the local one, but not vice versa.
The configuration will get updated automatically, as soon as the file changes. This means that changes which can be integrated in a running corosync will take effect immediately. Thus, you should always make a copy and edit that instead, to avoid triggering unintended changes when saving the file while editing.
cp /etc/pve/corosync.conf /etc/pve/corosync.conf.new
Then, open the config file with your favorite editor, such as nano or vim.tiny, which come pre-installed on every Proxmox VE node.
|
|
Always increment the config_version number after configuration changes; omitting this can lead to problems. |
After making the necessary changes, create another copy of the current working configuration file. This serves as a backup if the new configuration fails to apply or causes other issues.
cp /etc/pve/corosync.conf /etc/pve/corosync.conf.bak
Then replace the old configuration file with the new one:
mv /etc/pve/corosync.conf.new /etc/pve/corosync.conf
You can check if the changes could be applied automatically, using the following commands:
systemctl status corosync
journalctl -b -u corosync
If the changes could not be applied automatically, you may have to restart the corosync service via:
systemctl restart corosync
On errors, check the troubleshooting section below.
Troubleshooting
Issue: quorum.expected_votes must be configured
When corosync starts to fail and you get the following message in the system log:
[...]
corosync[1647]:  [QUORUM] Quorum provider: corosync_votequorum failed to initialize.
corosync[1647]:  [SERV  ] Service engine 'corosync_quorum' failed to load for reason
    'configuration error: nodelist or quorum.expected_votes must be configured!'
[...]
It means that the hostname you set for a corosync ringX_addr in the configuration could not be resolved.
Write Configuration When Not Quorate
If you need to change /etc/pve/corosync.conf on a node with no quorum, and you understand what you are doing, use:
pvecm expected 1This sets the expected vote count to 1 and makes the cluster quorate. You can then fix your configuration, or revert it back to the last working backup.
This is not enough if corosync cannot start anymore. In that case, it is best to edit the local copy of the corosync configuration in /etc/corosync/corosync.conf, so that corosync can start again. Ensure that on all nodes, this configuration has the same content to avoid split-brain situations.
Corosync Configuration Glossary
- ringX_addr
-
This names the different link addresses for the Kronosnet connections between nodes.
Cluster Cold Start
It is obvious that a cluster is not quorate when all nodes are offline. This is a common case after a power failure.
|
|
It is always a good idea to use an uninterruptible power supply (“UPS”, also called “battery backup”) to avoid this state, especially if you want HA. |
On node startup, the pve-guests service is started and waits for quorum. Once quorate, it starts all guests which have the onboot flag set.
When you turn on nodes, or when power comes back after power failure, it is likely that some nodes will boot faster than others. Please keep in mind that guest startup is delayed until you reach quorum.
Guest VMID Auto-Selection
When creating new guests the web interface will ask the backend for a free VMID automatically. The default range for searching is 100 to 1000000 (lower than the maximal allowed VMID enforced by the schema).
Sometimes admins either want to allocate new VMIDs in a separate range, for example to easily separate temporary VMs with ones that choose a VMID manually. Other times its just desired to provided a stable length VMID, for which setting the lower boundary to, for example, 100000 gives much more room for.
To accommodate this use case one can set either lower, upper or both boundaries via the datacenter.cfg configuration file, which can be edited in the web interface under Datacenter → Options.
|
|
The range is only used for the next-id API call, so it isn’t a hard limit. |
Guest Migration
Migrating virtual guests to other nodes is a useful feature in a cluster. There are settings to control the behavior of such migrations. This can be done via the configuration file datacenter.cfg or for a specific migration via API or command-line parameters.
It makes a difference if a guest is online or offline, or if it has local resources (like a local disk).
For details about virtual machine migration, see the QEMU/KVM Migration Chapter.
For details about container migration, see the Container Migration Chapter.
Migration Type
The migration type defines if the migration data should be sent over an encrypted (secure) channel or an unencrypted (insecure) one. Setting the migration type to insecure means that the RAM content of a virtual guest is also transferred unencrypted, which can lead to information disclosure of critical data from inside the guest (for example, passwords or encryption keys).
Therefore, we strongly recommend using the secure channel if you do not have full control over the network and can not guarantee that no one is eavesdropping on it.
|
|
Storage migration does not follow this setting. Currently, it always sends the storage content over a secure channel. |
Encryption requires a lot of computing power, so this setting is often changed to insecure to achieve better performance. The impact on modern systems is lower because they implement AES encryption in hardware. The performance impact is particularly evident in fast networks, where you can transfer 10 Gbps or more.
Migration Network
By default, Proxmox VE uses the network in which cluster communication takes place to send the migration traffic. This is not optimal both because sensitive cluster traffic can be disrupted and this network may not have the best bandwidth available on the node.
Setting the migration network parameter allows the use of a dedicated network for all migration traffic. In addition to the memory, this also affects the storage traffic for offline migrations.
The migration network is set as a network using CIDR notation. This has the advantage that you don’t have to set individual IP addresses for each node. Proxmox VE can determine the real address on the destination node from the network specified in the CIDR form. To enable this, the network must be specified so that each node has exactly one IP in the respective network.
Example
We assume that we have a three-node setup, with three separate networks. One for public communication with the Internet, one for cluster communication, and a very fast one, which we want to use as a dedicated network for migration.
A network configuration for such a setup might look as follows:
iface eno1 inet manual

# public network
auto vmbr0
iface vmbr0 inet static
    address 192.X.Y.57/24
    gateway 192.X.Y.1
    bridge-ports eno1
    bridge-stp off
    bridge-fd 0

# cluster network
auto eno2
iface eno2 inet static
    address  10.1.1.1/24

# fast network
auto eno3
iface eno3 inet static
    address  10.1.2.1/24
Here, we will use the network 10.1.2.0/24 as a migration network. For a single migration, you can do this using the migration_network parameter of the command-line tool:
# qm migrate 106 tre --online --migration_network 10.1.2.0/24
To configure this as the default network for all migrations in the cluster, set the migration property of the /etc/pve/datacenter.cfg file:
# use dedicated migration network
migration: secure,network=10.1.2.0/24
|
|
The migration type must always be set when the migration network is set in /etc/pve/datacenter.cfg. |