Difference between revisions of "Deploy Hyper-Converged Ceph Cluster"
| (8 intermediate revisions by the same user not shown) | |||
| Line 4: | Line 4: | ||
[[Category:Reference Documentation]] | [[Category:Reference Documentation]] | ||
<pvehide> | <pvehide> | ||
| − | Proxmox VE unifies your compute and storage systems, | + | Proxmox VE unifies your compute and storage systems, that is, you can use the same |
physical nodes within a cluster for both computing (processing VMs and | physical nodes within a cluster for both computing (processing VMs and | ||
containers) and replicated storage. The traditional silos of compute and | containers) and replicated storage. The traditional silos of compute and | ||
storage resources can be wrapped up into a single hyper-converged appliance. | storage resources can be wrapped up into a single hyper-converged appliance. | ||
| − | Separate storage networks (SANs) and connections via network attached | + | Separate storage networks (SANs) and connections via network attached storage |
(NAS) disappear. With the integration of Ceph, an open source software-defined | (NAS) disappear. With the integration of Ceph, an open source software-defined | ||
storage platform, Proxmox VE has the ability to run and manage Ceph storage directly | storage platform, Proxmox VE has the ability to run and manage Ceph storage directly | ||
| Line 15: | Line 15: | ||
excellent performance, reliability and scalability. | excellent performance, reliability and scalability. | ||
Some advantages of Ceph on Proxmox VE are: | Some advantages of Ceph on Proxmox VE are: | ||
| − | Easy setup and management | + | Easy setup and management via CLI and GUI |
Thin provisioning | Thin provisioning | ||
| − | + | Snapshot support | |
Self healing | Self healing | ||
Scalable to the exabyte level | Scalable to the exabyte level | ||
Setup pools with different performance and redundancy characteristics | Setup pools with different performance and redundancy characteristics | ||
Data is replicated, making it fault tolerant | Data is replicated, making it fault tolerant | ||
| − | Runs on | + | Runs on commodity hardware |
No need for hardware RAID controllers | No need for hardware RAID controllers | ||
Open source | Open source | ||
| − | For small to | + | For small to medium-sized deployments, it is possible to install a Ceph server for |
| − | RADOS Block Devices (RBD) directly on your Proxmox VE cluster nodes | + | RADOS Block Devices (RBD) directly on your Proxmox VE cluster nodes (see |
| − | Ceph RADOS Block Devices (RBD). Recent | + | Ceph RADOS Block Devices (RBD)). Recent |
| − | hardware has | + | hardware has a lot of CPU power and RAM, so running storage services |
and VMs on the same node is possible. | and VMs on the same node is possible. | ||
| − | To simplify management, we provide pveceph - a tool | + | To simplify management, we provide pveceph - a tool for installing and |
| − | + | managing Ceph services on Proxmox VE nodes. | |
| − | Ceph consists of | + | Ceph consists of multiple Daemons, for use as an RBD storage: |
Ceph Monitor (ceph-mon) | Ceph Monitor (ceph-mon) | ||
Ceph Manager (ceph-mgr) | Ceph Manager (ceph-mgr) | ||
Ceph OSD (ceph-osd; Object Storage Daemon) | Ceph OSD (ceph-osd; Object Storage Daemon) | ||
| − | We highly recommend to get familiar with Ceph | + | We highly recommend to get familiar with Ceph |
| − | [Ceph architecture https://docs.ceph.com/ | + | [Ceph intro https://docs.ceph.com/en/octopus/start/intro/], |
| + | its architecture | ||
| + | [Ceph architecture https://docs.ceph.com/en/octopus/architecture/] | ||
and vocabulary | and vocabulary | ||
| − | [Ceph glossary https://docs.ceph.com/ | + | [Ceph glossary https://docs.ceph.com/en/octopus/glossary]. |
Precondition | Precondition | ||
| − | To build a hyper-converged Proxmox + Ceph Cluster | + | To build a hyper-converged Proxmox + Ceph Cluster, you must use at least |
three (preferably) identical servers for the setup. | three (preferably) identical servers for the setup. | ||
Check also the recommendations from | Check also the recommendations from | ||
Ceph’s website. | Ceph’s website. | ||
CPU | CPU | ||
| − | + | A high CPU core frequency reduces latency and should be preferred. As a simple | |
rule of thumb, you should assign a CPU core (or thread) to each Ceph service to | rule of thumb, you should assign a CPU core (or thread) to each Ceph service to | ||
provide enough resources for stable and durable Ceph performance. | provide enough resources for stable and durable Ceph performance. | ||
Memory | Memory | ||
Especially in a hyper-converged setup, the memory consumption needs to be | Especially in a hyper-converged setup, the memory consumption needs to be | ||
| − | carefully monitored. In addition to the | + | carefully monitored. In addition to the predicted memory usage of virtual |
| − | and | + | machines and containers, you must also account for having enough memory |
| − | performance. As a rule of thumb, for roughly 1 TiB of data, 1 GiB of memory | + | available for Ceph to provide excellent and stable performance. |
| − | will be used by an OSD. | + | As a rule of thumb, for roughly 1 TiB of data, 1 GiB of memory will be used |
| + | by an OSD. Especially during recovery, re-balancing or backfilling. | ||
| + | The daemon itself will use additional memory. The Bluestore backend of the | ||
| + | daemon requires by default 3-5 GiB of memory (adjustable). In contrast, the | ||
| + | legacy Filestore backend uses the OS page cache and the memory consumption is | ||
| + | generally related to PGs of an OSD daemon. | ||
Network | Network | ||
We recommend a network bandwidth of at least 10 GbE or more, which is used | We recommend a network bandwidth of at least 10 GbE or more, which is used | ||
| Line 62: | Line 69: | ||
The volume of traffic, especially during recovery, will interfere with other | The volume of traffic, especially during recovery, will interfere with other | ||
services on the same network and may even break the Proxmox VE cluster stack. | services on the same network and may even break the Proxmox VE cluster stack. | ||
| − | + | Furthermore, you should estimate your bandwidth needs. While one HDD might not | |
| − | link, multiple HDD OSDs per node can, and modern NVMe SSDs will even saturate | + | saturate a 1 Gb link, multiple HDD OSDs per node can, and modern NVMe SSDs will |
| − | 10 Gbps of bandwidth quickly. Deploying a network capable of even more | + | even saturate 10 Gbps of bandwidth quickly. Deploying a network capable of even |
| − | will ensure that | + | more bandwidth will ensure that this isn’t your bottleneck and won’t be anytime |
| − | even 100 | + | soon. 25, 40 or even 100 Gbps are possible. |
Disks | Disks | ||
When planning the size of your Ceph cluster, it is important to take the | When planning the size of your Ceph cluster, it is important to take the | ||
| − | recovery time into consideration. Especially with small clusters, | + | recovery time into consideration. Especially with small clusters, recovery |
might take long. It is recommended that you use SSDs instead of HDDs in small | might take long. It is recommended that you use SSDs instead of HDDs in small | ||
setups to reduce recovery time, minimizing the likelihood of a subsequent | setups to reduce recovery time, minimizing the likelihood of a subsequent | ||
failure event during recovery. | failure event during recovery. | ||
| − | In general SSDs will provide more | + | In general, SSDs will provide more IOPS than spinning disks. With this in mind, |
| − | higher cost may make a class based separation of | + | in addition to the higher cost, it may make sense to implement a |
| − | pools | + | class based separation of pools. Another way to |
| − | as journal or DB/Write-Ahead-Log device, see | + | speed up OSDs is to use a faster disk as a journal or |
| − | creating Ceph OSDs. If a faster disk is used for multiple | + | DB/Write-Ahead-Log device, see |
| − | OSDs, a proper balance between OSD and WAL / DB (or journal) disk must be | + | creating Ceph OSDs. |
| − | selected, otherwise the faster disk becomes the bottleneck for all linked OSDs. | + | If a faster disk is used for multiple OSDs, a proper balance between OSD |
| − | Aside from the disk type, Ceph best | + | and WAL / DB (or journal) disk must be selected, otherwise the faster disk |
| − | amount of disks per node. For example, 4 x 500 GB disks | + | becomes the bottleneck for all linked OSDs. |
| + | Aside from the disk type, Ceph performs best with an even sized and distributed | ||
| + | amount of disks per node. For example, 4 x 500 GB disks within each node is | ||
better than a mixed setup with a single 1 TB and three 250 GB disk. | better than a mixed setup with a single 1 TB and three 250 GB disk. | ||
| − | + | You also need to balance OSD count and single OSD capacity. More capacity | |
| − | allows to increase storage density, but it also means that a single OSD | + | allows you to increase storage density, but it also means that a single OSD |
| − | failure forces | + | failure forces Ceph to recover more data at once. |
Avoid RAID | Avoid RAID | ||
As Ceph handles data object redundancy and multiple parallel writes to disks | As Ceph handles data object redundancy and multiple parallel writes to disks | ||
(OSDs) on its own, using a RAID controller normally doesnât improve | (OSDs) on its own, using a RAID controller normally doesnât improve | ||
performance or availability. On the contrary, Ceph is designed to handle whole | performance or availability. On the contrary, Ceph is designed to handle whole | ||
| − | disks on it’s own, without any abstraction in between. RAID | + | disks on it’s own, without any abstraction in between. RAID controllers are not |
| − | designed for the Ceph | + | designed for the Ceph workload and may complicate things and sometimes even |
reduce performance, as their write and caching algorithms may interfere with | reduce performance, as their write and caching algorithms may interfere with | ||
the ones from Ceph. | the ones from Ceph. | ||
| − | Avoid RAID | + | Avoid RAID controllers. Use host bus adapter (HBA) instead. |
| − | + | The above recommendations should be seen as a rough guidance for choosing | |
| − | hardware. Therefore, it is still essential to adapt it to your specific needs | + | hardware. Therefore, it is still essential to adapt it to your specific needs. |
| − | test your setup and monitor health and performance continuously. | + | You should test your setup and monitor health and performance continuously. |
| − | Initial Ceph | + | Initial Ceph Installation & Configuration |
| + | Using the Web-based Wizard | ||
With Proxmox VE you have the benefit of an easy to use installation wizard | With Proxmox VE you have the benefit of an easy to use installation wizard | ||
for Ceph. Click on one of your cluster nodes and navigate to the Ceph | for Ceph. Click on one of your cluster nodes and navigate to the Ceph | ||
| − | section in the menu tree. If Ceph is not already installed you will | + | section in the menu tree. If Ceph is not already installed, you will see a |
| − | + | prompt offering to do so. | |
| − | The wizard is divided into | + | The wizard is divided into multiple sections, where each needs to |
| − | + | finish successfully, in order to use Ceph. | |
| − | the wizard will download and install all required packages from Proxmox VE’s | + | First you need to chose which Ceph version you want to install. Prefer the one |
| − | repository. | + | from your other nodes, or the newest if this is the first node you install |
| − | After finishing the | + | Ceph. |
| + | After starting the installation, the wizard will download and install all the | ||
| + | required packages from Proxmox VE’s Ceph repository. | ||
| + | After finishing the installation step, you will need to create a configuration. | ||
This step is only needed once per cluster, as this configuration is distributed | This step is only needed once per cluster, as this configuration is distributed | ||
automatically to all remaining cluster members through Proxmox VE’s clustered | automatically to all remaining cluster members through Proxmox VE’s clustered | ||
configuration file system (pmxcfs). | configuration file system (pmxcfs). | ||
The configuration step includes the following settings: | The configuration step includes the following settings: | ||
| − | Public Network: You | + | Public Network: You can set up a dedicated network for Ceph. This |
| − | setting is required. Separating your Ceph traffic is highly recommended, | + | setting is required. Separating your Ceph traffic is highly recommended. |
| − | + | Otherwise, it could cause trouble with other latency dependent services, | |
| − | + | for example, cluster communication may decrease Ceph’s performance. | |
| − | Cluster Network: As an optional step you can go even further and | + | Cluster Network: As an optional step, you can go even further and |
separate the OSD replication & heartbeat traffic | separate the OSD replication & heartbeat traffic | ||
as well. This will relieve the public network and could lead to | as well. This will relieve the public network and could lead to | ||
| − | significant performance improvements especially in | + | significant performance improvements, especially in large clusters. |
You have two more options which are considered advanced and therefore | You have two more options which are considered advanced and therefore | ||
| − | should only changed if you are | + | should only changed if you know what you are doing. |
| − | Number of replicas: Defines | + | Number of replicas: Defines how often an object is replicated |
Minimum replicas: Defines the minimum number of required replicas | Minimum replicas: Defines the minimum number of required replicas | ||
| − | + | for I/O to be marked as complete. | |
| − | Additionally you need to choose your first monitor node | + | Additionally, you need to choose your first monitor node. This step is required. |
| − | That’s it | + | That’s it. You should now see a success page as the last step, with further |
| − | instructions on how to | + | instructions on how to proceed. Your system is now ready to start using Ceph. |
| − | + | To get started, you will need to create some additional monitors, | |
| − | + | OSDs and at least one pool. | |
| − | The rest of this chapter will guide you | + | The rest of this chapter will guide you through getting the most out of |
| − | your Proxmox VE based Ceph setup | + | your Proxmox VE based Ceph setup. This includes the aforementioned tips and |
| − | more | + | more, such as CephFS, which is a helpful addition to your |
new Ceph cluster. | new Ceph cluster. | ||
| − | Installation of Ceph Packages | + | CLI Installation of Ceph Packages |
| − | + | Alternatively to the the recommended Proxmox VE Ceph installation wizard available | |
| − | command on each node: | + | in the web-interface, you can use the following CLI command on each node: |
pveceph install | pveceph install | ||
This sets up an apt package repository in | This sets up an apt package repository in | ||
/etc/apt/sources.list.d/ceph.list and installs the required software. | /etc/apt/sources.list.d/ceph.list and installs the required software. | ||
| − | + | Initial Ceph configuration via CLI | |
Use the Proxmox VE Ceph installation wizard (recommended) or run the | Use the Proxmox VE Ceph installation wizard (recommended) or run the | ||
following command on one node: | following command on one node: | ||
pveceph init --network 10.10.10.0/24 | pveceph init --network 10.10.10.0/24 | ||
This creates an initial configuration at /etc/pve/ceph.conf with a | This creates an initial configuration at /etc/pve/ceph.conf with a | ||
| − | dedicated network for | + | dedicated network for Ceph. This file is automatically distributed to |
| − | all Proxmox VE nodes | + | all Proxmox VE nodes, using pmxcfs. The command also |
| − | creates a symbolic link | + | creates a symbolic link at /etc/ceph/ceph.conf, which points to that file. |
| − | + | Thus, you can simply run Ceph commands without the need to specify a | |
configuration file. | configuration file. | ||
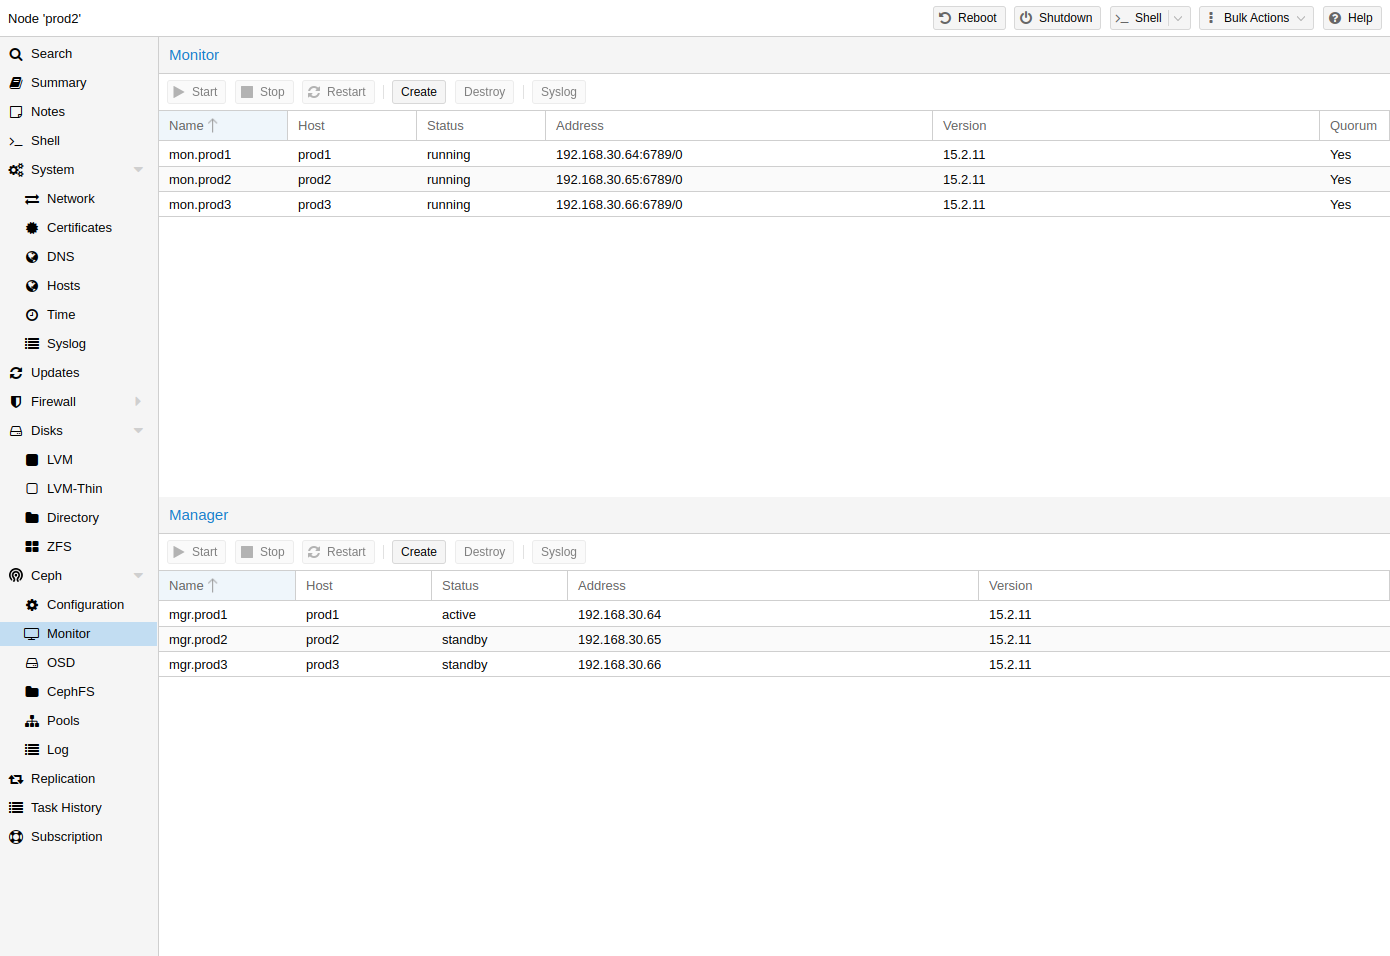
Ceph Monitor | Ceph Monitor | ||
The Ceph Monitor (MON) | The Ceph Monitor (MON) | ||
| − | [Ceph Monitor https://docs.ceph.com/ | + | [Ceph Monitor https://docs.ceph.com/en/octopus/start/intro/] |
| − | maintains a master copy of the cluster map. For high availability you need | + | maintains a master copy of the cluster map. For high availability, you need at |
| − | + | least 3 monitors. One monitor will already be installed if you | |
| − | used the installation wizard. You won’t need more than 3 monitors as long | + | used the installation wizard. You won’t need more than 3 monitors, as long |
| − | as your cluster is small to | + | as your cluster is small to medium-sized. Only really large clusters will |
| − | + | require more than this. | |
Create Monitors | Create Monitors | ||
On each node where you want to place a monitor (three monitors are recommended), | On each node where you want to place a monitor (three monitors are recommended), | ||
| − | create | + | create one by using the Ceph → Monitor tab in the GUI or run: |
pveceph mon create | pveceph mon create | ||
Destroy Monitors | Destroy Monitors | ||
| − | To remove a Ceph Monitor via the GUI first select a node in the tree view and | + | To remove a Ceph Monitor via the GUI, first select a node in the tree view and |
go to the Ceph → Monitor panel. Select the MON and click the Destroy | go to the Ceph → Monitor panel. Select the MON and click the Destroy | ||
button. | button. | ||
| − | To remove a Ceph Monitor via the CLI first connect to the node on which the MON | + | To remove a Ceph Monitor via the CLI, first connect to the node on which the MON |
is running. Then execute the following command: | is running. Then execute the following command: | ||
pveceph mon destroy | pveceph mon destroy | ||
| Line 172: | Line 185: | ||
Ceph Manager | Ceph Manager | ||
The Manager daemon runs alongside the monitors. It provides an interface to | The Manager daemon runs alongside the monitors. It provides an interface to | ||
| − | monitor the cluster. Since the Ceph luminous | + | monitor the cluster. Since the release of Ceph luminous, at least one ceph-mgr |
| − | [Ceph Manager https://docs.ceph.com/ | + | [Ceph Manager https://docs.ceph.com/en/octopus/mgr/] daemon is |
required. | required. | ||
Create Manager | Create Manager | ||
| − | Multiple Managers can be installed, but | + | Multiple Managers can be installed, but only one Manager is active at any given |
| + | time. | ||
pveceph mgr create | pveceph mgr create | ||
It is recommended to install the Ceph Manager on the monitor nodes. For | It is recommended to install the Ceph Manager on the monitor nodes. For | ||
high availability install more then one manager. | high availability install more then one manager. | ||
Destroy Manager | Destroy Manager | ||
| − | To remove a Ceph Manager via the GUI first select a node in the tree view and | + | To remove a Ceph Manager via the GUI, first select a node in the tree view and |
go to the Ceph → Monitor panel. Select the Manager and click the | go to the Ceph → Monitor panel. Select the Manager and click the | ||
Destroy button. | Destroy button. | ||
| − | To remove a Ceph Monitor via the CLI first connect to the node on which the | + | To remove a Ceph Monitor via the CLI, first connect to the node on which the |
Manager is running. Then execute the following command: | Manager is running. Then execute the following command: | ||
pveceph mgr destroy | pveceph mgr destroy | ||
| − | + | While a manager is not a hard-dependency, it is crucial for a Ceph cluster, | |
| − | + | as it handles important features like PG-autoscaling, device health monitoring, | |
| + | telemetry and more. | ||
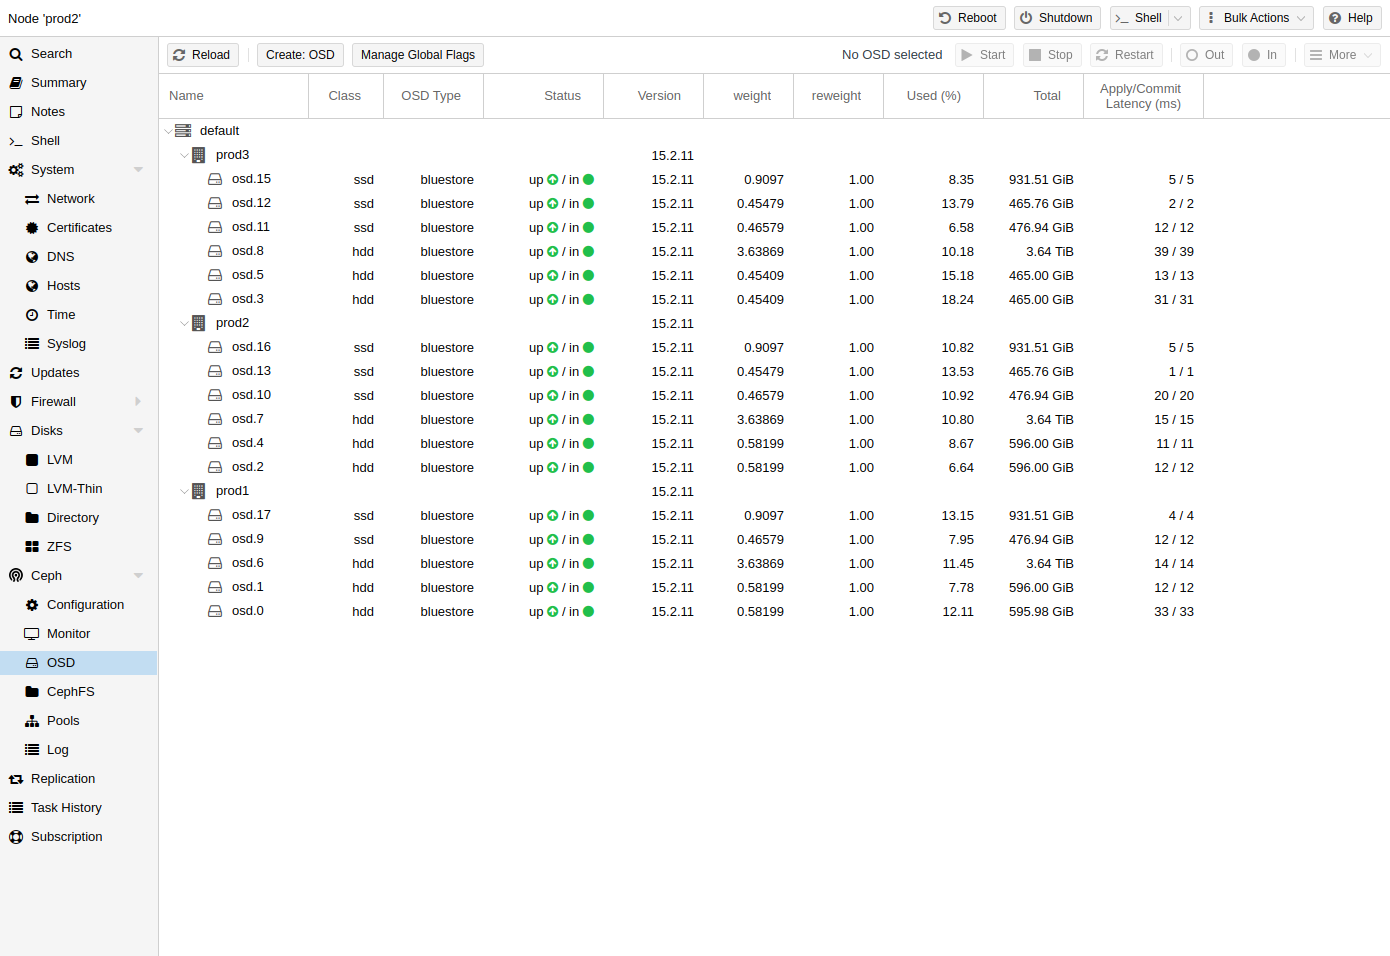
Ceph OSDs | Ceph OSDs | ||
| − | Ceph Object Storage Daemons | + | Ceph Object Storage Daemons store objects for Ceph over the |
network. It is recommended to use one OSD per physical disk. | network. It is recommended to use one OSD per physical disk. | ||
| − | |||
Create OSDs | Create OSDs | ||
| − | via | + | You can create an OSD either via the Proxmox VE web-interface or via the CLI using |
| + | pveceph. For example: | ||
pveceph osd create /dev/sd[X] | pveceph osd create /dev/sd[X] | ||
| − | We recommend a Ceph cluster | + | We recommend a Ceph cluster with at least three nodes and at least 12 |
| − | + | OSDs, evenly distributed among the nodes. | |
| − | If the disk was | + | If the disk was in use before (for example, for ZFS or as an OSD) you first need |
| − | sector and any OSD leftover the following command | + | to zap all traces of that usage. To remove the partition table, boot sector and |
| + | any other OSD leftover, you can use the following command: | ||
ceph-volume lvm zap /dev/sd[X] --destroy | ceph-volume lvm zap /dev/sd[X] --destroy | ||
| − | The above command will destroy data on the disk! | + | The above command will destroy all data on the disk! |
Ceph Bluestore | Ceph Bluestore | ||
Starting with the Ceph Kraken release, a new Ceph OSD storage type was | Starting with the Ceph Kraken release, a new Ceph OSD storage type was | ||
| − | introduced | + | introduced called Bluestore |
[Ceph Bluestore https://ceph.com/community/new-luminous-bluestore/]. | [Ceph Bluestore https://ceph.com/community/new-luminous-bluestore/]. | ||
This is the default when creating OSDs since Ceph Luminous. | This is the default when creating OSDs since Ceph Luminous. | ||
| Line 213: | Line 229: | ||
not specified separately. | not specified separately. | ||
pveceph osd create /dev/sd[X] -db_dev /dev/sd[Y] -wal_dev /dev/sd[Z] | pveceph osd create /dev/sd[X] -db_dev /dev/sd[Y] -wal_dev /dev/sd[Z] | ||
| − | You can directly choose the size | + | You can directly choose the size of those with the -db_size and -wal_size |
| − | + | parameters respectively. If they are not given, the following values (in order) | |
will be used: | will be used: | ||
| − | bluestore_block_{db,wal}_size from | + | bluestore_block_{db,wal}_size from Ceph configuration… |
… database, section osd | … database, section osd | ||
… database, section global | … database, section global | ||
| Line 222: | Line 238: | ||
… file, section global | … file, section global | ||
10% (DB)/1% (WAL) of OSD size | 10% (DB)/1% (WAL) of OSD size | ||
| − | The DB stores BlueStoreâs internal metadata and the WAL is BlueStoreâs | + | The DB stores BlueStoreâs internal metadata, and the WAL is BlueStoreâs |
internal journal or write-ahead log. It is recommended to use a fast SSD or | internal journal or write-ahead log. It is recommended to use a fast SSD or | ||
NVRAM for better performance. | NVRAM for better performance. | ||
Ceph Filestore | Ceph Filestore | ||
| − | Before Ceph Luminous, Filestore was used as default storage type for Ceph OSDs. | + | Before Ceph Luminous, Filestore was used as the default storage type for Ceph OSDs. |
Starting with Ceph Nautilus, Proxmox VE does not support creating such OSDs with | Starting with Ceph Nautilus, Proxmox VE does not support creating such OSDs with | ||
pveceph anymore. If you still want to create filestore OSDs, use | pveceph anymore. If you still want to create filestore OSDs, use | ||
| Line 232: | Line 248: | ||
ceph-volume lvm create --filestore --data /dev/sd[X] --journal /dev/sd[Y] | ceph-volume lvm create --filestore --data /dev/sd[X] --journal /dev/sd[Y] | ||
Destroy OSDs | Destroy OSDs | ||
| − | To remove an OSD via the GUI first select a Proxmox VE node in the tree view and go | + | To remove an OSD via the GUI, first select a Proxmox VE node in the tree view and go |
| − | to the Ceph → OSD panel. | + | to the Ceph → OSD panel. Then select the OSD to destroy and click the OUT |
| − | button. Once the OSD status changed from in to out click the STOP | + | button. Once the OSD status has changed from in to out, click the STOP |
| − | button. | + | button. Finally, after the status has changed from up to down, select |
| − | from the More drop-down menu. | + | Destroy from the More drop-down menu. |
To remove an OSD via the CLI run the following commands. | To remove an OSD via the CLI run the following commands. | ||
ceph osd out <ID> | ceph osd out <ID> | ||
| Line 246: | Line 262: | ||
additionally destroy the partition table. | additionally destroy the partition table. | ||
pveceph osd destroy <ID> | pveceph osd destroy <ID> | ||
| − | The above command will destroy data on the disk! | + | The above command will destroy all data on the disk! |
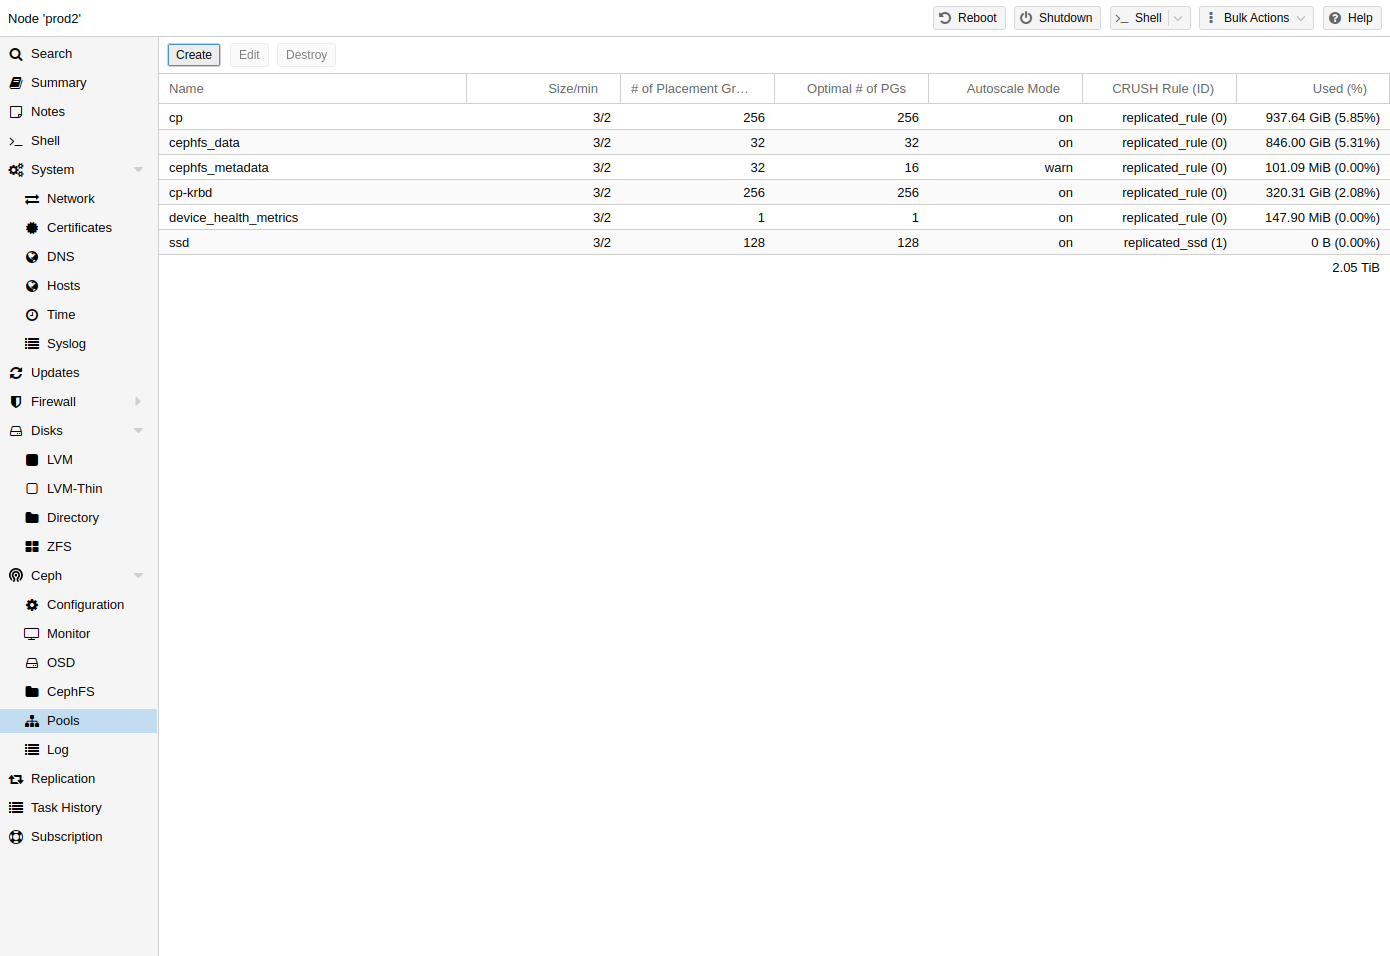
Ceph Pools | Ceph Pools | ||
| − | A pool is a logical group for storing objects. It holds Placement | + | A pool is a logical group for storing objects. It holds a collection of objects, |
| − | Groups (PG, pg_num) | + | known as Placement Groups (PG, pg_num). |
| − | Create Pools | + | Create and Edit Pools |
| + | You can create and edit pools from the command line or the web-interface of any | ||
| + | Proxmox VE host under Ceph → Pools. | ||
When no options are given, we set a default of 128 PGs, a size of 3 | When no options are given, we set a default of 128 PGs, a size of 3 | ||
| − | replicas and a min_size of 2 replicas | + | replicas and a min_size of 2 replicas, to ensure no data loss occurs if |
| − | + | any OSD fails. | |
| − | + | Do not set a min_size of 1. A replicated pool with min_size of 1 | |
| − | + | allows I/O on an object when it has only 1 replica, which could lead to data | |
| − | It is advised | + | loss, incomplete PGs or unfound objects. |
| − | the formula and the PG calculator [PG calculator | + | It is advised that you either enable the PG-Autoscaler or calculate the PG |
| − | https://ceph.com/pgcalc/] online. | + | number based on your setup. You can find the formula and the PG calculator |
| − | + | [PG calculator https://web.archive.org/web/20210301111112/http://ceph.com/pgcalc/] online. From Ceph Nautilus | |
| − | + | onward, you can change the number of PGs | |
| − | + | [Placement Groups https://docs.ceph.com/en/octopus/rados/operations/placement-groups/] after the setup. | |
| − | pveceph pool create <name> | + | The PG autoscaler [Automated Scaling https://docs.ceph.com/en/octopus/rados/operations/placement-groups/#automated-scaling] can |
| − | If you would like to automatically | + | automatically scale the PG count for a pool in the background. Setting the |
| − | + | Target Size or Target Ratio advanced parameters helps the PG-Autoscaler to | |
| − | --add_storages at pool creation. | + | make better decisions. |
| + | Example for creating a pool over the CLI | ||
| + | pveceph pool create <pool-name> --add_storages | ||
| + | If you would also like to automatically define a storage for your | ||
| + | pool, keep the ‘Add as Storage’ checkbox checked in the web-interface, or use the | ||
| + | command line option --add_storages at pool creation. | ||
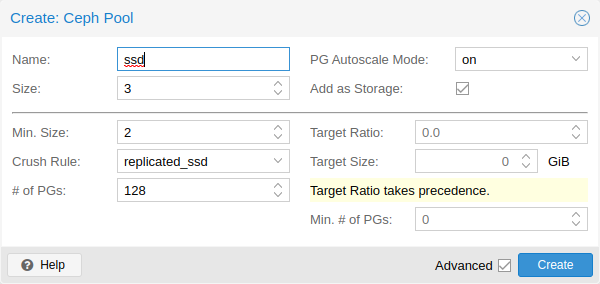
| + | Pool Options | ||
| + | The following options are available on pool creation, and partially also when | ||
| + | editing a pool. | ||
| + | Name | ||
| + | The name of the pool. This must be unique and can’t be changed afterwards. | ||
| + | Size | ||
| + | The number of replicas per object. Ceph always tries to have this many | ||
| + | copies of an object. Default: 3. | ||
| + | PG Autoscale Mode | ||
| + | The automatic PG scaling mode [autoscaler] of | ||
| + | the pool. If set to warn, it produces a warning message when a pool | ||
| + | has a non-optimal PG count. Default: warn. | ||
| + | Add as Storage | ||
| + | Configure a VM or container storage using the new pool. | ||
| + | Default: true (only visible on creation). | ||
| + | Advanced Options | ||
| + | Min. Size | ||
| + | The minimum number of replicas per object. Ceph will reject I/O on | ||
| + | the pool if a PG has less than this many replicas. Default: 2. | ||
| + | Crush Rule | ||
| + | The rule to use for mapping object placement in the cluster. These | ||
| + | rules define how data is placed within the cluster. See | ||
| + | Ceph CRUSH & device classes for information on | ||
| + | device-based rules. | ||
| + | # of PGs | ||
| + | The number of placement groups [placement_groups] that | ||
| + | the pool should have at the beginning. Default: 128. | ||
| + | Target Ratio | ||
| + | The ratio of data that is expected in the pool. The PG | ||
| + | autoscaler uses the ratio relative to other ratio sets. It takes precedence | ||
| + | over the target size if both are set. | ||
| + | Target Size | ||
| + | The estimated amount of data expected in the pool. The PG | ||
| + | autoscaler uses this size to estimate the optimal PG count. | ||
| + | Min. # of PGs | ||
| + | The minimum number of placement groups. This setting is used to | ||
| + | fine-tune the lower bound of the PG count for that pool. The PG autoscaler | ||
| + | will not merge PGs below this threshold. | ||
Further information on Ceph pool handling can be found in the Ceph pool | Further information on Ceph pool handling can be found in the Ceph pool | ||
operation [Ceph pool operation | operation [Ceph pool operation | ||
| − | https://docs.ceph.com/ | + | https://docs.ceph.com/en/octopus/rados/operations/pools/] |
manual. | manual. | ||
| + | Erasure Coded Pools | ||
| + | Erasure coding (EC) is a form of ‘forward error correction’ codes that allows | ||
| + | to recover from a certain amount of data loss. Erasure coded pools can offer | ||
| + | more usable space compared to replicated pools, but they do that for the price | ||
| + | of performance. | ||
| + | For comparison: in classic, replicated pools, multiple replicas of the data | ||
| + | are stored (size) while in erasure coded pool, data is split into k data | ||
| + | chunks with additional m coding (checking) chunks. Those coding chunks can be | ||
| + | used to recreate data should data chunks be missing. | ||
| + | The number of coding chunks, m, defines how many OSDs can be lost without | ||
| + | losing any data. The total amount of objects stored is k + m. | ||
| + | Creating EC Pools | ||
| + | Erasure coded (EC) pools can be created with the pveceph CLI tooling. | ||
| + | Planning an EC pool needs to account for the fact, that they work differently | ||
| + | than replicated pools. | ||
| + | The default min_size of an EC pool depends on the m parameter. If m = 1, | ||
| + | the min_size of the EC pool will be k. The min_size will be k + 1 if | ||
| + | m > 1. The Ceph documentation recommends a conservative min_size of k + 2 | ||
| + | [Ceph Erasure Coded Pool Recovery | ||
| + | https://docs.ceph.com/en/octopus/rados/operations/erasure-code/#erasure-coded-pool-recovery]. | ||
| + | If there are less than min_size OSDs available, any IO to the pool will be | ||
| + | blocked until there are enough OSDs available again. | ||
| + | When planning an erasure coded pool, keep an eye on the min_size as it | ||
| + | defines how many OSDs need to be available. Otherwise, IO will be blocked. | ||
| + | For example, an EC pool with k = 2 and m = 1 will have size = 3, | ||
| + | min_size = 2 and will stay operational if one OSD fails. If the pool is | ||
| + | configured with k = 2, m = 2, it will have a size = 4 and min_size = 3 | ||
| + | and stay operational if one OSD is lost. | ||
| + | To create a new EC pool, run the following command: | ||
| + | pveceph pool create <pool-name> --erasure-coding k=2,m=1 | ||
| + | Optional parameters are failure-domain and device-class. If you | ||
| + | need to change any EC profile settings used by the pool, you will have to | ||
| + | create a new pool with a new profile. | ||
| + | This will create a new EC pool plus the needed replicated pool to store the RBD | ||
| + | omap and other metadata. In the end, there will be a <pool name>-data and | ||
| + | <pool name>-metada pool. The default behavior is to create a matching storage | ||
| + | configuration as well. If that behavior is not wanted, you can disable it by | ||
| + | providing the --add_storages 0 parameter. When configuring the storage | ||
| + | configuration manually, keep in mind that the data-pool parameter needs to be | ||
| + | set. Only then will the EC pool be used to store the data objects. For example: | ||
| + | The optional parameters --size, --min_size and --crush_rule will be | ||
| + | used for the replicated metadata pool, but not for the erasure coded data pool. | ||
| + | If you need to change the min_size on the data pool, you can do it later. | ||
| + | The size and crush_rule parameters cannot be changed on erasure coded | ||
| + | pools. | ||
| + | If there is a need to further customize the EC profile, you can do so by | ||
| + | creating it with the Ceph tools directly [Ceph Erasure Code Profile | ||
| + | https://docs.ceph.com/en/octopus/rados/operations/erasure-code/#erasure-code-profiles], and | ||
| + | specify the profile to use with the profile parameter. | ||
| + | For example: | ||
| + | pveceph pool create <pool-name> --erasure-coding profile=<profile-name> | ||
| + | Adding EC Pools as Storage | ||
| + | You can add an already existing EC pool as storage to Proxmox VE. It works the same | ||
| + | way as adding an RBD pool but requires the extra data-pool option. | ||
| + | pvesm add rbd <storage-name> --pool <replicated-pool> --data-pool <ec-pool> | ||
| + | Do not forget to add the keyring and monhost option for any external | ||
| + | Ceph clusters, not managed by the local Proxmox VE cluster. | ||
Destroy Pools | Destroy Pools | ||
| − | To destroy a pool via the GUI select a node in the tree view and go to the | + | To destroy a pool via the GUI, select a node in the tree view and go to the |
Ceph → Pools panel. Select the pool to destroy and click the Destroy | Ceph → Pools panel. Select the pool to destroy and click the Destroy | ||
| − | button. To confirm the destruction of the pool you need to enter the pool name. | + | button. To confirm the destruction of the pool, you need to enter the pool name. |
Run the following command to destroy a pool. Specify the -remove_storages to | Run the following command to destroy a pool. Specify the -remove_storages to | ||
also remove the associated storage. | also remove the associated storage. | ||
pveceph pool destroy <name> | pveceph pool destroy <name> | ||
| − | + | Pool deletion runs in the background and can take some time. | |
| − | You will notice | + | You will notice the data usage in the cluster decreasing throughout this |
| + | process. | ||
| + | PG Autoscaler | ||
| + | The PG autoscaler allows the cluster to consider the amount of (expected) data | ||
| + | stored in each pool and to choose the appropriate pg_num values automatically. | ||
| + | It is available since Ceph Nautilus. | ||
| + | You may need to activate the PG autoscaler module before adjustments can take | ||
| + | effect. | ||
| + | ceph mgr module enable pg_autoscaler | ||
| + | The autoscaler is configured on a per pool basis and has the following modes: | ||
| + | warn | ||
| + | A health warning is issued if the suggested pg_num value differs too | ||
| + | much from the current value. | ||
| + | on | ||
| + | The pg_num is adjusted automatically with no need for any manual | ||
| + | interaction. | ||
| + | off | ||
| + | No automatic pg_num adjustments are made, and no warning will be issued | ||
| + | if the PG count is not optimal. | ||
| + | The scaling factor can be adjusted to facilitate future data storage with the | ||
| + | target_size, target_size_ratio and the pg_num_min options. | ||
| + | By default, the autoscaler considers tuning the PG count of a pool if | ||
| + | it is off by a factor of 3. This will lead to a considerable shift in data | ||
| + | placement and might introduce a high load on the cluster. | ||
| + | You can find a more in-depth introduction to the PG autoscaler on Ceph’s Blog - | ||
| + | New in | ||
| + | Nautilus: PG merging and autotuning. | ||
Ceph CRUSH & device classes | Ceph CRUSH & device classes | ||
| − | The | + | The [CRUSH |
| − | + | https://ceph.com/wp-content/uploads/2016/08/weil-crush-sc06.pdf] (Controlled | |
| − | + | Replication Under Scalable Hashing) algorithm is at the | |
| − | CRUSH calculates where to store | + | foundation of Ceph. |
| − | advantage that no central | + | CRUSH calculates where to store and retrieve data from. This has the |
| + | advantage that no central indexing service is needed. CRUSH works using a map of | ||
OSDs, buckets (device locations) and rulesets (data replication) for pools. | OSDs, buckets (device locations) and rulesets (data replication) for pools. | ||
Further information can be found in the Ceph documentation, under the | Further information can be found in the Ceph documentation, under the | ||
| − | section CRUSH map [CRUSH map https://docs.ceph.com/ | + | section CRUSH map [CRUSH map https://docs.ceph.com/en/octopus/rados/operations/crush-map/]. |
This map can be altered to reflect different replication hierarchies. The object | This map can be altered to reflect different replication hierarchies. The object | ||
| − | replicas can be separated ( | + | replicas can be separated (e.g., failure domains), while maintaining the desired |
distribution. | distribution. | ||
| − | A common | + | A common configuration is to use different classes of disks for different Ceph |
| − | For this reason, Ceph introduced | + | pools. For this reason, Ceph introduced device classes with luminous, to |
accommodate the need for easy ruleset generation. | accommodate the need for easy ruleset generation. | ||
The device classes can be seen in the ceph osd tree output. These classes | The device classes can be seen in the ceph osd tree output. These classes | ||
| Line 313: | Line 458: | ||
-7 2.56848 host sumi3 | -7 2.56848 host sumi3 | ||
14 nvme 0.72769 osd.14 | 14 nvme 0.72769 osd.14 | ||
| − | To | + | To instruct a pool to only distribute objects on a specific device class, you |
| − | to create a ruleset | + | first need to create a ruleset for the device class: |
ceph osd crush rule create-replicated <rule-name> <root> <failure-domain> <class> | ceph osd crush rule create-replicated <rule-name> <root> <failure-domain> <class> | ||
<rule-name> | <rule-name> | ||
name of the rule, to connect with a pool (seen in GUI & CLI) | name of the rule, to connect with a pool (seen in GUI & CLI) | ||
<root> | <root> | ||
| − | which crush root it should belong to (default | + | which crush root it should belong to (default Ceph root "default") |
<failure-domain> | <failure-domain> | ||
at which failure-domain the objects should be distributed (usually host) | at which failure-domain the objects should be distributed (usually host) | ||
<class> | <class> | ||
| − | what type of OSD backing store to use ( | + | what type of OSD backing store to use (e.g., nvme, ssd, hdd) |
Once the rule is in the CRUSH map, you can tell a pool to use the ruleset. | Once the rule is in the CRUSH map, you can tell a pool to use the ruleset. | ||
ceph osd pool set <pool-name> crush_rule <rule-name> | ceph osd pool set <pool-name> crush_rule <rule-name> | ||
| − | If the pool already contains objects, | + | If the pool already contains objects, these must be moved accordingly. |
| − | accordingly. Depending on your setup this may introduce a big performance | + | Depending on your setup, this may introduce a big performance impact on your |
| − | on your cluster. As an alternative, you can create a new pool and move disks | + | cluster. As an alternative, you can create a new pool and move disks separately. |
| − | separately. | ||
Ceph Client | Ceph Client | ||
| − | + | Following the setup from the previous sections, you can configure Proxmox VE to use | |
| − | Container images. Simply use the GUI | + | such pools to store VM and Container images. Simply use the GUI to add a new |
| − | + | RBD storage (see section | |
| + | Ceph RADOS Block Devices (RBD)). | ||
You also need to copy the keyring to a predefined location for an external Ceph | You also need to copy the keyring to a predefined location for an external Ceph | ||
cluster. If Ceph is installed on the Proxmox nodes itself, then this will be | cluster. If Ceph is installed on the Proxmox nodes itself, then this will be | ||
done automatically. | done automatically. | ||
| − | The | + | The filename needs to be <storage_id> + `.keyring, where <storage_id> is |
| − | the expression after rbd: in /etc/pve/storage.cfg | + | the expression after rbd: in /etc/pve/storage.cfg. In the following example, |
| − | my-ceph-storage | + | my-ceph-storage is the <storage_id>: |
mkdir /etc/pve/priv/ceph | mkdir /etc/pve/priv/ceph | ||
cp /etc/ceph/ceph.client.admin.keyring /etc/pve/priv/ceph/my-ceph-storage.keyring | cp /etc/ceph/ceph.client.admin.keyring /etc/pve/priv/ceph/my-ceph-storage.keyring | ||
CephFS | CephFS | ||
| − | Ceph provides | + | Ceph also provides a filesystem, which runs on top of the same object storage as |
| − | RADOS block devices do. A Metadata Server (MDS) is used to map | + | RADOS block devices do. A Metadata Server (MDS) is used to map the |
| − | + | RADOS backed objects to files and directories, allowing Ceph to provide a | |
| − | POSIX-compliant replicated filesystem. This allows | + | POSIX-compliant, replicated filesystem. This allows you to easily configure a |
| − | highly available shared filesystem | + | clustered, highly available, shared filesystem. Ceph’s Metadata Servers |
| − | Metadata Servers guarantee that files | + | guarantee that files are evenly distributed over the entire Ceph cluster. As a |
| − | + | result, even cases of high load will not overwhelm a single host, which can be | |
| − | an issue with traditional shared filesystem approaches | + | an issue with traditional shared filesystem approaches, for example NFS. |
| − | example. | + | Proxmox VE supports both creating a hyper-converged CephFS and using an existing |
| − | Proxmox VE supports both | + | CephFS as storage to save backups, ISO files, and container |
| − | to save backups, ISO files | + | templates. |
| − | |||
Metadata Server (MDS) | Metadata Server (MDS) | ||
| − | CephFS needs at least one Metadata Server to be configured and running | + | CephFS needs at least one Metadata Server to be configured and running, in order |
| − | + | to function. You can create an MDS through the Proxmox VE web GUI’s Node | |
| − | CephFS panel or | + | -> CephFS panel or from the command line with: |
pveceph mds create | pveceph mds create | ||
| − | Multiple metadata servers can be created in a cluster | + | Multiple metadata servers can be created in a cluster, but with the default |
| − | settings only one can be active at | + | settings, only one can be active at a time. If an MDS or its node becomes |
unresponsive (or crashes), another standby MDS will get promoted to active. | unresponsive (or crashes), another standby MDS will get promoted to active. | ||
| − | + | You can speed up the handover between the active and standby MDS by using | |
| − | the hotstandby parameter option on | + | the hotstandby parameter option on creation, or if you have already created it |
you may set/add: | you may set/add: | ||
mds standby replay = true | mds standby replay = true | ||
| − | in the ceph.conf | + | in the respective MDS section of /etc/pve/ceph.conf. With this enabled, the |
| − | will | + | specified MDS will remain in a warm state, polling the active one, so that it |
| − | + | can take over faster in case of any issues. | |
| − | performance impact on your system and active MDS. | + | This active polling will have an additional performance impact on your |
| + | system and the active MDS. | ||
Multiple Active MDS | Multiple Active MDS | ||
| − | Since Luminous (12.2.x) you can | + | Since Luminous (12.2.x) you can have multiple active metadata servers |
| − | running, but this is normally only useful | + | running at once, but this is normally only useful if you have a high amount of |
| − | + | clients running in parallel. Otherwise the MDS is rarely the bottleneck in a | |
| − | refer to the | + | system. If you want to set this up, please refer to the Ceph documentation. |
| − | + | [Configuring multiple active MDS daemons | |
| + | https://docs.ceph.com/en/octopus/cephfs/multimds/] | ||
Create CephFS | Create CephFS | ||
| − | With Proxmox VE’s CephFS | + | With Proxmox VE’s integration of CephFS, you can easily create a CephFS using the |
| − | + | web interface, CLI or an external API interface. Some prerequisites are required | |
for this to work: | for this to work: | ||
Prerequisites for a successful CephFS setup: | Prerequisites for a successful CephFS setup: | ||
| − | Install Ceph packages | + | Install Ceph packages - if this was already done some |
| − | + | time ago, you may want to rerun it on an up-to-date system to | |
| − | + | ensure that all CephFS related packages get installed. | |
Setup Monitors | Setup Monitors | ||
Setup your OSDs | Setup your OSDs | ||
Setup at least one MDS | Setup at least one MDS | ||
| − | After this | + | After this is complete, you can simply create a CephFS through |
either the Web GUI’s Node -> CephFS panel or the command line tool pveceph, | either the Web GUI’s Node -> CephFS panel or the command line tool pveceph, | ||
| − | for example | + | for example: |
pveceph fs create --pg_num 128 --add-storage | pveceph fs create --pg_num 128 --add-storage | ||
| − | This creates a CephFS named | + | This creates a CephFS named cephfs, using a pool for its data named |
| − | + | cephfs_data with 128 placement groups and a pool for its metadata named | |
| − | + | cephfs_metadata with one quarter of the data pool’s placement groups (32). | |
Check the Proxmox VE managed Ceph pool chapter or visit the | Check the Proxmox VE managed Ceph pool chapter or visit the | ||
| − | Ceph documentation for more information regarding | + | Ceph documentation for more information regarding an appropriate placement group |
| − | number (pg_num) for your setup [ | + | number (pg_num) for your setup [placement_groups]. |
| − | + | Additionally, the --add-storage parameter will add the CephFS to the Proxmox VE | |
| − | Additionally, the | + | storage configuration after it has been created successfully. |
| − | storage configuration after it | ||
Destroy CephFS | Destroy CephFS | ||
| − | Destroying a CephFS will render all its data unusable | + | Destroying a CephFS will render all of its data unusable. This cannot be |
undone! | undone! | ||
| − | + | To completely and gracefully remove a CephFS, the following steps are | |
| − | + | necessary: | |
| − | + | Disconnect every non-Proxmox VE client (e.g. unmount the CephFS in guests). | |
| + | Disable all related CephFS Proxmox VE storage entries (to prevent it from being | ||
| + | automatically mounted). | ||
| + | Remove all used resources from guests (e.g. ISOs) that are on the CephFS you | ||
| + | want to destroy. | ||
| + | Unmount the CephFS storages on all cluster nodes manually with | ||
| + | umount /mnt/pve/<STORAGE-NAME> | ||
| + | Where <STORAGE-NAME> is the name of the CephFS storage in your Proxmox VE. | ||
| + | Now make sure that no metadata server (MDS) is running for that CephFS, | ||
| + | either by stopping or destroying them. This can be done through the web | ||
| + | interface or via the command line interface, for the latter you would issue | ||
| + | the following command: | ||
| + | pveceph stop --service mds.NAME | ||
| + | to stop them, or | ||
pveceph mds destroy NAME | pveceph mds destroy NAME | ||
| − | + | to destroy them. | |
| − | + | Note that standby servers will automatically be promoted to active when an | |
| − | + | active MDS is stopped or removed, so it is best to first stop all standby | |
| − | + | servers. | |
| − | + | Now you can destroy the CephFS with | |
| − | + | pveceph fs destroy NAME --remove-storages --remove-pools | |
| − | + | This will automatically destroy the underlying Ceph pools as well as remove | |
| + | the storages from pve config. | ||
| + | After these steps, the CephFS should be completely removed and if you have | ||
| + | other CephFS instances, the stopped metadata servers can be started again | ||
| + | to act as standbys. | ||
Ceph maintenance | Ceph maintenance | ||
Replace OSDs | Replace OSDs | ||
| − | One of the common maintenance tasks in Ceph is to replace | + | One of the most common maintenance tasks in Ceph is to replace the disk of an |
| − | a disk is already in a failed state, then you can go ahead and run through the | + | OSD. If a disk is already in a failed state, then you can go ahead and run |
| − | steps in Destroy OSDs. Ceph will recreate those | + | through the steps in Destroy OSDs. Ceph will recreate |
| − | copies on the remaining OSDs if possible. This rebalancing will start as soon | + | those copies on the remaining OSDs if possible. This rebalancing will start as |
| − | as an OSD failure is detected or an OSD was actively stopped. | + | soon as an OSD failure is detected or an OSD was actively stopped. |
With the default size/min_size (3/2) of a pool, recovery only starts when | With the default size/min_size (3/2) of a pool, recovery only starts when | ||
‘size + 1` nodes are available. The reason for this is that the Ceph object | ‘size + 1` nodes are available. The reason for this is that the Ceph object | ||
balancer CRUSH defaults to a full node as | balancer CRUSH defaults to a full node as | ||
`failure domain’. | `failure domain’. | ||
| − | To replace a | + | To replace a functioning disk from the GUI, go through the steps in |
Destroy OSDs. The only addition is to wait until | Destroy OSDs. The only addition is to wait until | ||
the cluster shows HEALTH_OK before stopping the OSD to destroy it. | the cluster shows HEALTH_OK before stopping the OSD to destroy it. | ||
| − | On the command line use the following commands | + | On the command line, use the following commands: |
ceph osd out osd.<id> | ceph osd out osd.<id> | ||
You can check with the command below if the OSD can be safely removed. | You can check with the command below if the OSD can be safely removed. | ||
ceph osd safe-to-destroy osd.<id> | ceph osd safe-to-destroy osd.<id> | ||
| − | Once the above check tells you that it is | + | Once the above check tells you that it is safe to remove the OSD, you can |
| − | continue with following commands | + | continue with the following commands: |
systemctl stop ceph-osd@<id>.service | systemctl stop ceph-osd@<id>.service | ||
pveceph osd destroy <id> | pveceph osd destroy <id> | ||
| Line 440: | Line 602: | ||
in Create OSDs. | in Create OSDs. | ||
Trim/Discard | Trim/Discard | ||
| − | It is | + | It is good practice to run fstrim (discard) regularly on VMs and containers. |
This releases data blocks that the filesystem isnât using anymore. It reduces | This releases data blocks that the filesystem isnât using anymore. It reduces | ||
data usage and resource load. Most modern operating systems issue such discard | data usage and resource load. Most modern operating systems issue such discard | ||
| Line 451: | Line 613: | ||
the objects and uses checksums to ensure data integrity. If a running scrub | the objects and uses checksums to ensure data integrity. If a running scrub | ||
interferes with business (performance) needs, you can adjust the time when | interferes with business (performance) needs, you can adjust the time when | ||
| − | scrubs [Ceph scrubbing https://docs.ceph.com/ | + | scrubs [Ceph scrubbing https://docs.ceph.com/en/octopus/rados/configuration/osd-config-ref/#scrubbing] |
are executed. | are executed. | ||
| − | Ceph | + | Ceph Monitoring and Troubleshooting |
| − | + | It is important to continuously monitor the health of a Ceph deployment from the | |
| − | + | beginning, either by using the Ceph tools or by accessing | |
the status through the Proxmox VE API. | the status through the Proxmox VE API. | ||
| − | The following | + | The following Ceph commands can be used to see if the cluster is healthy |
(HEALTH_OK), if there are warnings (HEALTH_WARN), or even errors | (HEALTH_OK), if there are warnings (HEALTH_WARN), or even errors | ||
| − | (HEALTH_ERR). If the cluster is in an unhealthy state the status commands | + | (HEALTH_ERR). If the cluster is in an unhealthy state, the status commands |
below will also give you an overview of the current events and actions to take. | below will also give you an overview of the current events and actions to take. | ||
# single time output | # single time output | ||
| Line 465: | Line 627: | ||
# continuously output status changes (press CTRL+C to stop) | # continuously output status changes (press CTRL+C to stop) | ||
pve# ceph -w | pve# ceph -w | ||
| − | To get a more detailed view, every | + | To get a more detailed view, every Ceph service has a log file under |
| − | /var/log/ceph/ | + | /var/log/ceph/. If more detail is required, the log level can be |
| − | adjusted [Ceph log and debugging https://docs.ceph.com/ | + | adjusted [Ceph log and debugging https://docs.ceph.com/en/octopus/rados/troubleshooting/log-and-debug/]. |
You can find more information about troubleshooting | You can find more information about troubleshooting | ||
| − | [Ceph troubleshooting https://docs.ceph.com/ | + | [Ceph troubleshooting https://docs.ceph.com/en/octopus/rados/troubleshooting/] |
a Ceph cluster on the official website. | a Ceph cluster on the official website. | ||
</pvehide> | </pvehide> | ||
<!--PVE_IMPORT_END_MARKER--> | <!--PVE_IMPORT_END_MARKER--> | ||
Revision as of 12:46, 22 November 2022
Introduction
Proxmox VE unifies your compute and storage systems, that is, you can use the same physical nodes within a cluster for both computing (processing VMs and containers) and replicated storage. The traditional silos of compute and storage resources can be wrapped up into a single hyper-converged appliance. Separate storage networks (SANs) and connections via network attached storage (NAS) disappear. With the integration of Ceph, an open source software-defined storage platform, Proxmox VE has the ability to run and manage Ceph storage directly on the hypervisor nodes.
Ceph is a distributed object store and file system designed to provide excellent performance, reliability and scalability.
-
Easy setup and management via CLI and GUI
-
Thin provisioning
-
Snapshot support
-
Self healing
-
Scalable to the exabyte level
-
Provides block, file system, and object storage
-
Setup pools with different performance and redundancy characteristics
-
Data is replicated, making it fault tolerant
-
Runs on commodity hardware
-
No need for hardware RAID controllers
-
Open source
For small to medium-sized deployments, it is possible to install a Ceph server for using RADOS Block Devices (RBD) or CephFS directly on your Proxmox VE cluster nodes (see Ceph RADOS Block Devices (RBD)). Recent hardware has a lot of CPU power and RAM, so running storage services and virtual guests on the same node is possible.
To simplify management, Proxmox VE provides you native integration to install and manage Ceph services on Proxmox VE nodes either via the built-in web interface, or using the pveceph command line tool.
Terminology
-
Ceph Monitor (ceph-mon, or MON)
-
Ceph Manager (ceph-mgr, or MGS)
-
Ceph Metadata Service (ceph-mds, or MDS)
-
Ceph Object Storage Daemon (ceph-osd, or OSD)

|
We highly recommend to get familiar with Ceph
[Ceph intro https://docs.ceph.com/en/quincy/start/intro/] , its architecture [Ceph architecture https://docs.ceph.com/en/quincy/architecture/] and vocabulary [Ceph glossary https://docs.ceph.com/en/quincy/glossary] . |
Recommendations for a Healthy Ceph Cluster
To build a hyper-converged Proxmox + Ceph Cluster, you must use at least three (preferably) identical servers for the setup.
Check also the recommendations from Ceph’s website.

|
The recommendations below should be seen as a rough guidance for choosing hardware. Therefore, it is still essential to adapt it to your specific needs. You should test your setup and monitor health and performance continuously. |
CPU
Ceph services can be classified into two categories: * Intensive CPU usage, benefiting from high CPU base frequencies and multiple cores. Members of that category are: Object Storage Daemon (OSD) services Meta Data Service (MDS) used for CephFS * Moderate CPU usage, not needing multiple CPU cores. These are: Monitor (MON) services Manager (MGR) services
As a simple rule of thumb, you should assign at least one CPU core (or thread) to each Ceph service to provide the minimum resources required for stable and durable Ceph performance.
For example, if you plan to run a Ceph monitor, a Ceph manager and 6 Ceph OSDs services on a node you should reserve 8 CPU cores purely for Ceph when targeting basic and stable performance.
Note that OSDs CPU usage depend mostly from the disks performance. The higher the possible IOPS (IO Operations per Second) of a disk, the more CPU can be utilized by a OSD service. For modern enterprise SSD disks, like NVMe’s that can permanently sustain a high IOPS load over 100’000 with sub millisecond latency, each OSD can use multiple CPU threads, e.g., four to six CPU threads utilized per NVMe backed OSD is likely for very high performance disks.
Memory
Especially in a hyper-converged setup, the memory consumption needs to be carefully planned out and monitored. In addition to the predicted memory usage of virtual machines and containers, you must also account for having enough memory available for Ceph to provide excellent and stable performance.
As a rule of thumb, for roughly 1 TiB of data, 1 GiB of memory will be used by an OSD. While the usage might be less under normal conditions, it will use most during critical operations like recovery, re-balancing or backfilling. That means that you should avoid maxing out your available memory already on normal operation, but rather leave some headroom to cope with outages.
The OSD service itself will use additional memory. The Ceph BlueStore backend of the daemon requires by default 3-5 GiB of memory (adjustable).
Network
We recommend a network bandwidth of at least 10 Gbps, or more, to be used
exclusively for Ceph traffic. A meshed network setup
[Full Mesh Network for Ceph https://pve.proxmox.com/wiki/Full_Mesh_Network_for_Ceph_Server]
is also an option for three to five node clusters, if there are no 10+ Gbps
switches available.

|
The volume of traffic, especially during recovery, will interfere with other services on the same network, especially the latency sensitive Proxmox VE corosync cluster stack can be affected, resulting in possible loss of cluster quorum. Moving the Ceph traffic to dedicated and physical separated networks will avoid such interference, not only for corosync, but also for the networking services provided by any virtual guests. |
For estimating your bandwidth needs, you need to take the performance of your disks into account.. While a single HDD might not saturate a 1 Gb link, multiple HDD OSDs per node can already saturate 10 Gbps too. If modern NVMe-attached SSDs are used, a single one can already saturate 10 Gbps of bandwidth, or more. For such high-performance setups we recommend at least a 25 Gpbs, while even 40 Gbps or 100+ Gbps might be required to utilize the full performance potential of the underlying disks.
If unsure, we recommend using three (physical) separate networks for high-performance setups: * one very high bandwidth (25+ Gbps) network for Ceph (internal) cluster traffic. * one high bandwidth (10+ Gpbs) network for Ceph (public) traffic between the ceph server and ceph client storage traffic. Depending on your needs this can also be used to host the virtual guest traffic and the VM live-migration traffic. * one medium bandwidth (1 Gbps) exclusive for the latency sensitive corosync cluster communication.
Disks
When planning the size of your Ceph cluster, it is important to take the recovery time into consideration. Especially with small clusters, recovery might take long. It is recommended that you use SSDs instead of HDDs in small setups to reduce recovery time, minimizing the likelihood of a subsequent failure event during recovery.
In general, SSDs will provide more IOPS than spinning disks. With this in mind, in addition to the higher cost, it may make sense to implement a class based separation of pools. Another way to speed up OSDs is to use a faster disk as a journal or DB/Write-Ahead-Log device, see creating Ceph OSDs. If a faster disk is used for multiple OSDs, a proper balance between OSD and WAL / DB (or journal) disk must be selected, otherwise the faster disk becomes the bottleneck for all linked OSDs.
Aside from the disk type, Ceph performs best with an evenly sized, and an evenly distributed amount of disks per node. For example, 4 x 500 GB disks within each node is better than a mixed setup with a single 1 TB and three 250 GB disk.
You also need to balance OSD count and single OSD capacity. More capacity allows you to increase storage density, but it also means that a single OSD failure forces Ceph to recover more data at once.
Avoid RAID
As Ceph handles data object redundancy and multiple parallel writes to disks (OSDs) on its own, using a RAID controller normally doesn’t improve performance or availability. On the contrary, Ceph is designed to handle whole disks on it’s own, without any abstraction in between. RAID controllers are not designed for the Ceph workload and may complicate things and sometimes even reduce performance, as their write and caching algorithms may interfere with the ones from Ceph.

|
Avoid RAID controllers. Use host bus adapter (HBA) instead. |
Initial Ceph Installation & Configuration
Using the Web-based Wizard
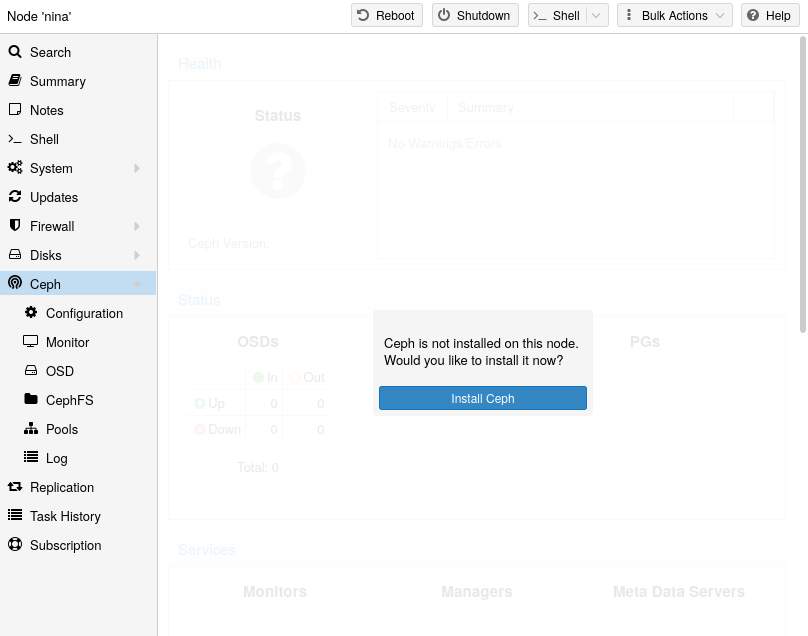
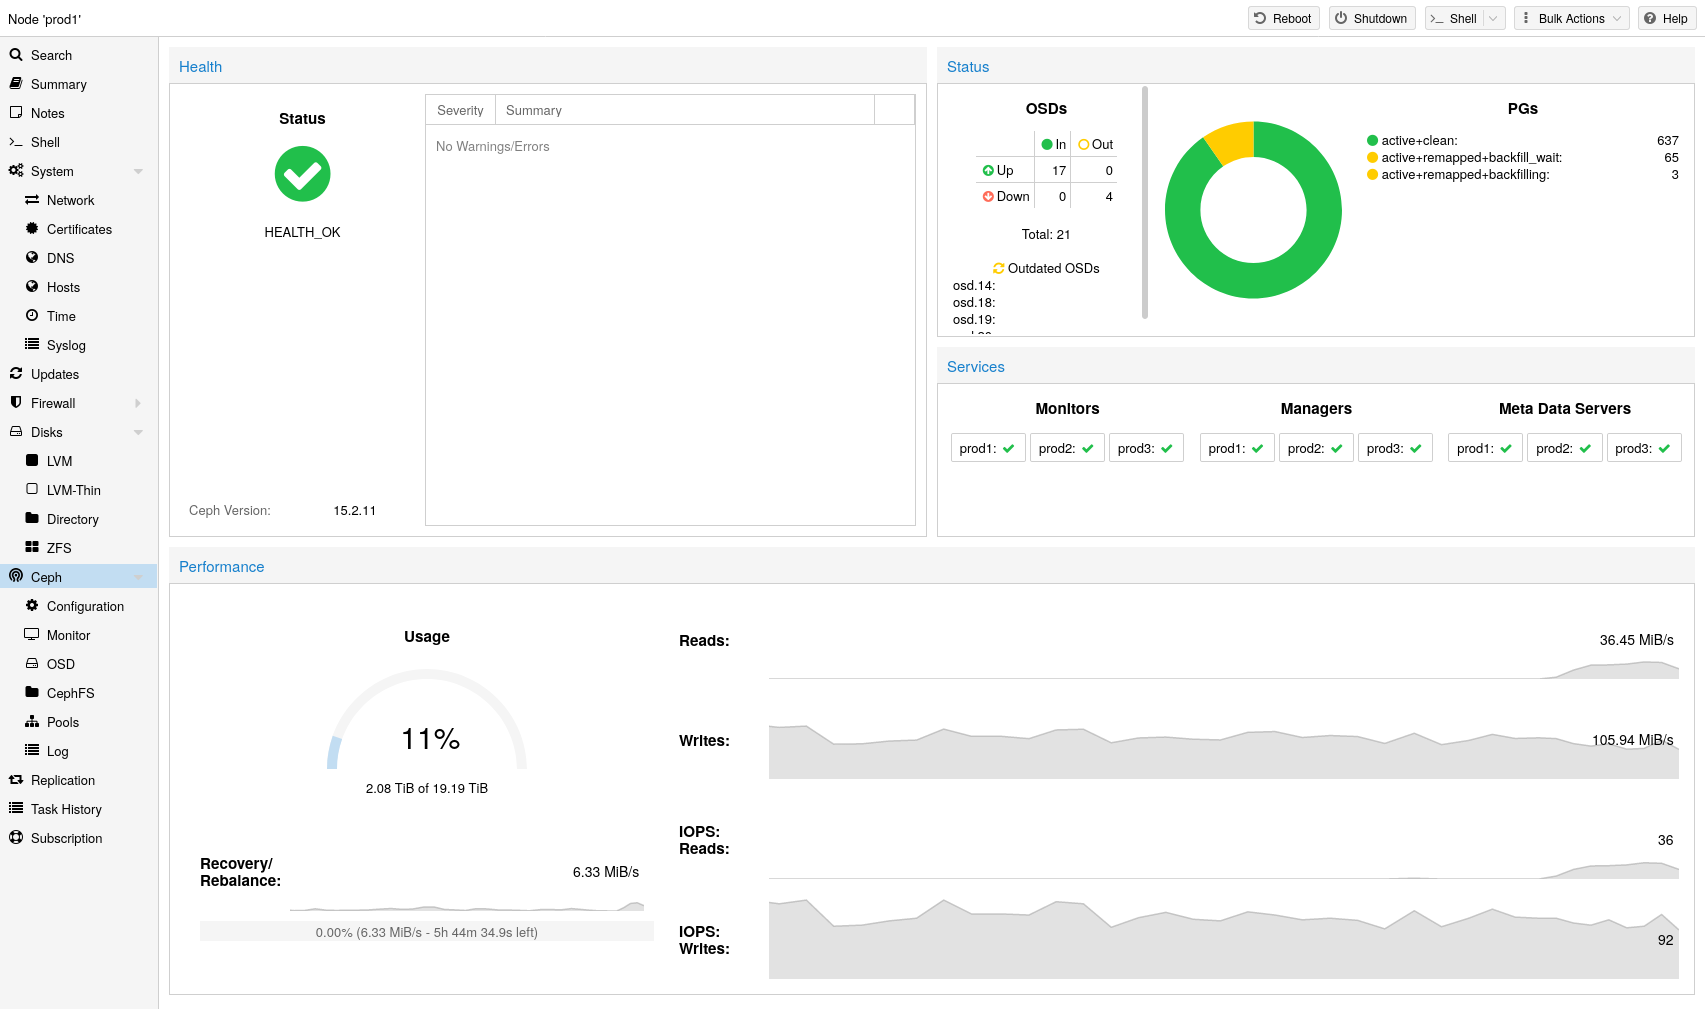
With Proxmox VE you have the benefit of an easy to use installation wizard for Ceph. Click on one of your cluster nodes and navigate to the Ceph section in the menu tree. If Ceph is not already installed, you will see a prompt offering to do so.
The wizard is divided into multiple sections, where each needs to finish successfully, in order to use Ceph.
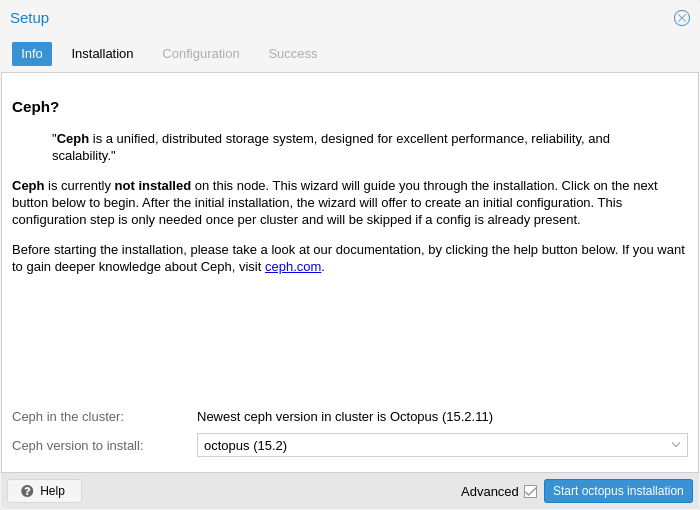
First you need to chose which Ceph version you want to install. Prefer the one from your other nodes, or the newest if this is the first node you install Ceph.
After starting the installation, the wizard will download and install all the required packages from Proxmox VE’s Ceph repository.
After finishing the installation step, you will need to create a configuration. This step is only needed once per cluster, as this configuration is distributed automatically to all remaining cluster members through Proxmox VE’s clustered configuration file system (pmxcfs).
The configuration step includes the following settings:
-
Public Network: This network will be used for public storage communication (e.g., for virtual machines using a Ceph RBD backed disk, or a CephFS mount), and communication between the different Ceph services. This setting is required.
Separating your Ceph traffic from the Proxmox VE cluster communication (corosync), and possible the front-facing (public) networks of your virtual guests, is highly recommended. Otherwise, Ceph’s high-bandwidth IO-traffic could cause interference with other low-latency dependent services. -
Cluster Network: Specify to separate the OSD replication and heartbeat traffic as well. This setting is optional.
Using a physically separated network is recommended, as it will relieve the Ceph public and the virtual guests network, while also providing a significant Ceph performance improvements.
The Ceph cluster network can be configured and moved to another physically separated network at a later time.
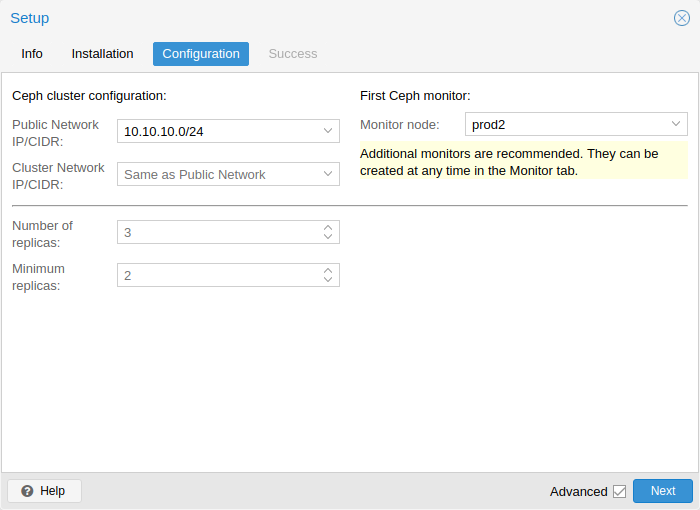
You have two more options which are considered advanced and therefore should only changed if you know what you are doing.
-
Number of replicas: Defines how often an object is replicated.
-
Minimum replicas: Defines the minimum number of required replicas for I/O to be marked as complete.
Additionally, you need to choose your first monitor node. This step is required.
That’s it. You should now see a success page as the last step, with further instructions on how to proceed. Your system is now ready to start using Ceph. To get started, you will need to create some additional monitors, OSDs and at least one pool.
The rest of this chapter will guide you through getting the most out of your Proxmox VE based Ceph setup. This includes the aforementioned tips and more, such as CephFS, which is a helpful addition to your new Ceph cluster.
CLI Installation of Ceph Packages
Alternatively to the the recommended Proxmox VE Ceph installation wizard available in the web interface, you can use the following CLI command on each node:
pveceph install
This sets up an apt package repository in /etc/apt/sources.list.d/ceph.list and installs the required software.
Initial Ceph configuration via CLI
Use the Proxmox VE Ceph installation wizard (recommended) or run the following command on one node:
pveceph init --network 10.10.10.0/24
This creates an initial configuration at /etc/pve/ceph.conf with a dedicated network for Ceph. This file is automatically distributed to all Proxmox VE nodes, using pmxcfs. The command also creates a symbolic link at /etc/ceph/ceph.conf, which points to that file. Thus, you can simply run Ceph commands without the need to specify a configuration file.
Ceph Monitor
The Ceph Monitor (MON)
[Ceph Monitor https://docs.ceph.com/en/quincy/start/intro/]
maintains a master copy of the cluster map. For high availability, you need at
least 3 monitors. One monitor will already be installed if you
used the installation wizard. You won’t need more than 3 monitors, as long
as your cluster is small to medium-sized. Only really large clusters will
require more than this.
Create Monitors
On each node where you want to place a monitor (three monitors are recommended), create one by using the Ceph → Monitor tab in the GUI or run:
pveceph mon create
Destroy Monitors
To remove a Ceph Monitor via the GUI, first select a node in the tree view and go to the Ceph → Monitor panel. Select the MON and click the Destroy button.
To remove a Ceph Monitor via the CLI, first connect to the node on which the MON is running. Then execute the following command:
pveceph mon destroy
|
|
At least three Monitors are needed for quorum. |
Ceph Manager
The Manager daemon runs alongside the monitors. It provides an interface to
monitor the cluster. Since the release of Ceph luminous, at least one ceph-mgr
[Ceph Manager https://docs.ceph.com/en/quincy/mgr/]
daemon is
required.
Create Manager
Multiple Managers can be installed, but only one Manager is active at any given time.
pveceph mgr create
|
|
It is recommended to install the Ceph Manager on the monitor nodes. For high availability install more then one manager. |
Destroy Manager
To remove a Ceph Manager via the GUI, first select a node in the tree view and go to the Ceph → Monitor panel. Select the Manager and click the Destroy button.
To remove a Ceph Monitor via the CLI, first connect to the node on which the Manager is running. Then execute the following command:
pveceph mgr destroy
|
|
While a manager is not a hard-dependency, it is crucial for a Ceph cluster, as it handles important features like PG-autoscaling, device health monitoring, telemetry and more. |
Ceph OSDs
Ceph Object Storage Daemons store objects for Ceph over the network. It is recommended to use one OSD per physical disk.
Create OSDs
You can create an OSD either via the Proxmox VE web interface or via the CLI using pveceph. For example:
pveceph osd create /dev/sd[X]
|
|
We recommend a Ceph cluster with at least three nodes and at least 12 OSDs, evenly distributed among the nodes. |
If the disk was in use before (for example, for ZFS or as an OSD) you first need to zap all traces of that usage. To remove the partition table, boot sector and any other OSD leftover, you can use the following command:
ceph-volume lvm zap /dev/sd[X] --destroy
|
|
The above command will destroy all data on the disk! |
Ceph Bluestore
Starting with the Ceph Kraken release, a new Ceph OSD storage type was
introduced called Bluestore
[Ceph Bluestore https://ceph.com/community/new-luminous-bluestore/]
.
This is the default when creating OSDs since Ceph Luminous.
pveceph osd create /dev/sd[X]
Block.db and block.wal
If you want to use a separate DB/WAL device for your OSDs, you can specify it through the -db_dev and -wal_dev options. The WAL is placed with the DB, if not specified separately.
pveceph osd create /dev/sd[X] -db_dev /dev/sd[Y] -wal_dev /dev/sd[Z]
You can directly choose the size of those with the -db_size and -wal_size parameters respectively. If they are not given, the following values (in order) will be used:
-
bluestore_block_{db,wal}_size from Ceph configuration…
-
… database, section osd
-
… database, section global
-
… file, section osd
-
… file, section global
-
-
10% (DB)/1% (WAL) of OSD size
|
|
The DB stores BlueStore’s internal metadata, and the WAL is BlueStore’s internal journal or write-ahead log. It is recommended to use a fast SSD or NVRAM for better performance. |
Ceph Filestore
Before Ceph Luminous, Filestore was used as the default storage type for Ceph OSDs. Starting with Ceph Nautilus, Proxmox VE does not support creating such OSDs with pveceph anymore. If you still want to create filestore OSDs, use ceph-volume directly.
ceph-volume lvm create --filestore --data /dev/sd[X] --journal /dev/sd[Y]
Destroy OSDs
To remove an OSD via the GUI, first select a Proxmox VE node in the tree view and go to the Ceph → OSD panel. Then select the OSD to destroy and click the OUT button. Once the OSD status has changed from in to out, click the STOP button. Finally, after the status has changed from up to down, select Destroy from the More drop-down menu.
To remove an OSD via the CLI run the following commands.
ceph osd out <ID>
systemctl stop ceph-osd@<ID>.service
|
|
The first command instructs Ceph not to include the OSD in the data distribution. The second command stops the OSD service. Until this time, no data is lost. |
The following command destroys the OSD. Specify the -cleanup option to additionally destroy the partition table.
pveceph osd destroy <ID>
|
|
The above command will destroy all data on the disk! |
Ceph Pools
A pool is a logical group for storing objects. It holds a collection of objects, known as Placement Groups (PG, pg_num).
Create and Edit Pools
You can create and edit pools from the command line or the web interface of any Proxmox VE host under Ceph → Pools.
When no options are given, we set a default of 128 PGs, a size of 3 replicas and a min_size of 2 replicas, to ensure no data loss occurs if any OSD fails.
|
|
Do not set a min_size of 1. A replicated pool with min_size of 1 allows I/O on an object when it has only 1 replica, which could lead to data loss, incomplete PGs or unfound objects. |
It is advised that you either enable the PG-Autoscaler or calculate the PG
number based on your setup. You can find the formula and the PG calculator
[PG calculator https://web.archive.org/web/20210301111112/http://ceph.com/pgcalc/]
online. From Ceph Nautilus
onward, you can change the number of PGs
[Placement Groups https://docs.ceph.com/en/quincy/rados/operations/placement-groups/]
after the setup.
The PG autoscaler
[Automated Scaling https://docs.ceph.com/en/quincy/rados/operations/placement-groups/#automated-scaling]
can
automatically scale the PG count for a pool in the background. Setting the
Target Size or Target Ratio advanced parameters helps the PG-Autoscaler to
make better decisions.
pveceph pool create <pool-name> --add_storages
|
|
If you would also like to automatically define a storage for your pool, keep the ‘Add as Storage’ checkbox checked in the web interface, or use the command-line option --add_storages at pool creation. |
Pool Options
The following options are available on pool creation, and partially also when editing a pool.
- Name
-
The name of the pool. This must be unique and can’t be changed afterwards.
- Size
-
The number of replicas per object. Ceph always tries to have this many copies of an object. Default: 3.
- PG Autoscale Mode
-
The automatic PG scaling mode
[autoscaler]
of the pool. If set to warn, it produces a warning message when a pool has a non-optimal PG count. Default: warn. - Add as Storage
-
Configure a VM or container storage using the new pool. Default: true (only visible on creation).
- Min. Size
-
The minimum number of replicas per object. Ceph will reject I/O on the pool if a PG has less than this many replicas. Default: 2.
- Crush Rule
-
The rule to use for mapping object placement in the cluster. These rules define how data is placed within the cluster. See Ceph CRUSH & device classes for information on device-based rules.
- # of PGs
-
The number of placement groups
[placement_groups]
that the pool should have at the beginning. Default: 128. - Target Ratio
-
The ratio of data that is expected in the pool. The PG autoscaler uses the ratio relative to other ratio sets. It takes precedence over the target size if both are set.
- Target Size
-
The estimated amount of data expected in the pool. The PG autoscaler uses this size to estimate the optimal PG count.
- Min. # of PGs
-
The minimum number of placement groups. This setting is used to fine-tune the lower bound of the PG count for that pool. The PG autoscaler will not merge PGs below this threshold.
Further information on Ceph pool handling can be found in the Ceph pool
operation
[Ceph pool operation
https://docs.ceph.com/en/quincy/rados/operations/pools/]
manual.
Erasure Coded Pools
Erasure coding (EC) is a form of ‘forward error correction’ codes that allows to recover from a certain amount of data loss. Erasure coded pools can offer more usable space compared to replicated pools, but they do that for the price of performance.
For comparison: in classic, replicated pools, multiple replicas of the data are stored (size) while in erasure coded pool, data is split into k data chunks with additional m coding (checking) chunks. Those coding chunks can be used to recreate data should data chunks be missing.
The number of coding chunks, m, defines how many OSDs can be lost without losing any data. The total amount of objects stored is k + m.
Creating EC Pools
Erasure coded (EC) pools can be created with the pveceph CLI tooling. Planning an EC pool needs to account for the fact, that they work differently than replicated pools.
The default min_size of an EC pool depends on the m parameter. If m = 1,
the min_size of the EC pool will be k. The min_size will be k + 1 if
m > 1. The Ceph documentation recommends a conservative min_size of k + 2
[Ceph Erasure Coded Pool Recovery
https://docs.ceph.com/en/quincy/rados/operations/erasure-code/#erasure-coded-pool-recovery]
.
If there are less than min_size OSDs available, any IO to the pool will be blocked until there are enough OSDs available again.
|
|
When planning an erasure coded pool, keep an eye on the min_size as it defines how many OSDs need to be available. Otherwise, IO will be blocked. |
For example, an EC pool with k = 2 and m = 1 will have size = 3, min_size = 2 and will stay operational if one OSD fails. If the pool is configured with k = 2, m = 2, it will have a size = 4 and min_size = 3 and stay operational if one OSD is lost.
To create a new EC pool, run the following command:
pveceph pool create <pool-name> --erasure-coding k=2,m=1
Optional parameters are failure-domain and device-class. If you need to change any EC profile settings used by the pool, you will have to create a new pool with a new profile.
This will create a new EC pool plus the needed replicated pool to store the RBD omap and other metadata. In the end, there will be a <pool name>-data and <pool name>-metada pool. The default behavior is to create a matching storage configuration as well. If that behavior is not wanted, you can disable it by providing the --add_storages 0 parameter. When configuring the storage configuration manually, keep in mind that the data-pool parameter needs to be set. Only then will the EC pool be used to store the data objects. For example:
|
|
The optional parameters --size, --min_size and --crush_rule will be used for the replicated metadata pool, but not for the erasure coded data pool. If you need to change the min_size on the data pool, you can do it later. The size and crush_rule parameters cannot be changed on erasure coded pools. |
If there is a need to further customize the EC profile, you can do so by
creating it with the Ceph tools directly
[Ceph Erasure Code Profile
https://docs.ceph.com/en/quincy/rados/operations/erasure-code/#erasure-code-profiles]
, and
specify the profile to use with the profile parameter.
For example:
pveceph pool create <pool-name> --erasure-coding profile=<profile-name>
Adding EC Pools as Storage
You can add an already existing EC pool as storage to Proxmox VE. It works the same way as adding an RBD pool but requires the extra data-pool option.
pvesm add rbd <storage-name> --pool <replicated-pool> --data-pool <ec-pool>
|
|
Do not forget to add the keyring and monhost option for any external Ceph clusters, not managed by the local Proxmox VE cluster. |
Destroy Pools
To destroy a pool via the GUI, select a node in the tree view and go to the Ceph → Pools panel. Select the pool to destroy and click the Destroy button. To confirm the destruction of the pool, you need to enter the pool name.
Run the following command to destroy a pool. Specify the -remove_storages to also remove the associated storage.
pveceph pool destroy <name>
|
|
Pool deletion runs in the background and can take some time. You will notice the data usage in the cluster decreasing throughout this process. |
PG Autoscaler
The PG autoscaler allows the cluster to consider the amount of (expected) data stored in each pool and to choose the appropriate pg_num values automatically. It is available since Ceph Nautilus.
You may need to activate the PG autoscaler module before adjustments can take effect.
ceph mgr module enable pg_autoscalerThe autoscaler is configured on a per pool basis and has the following modes:
|
warn
|
A health warning is issued if the suggested pg_num value differs too much from the current value. |
|
on
|
The pg_num is adjusted automatically with no need for any manual interaction. |
|
off
|
No automatic pg_num adjustments are made, and no warning will be issued if the PG count is not optimal. |
The scaling factor can be adjusted to facilitate future data storage with the target_size, target_size_ratio and the pg_num_min options.
|
|
By default, the autoscaler considers tuning the PG count of a pool if it is off by a factor of 3. This will lead to a considerable shift in data placement and might introduce a high load on the cluster. |
You can find a more in-depth introduction to the PG autoscaler on Ceph’s Blog - New in Nautilus: PG merging and autotuning.
Ceph CRUSH & device classes
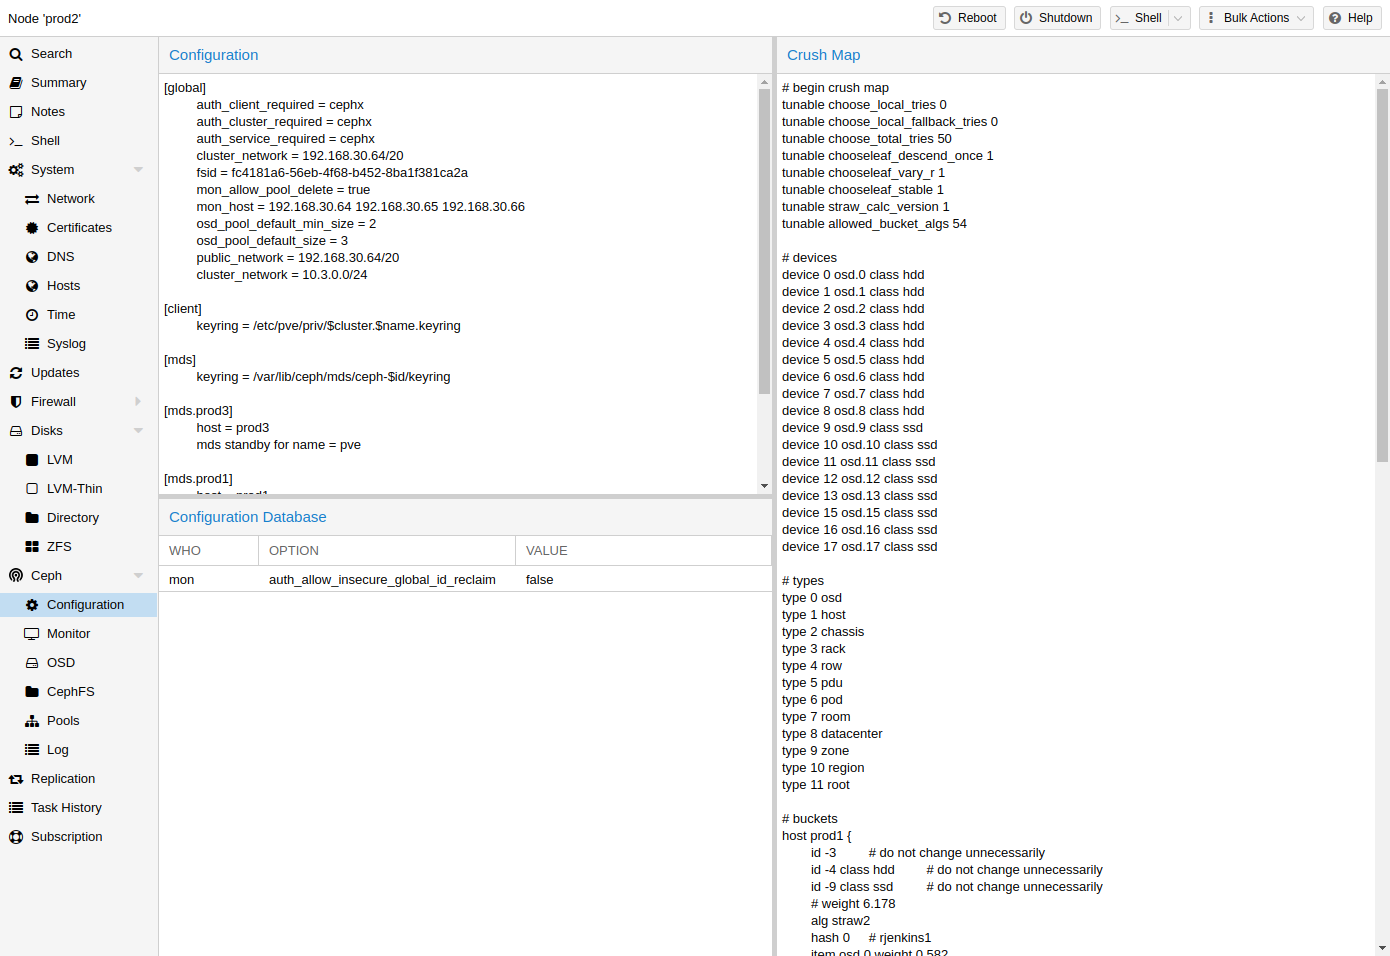
The
[CRUSH
https://ceph.com/wp-content/uploads/2016/08/weil-crush-sc06.pdf]
(Controlled
Replication Under Scalable Hashing) algorithm is at the
foundation of Ceph.
CRUSH calculates where to store and retrieve data from. This has the advantage that no central indexing service is needed. CRUSH works using a map of OSDs, buckets (device locations) and rulesets (data replication) for pools.
|
|
Further information can be found in the Ceph documentation, under the
section CRUSH map [CRUSH map https://docs.ceph.com/en/quincy/rados/operations/crush-map/] . |
This map can be altered to reflect different replication hierarchies. The object replicas can be separated (e.g., failure domains), while maintaining the desired distribution.
A common configuration is to use different classes of disks for different Ceph pools. For this reason, Ceph introduced device classes with luminous, to accommodate the need for easy ruleset generation.
The device classes can be seen in the ceph osd tree output. These classes represent their own root bucket, which can be seen with the below command.
ceph osd crush tree --show-shadow
Example output form the above command:
ID  CLASS WEIGHT  TYPE NAME
-16  nvme 2.18307 root default~nvme
-13  nvme 0.72769     host sumi1~nvme
 12  nvme 0.72769         osd.12
-14  nvme 0.72769     host sumi2~nvme
 13  nvme 0.72769         osd.13
-15  nvme 0.72769     host sumi3~nvme
 14  nvme 0.72769         osd.14
 -1       7.70544 root default
 -3       2.56848     host sumi1
 12  nvme 0.72769         osd.12
 -5       2.56848     host sumi2
 13  nvme 0.72769         osd.13
 -7       2.56848     host sumi3
 14  nvme 0.72769         osd.14
To instruct a pool to only distribute objects on a specific device class, you first need to create a ruleset for the device class:
ceph osd crush rule create-replicated <rule-name> <root> <failure-domain> <class>
<rule-name> |
name of the rule, to connect with a pool (seen in GUI & CLI) |
<root> |
which crush root it should belong to (default Ceph root "default") |
<failure-domain> |
at which failure-domain the objects should be distributed (usually host) |
<class> |
what type of OSD backing store to use (e.g., nvme, ssd, hdd) |
Once the rule is in the CRUSH map, you can tell a pool to use the ruleset.
ceph osd pool set <pool-name> crush_rule <rule-name>
|
|
If the pool already contains objects, these must be moved accordingly. Depending on your setup, this may introduce a big performance impact on your cluster. As an alternative, you can create a new pool and move disks separately. |
Ceph Client
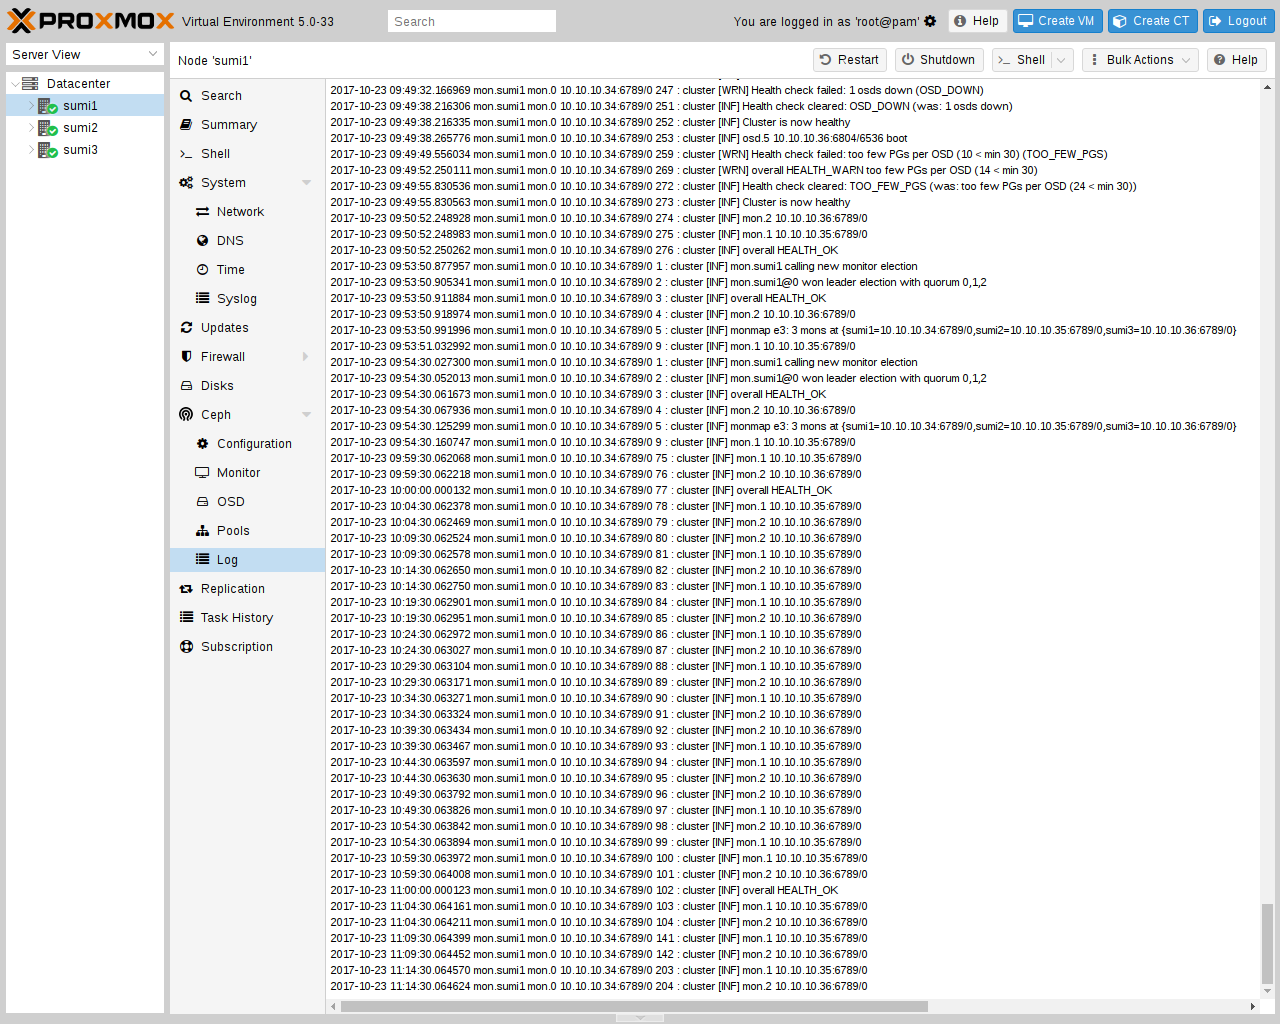
Following the setup from the previous sections, you can configure Proxmox VE to use such pools to store VM and Container images. Simply use the GUI to add a new RBD storage (see section Ceph RADOS Block Devices (RBD)).
You also need to copy the keyring to a predefined location for an external Ceph cluster. If Ceph is installed on the Proxmox nodes itself, then this will be done automatically.
|
|
The filename needs to be <storage_id> + `.keyring, where <storage_id> is the expression after rbd: in /etc/pve/storage.cfg. In the following example, my-ceph-storage is the <storage_id>: |
mkdir /etc/pve/priv/ceph
cp /etc/ceph/ceph.client.admin.keyring /etc/pve/priv/ceph/my-ceph-storage.keyring
CephFS
Ceph also provides a filesystem, which runs on top of the same object storage as RADOS block devices do. A Metadata Server (MDS) is used to map the RADOS backed objects to files and directories, allowing Ceph to provide a POSIX-compliant, replicated filesystem. This allows you to easily configure a clustered, highly available, shared filesystem. Ceph’s Metadata Servers guarantee that files are evenly distributed over the entire Ceph cluster. As a result, even cases of high load will not overwhelm a single host, which can be an issue with traditional shared filesystem approaches, for example NFS.
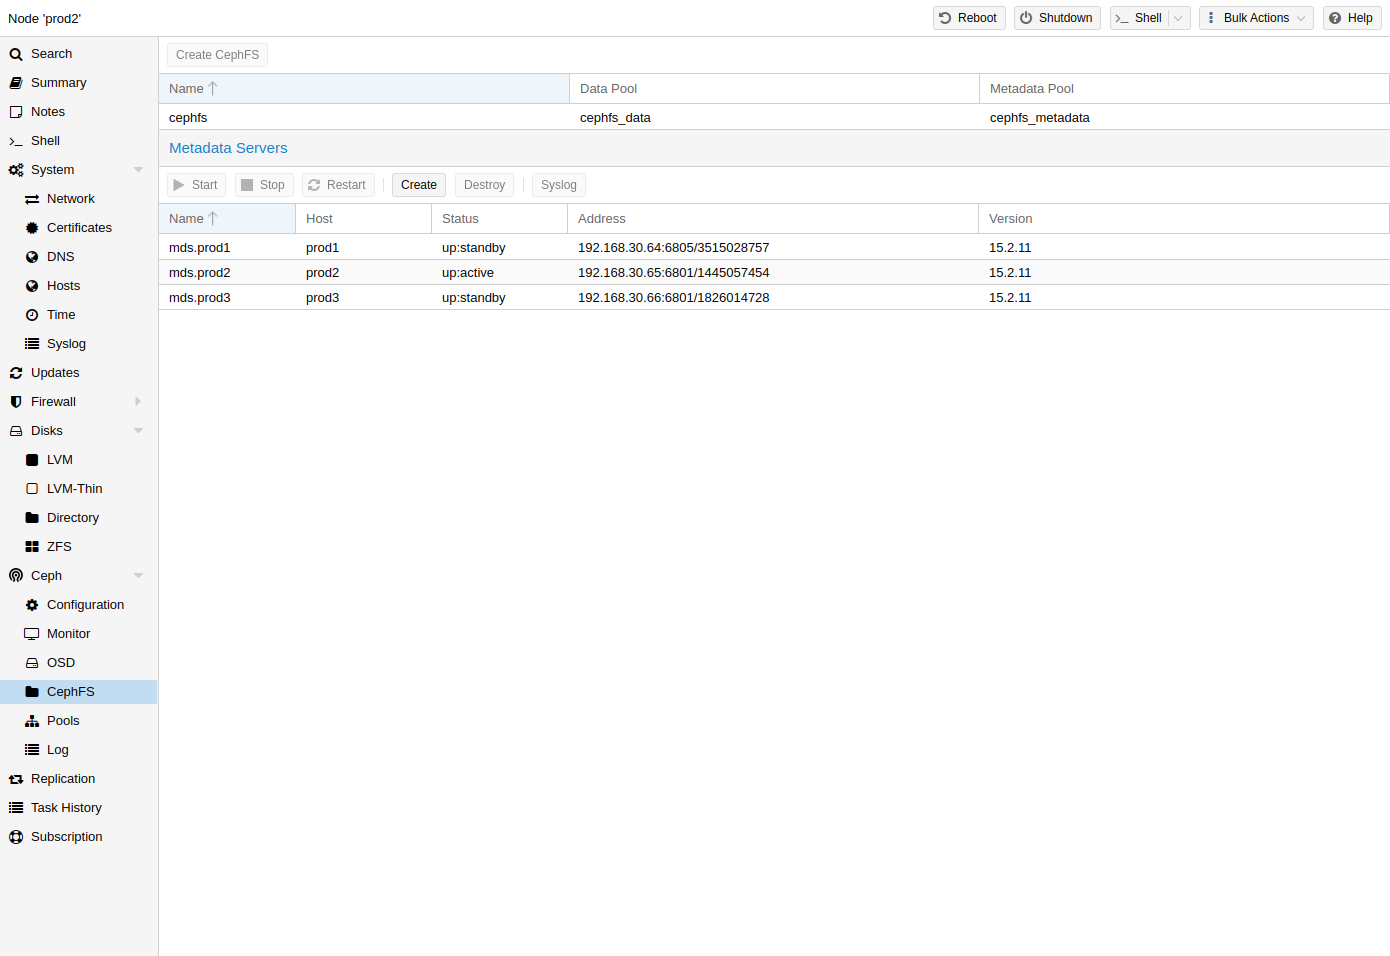
Proxmox VE supports both creating a hyper-converged CephFS and using an existing CephFS as storage to save backups, ISO files, and container templates.
Metadata Server (MDS)
CephFS needs at least one Metadata Server to be configured and running, in order to function. You can create an MDS through the Proxmox VE web GUI’s Node -> CephFS panel or from the command line with:
pveceph mds create
Multiple metadata servers can be created in a cluster, but with the default settings, only one can be active at a time. If an MDS or its node becomes unresponsive (or crashes), another standby MDS will get promoted to active. You can speed up the handover between the active and standby MDS by using the hotstandby parameter option on creation, or if you have already created it you may set/add:
mds standby replay = true
in the respective MDS section of /etc/pve/ceph.conf. With this enabled, the specified MDS will remain in a warm state, polling the active one, so that it can take over faster in case of any issues.
|
|
This active polling will have an additional performance impact on your system and the active MDS. |
Multiple Active MDS
Since Luminous (12.2.x) you can have multiple active metadata servers
running at once, but this is normally only useful if you have a high amount of
clients running in parallel. Otherwise the MDS is rarely the bottleneck in a
system. If you want to set this up, please refer to the Ceph documentation.
[Configuring multiple active MDS daemons
https://docs.ceph.com/en/quincy/cephfs/multimds/]
Create CephFS
With Proxmox VE’s integration of CephFS, you can easily create a CephFS using the web interface, CLI or an external API interface. Some prerequisites are required for this to work:
-
Install Ceph packages - if this was already done some time ago, you may want to rerun it on an up-to-date system to ensure that all CephFS related packages get installed.
After this is complete, you can simply create a CephFS through either the Web GUI’s Node -> CephFS panel or the command-line tool pveceph, for example:
pveceph fs create --pg_num 128 --add-storage
This creates a CephFS named cephfs, using a pool for its data named
cephfs_data with 128 placement groups and a pool for its metadata named
cephfs_metadata with one quarter of the data pool’s placement groups (32).
Check the Proxmox VE managed Ceph pool chapter or visit the
Ceph documentation for more information regarding an appropriate placement group
number (pg_num) for your setup
[placement_groups]
.
Additionally, the --add-storage parameter will add the CephFS to the Proxmox VE
storage configuration after it has been created successfully.
Destroy CephFS
|
|
Destroying a CephFS will render all of its data unusable. This cannot be undone! |
To completely and gracefully remove a CephFS, the following steps are necessary:
-
Disconnect every non-Proxmox VE client (e.g. unmount the CephFS in guests).
-
Disable all related CephFS Proxmox VE storage entries (to prevent it from being automatically mounted).
-
Remove all used resources from guests (e.g. ISOs) that are on the CephFS you want to destroy.
-
Unmount the CephFS storages on all cluster nodes manually with
umount /mnt/pve/<STORAGE-NAME>
Where <STORAGE-NAME> is the name of the CephFS storage in your Proxmox VE.
-
Now make sure that no metadata server (MDS) is running for that CephFS, either by stopping or destroying them. This can be done through the web interface or via the command-line interface, for the latter you would issue the following command:
pveceph stop --service mds.NAME
to stop them, or
pveceph mds destroy NAME
to destroy them.
Note that standby servers will automatically be promoted to active when an active MDS is stopped or removed, so it is best to first stop all standby servers.
-
Now you can destroy the CephFS with
pveceph fs destroy NAME --remove-storages --remove-pools
This will automatically destroy the underlying Ceph pools as well as remove the storages from pve config.
After these steps, the CephFS should be completely removed and if you have other CephFS instances, the stopped metadata servers can be started again to act as standbys.
Ceph maintenance
Replace OSDs
One of the most common maintenance tasks in Ceph is to replace the disk of an OSD. If a disk is already in a failed state, then you can go ahead and run through the steps in Destroy OSDs. Ceph will recreate those copies on the remaining OSDs if possible. This rebalancing will start as soon as an OSD failure is detected or an OSD was actively stopped.
|
|
With the default size/min_size (3/2) of a pool, recovery only starts when ‘size + 1` nodes are available. The reason for this is that the Ceph object balancer CRUSH defaults to a full node as `failure domain’. |
To replace a functioning disk from the GUI, go through the steps in Destroy OSDs. The only addition is to wait until the cluster shows HEALTH_OK before stopping the OSD to destroy it.
On the command line, use the following commands:
ceph osd out osd.<id>
You can check with the command below if the OSD can be safely removed.
ceph osd safe-to-destroy osd.<id>
Once the above check tells you that it is safe to remove the OSD, you can continue with the following commands:
systemctl stop ceph-osd@<id>.service
pveceph osd destroy <id>
Replace the old disk with the new one and use the same procedure as described in Create OSDs.
Trim/Discard
It is good practice to run fstrim (discard) regularly on VMs and containers. This releases data blocks that the filesystem isn’t using anymore. It reduces data usage and resource load. Most modern operating systems issue such discard commands to their disks regularly. You only need to ensure that the Virtual Machines enable the disk discard option.
Scrub & Deep Scrub
Ceph ensures data integrity by scrubbing placement groups. Ceph checks every
object in a PG for its health. There are two forms of Scrubbing, daily
cheap metadata checks and weekly deep data checks. The weekly deep scrub reads
the objects and uses checksums to ensure data integrity. If a running scrub
interferes with business (performance) needs, you can adjust the time when
scrubs
[Ceph scrubbing https://docs.ceph.com/en/quincy/rados/configuration/osd-config-ref/#scrubbing]
are executed.
Ceph Monitoring and Troubleshooting
It is important to continuously monitor the health of a Ceph deployment from the beginning, either by using the Ceph tools or by accessing the status through the Proxmox VE API.
The following Ceph commands can be used to see if the cluster is healthy (HEALTH_OK), if there are warnings (HEALTH_WARN), or even errors (HEALTH_ERR). If the cluster is in an unhealthy state, the status commands below will also give you an overview of the current events and actions to take.
# single time output
pve# ceph -s
# continuously output status changes (press CTRL+C to stop)
pve# ceph -w
To get a more detailed view, every Ceph service has a log file under
/var/log/ceph/. If more detail is required, the log level can be
adjusted
[Ceph log and debugging https://docs.ceph.com/en/quincy/rados/troubleshooting/log-and-debug/]
.
You can find more information about troubleshooting
[Ceph troubleshooting https://docs.ceph.com/en/quincy/rados/troubleshooting/]
a Ceph cluster on the official website.