Difference between revisions of "Storage Replication"
| (2 intermediate revisions by the same user not shown) | |||
| Line 10: | Line 10: | ||
without using shared storage. Replication uses snapshots to minimize traffic | without using shared storage. Replication uses snapshots to minimize traffic | ||
sent over the network. Therefore, new data is sent only incrementally after | sent over the network. Therefore, new data is sent only incrementally after | ||
| − | + | the initial full sync. In the case of a node failure, your guest data is | |
still available on the replicated node. | still available on the replicated node. | ||
| − | The replication | + | The replication is done automatically in configurable intervals. |
| − | The minimum replication interval is one minute and the maximal interval | + | The minimum replication interval is one minute, and the maximal interval |
once a week. The format used to specify those intervals is a subset of | once a week. The format used to specify those intervals is a subset of | ||
systemd calendar events, see | systemd calendar events, see | ||
Schedule Format section: | Schedule Format section: | ||
| − | + | It is possible to replicate a guest to multiple target nodes, | |
| − | + | but not twice to the same target node. | |
Each replications bandwidth can be limited, to avoid overloading a storage | Each replications bandwidth can be limited, to avoid overloading a storage | ||
or server. | or server. | ||
| − | + | Only changes since the last replication (so-called deltas) need to be | |
| − | + | transferred if the guest is migrated to a node to which it already is | |
| − | + | replicated. This reduces the time needed significantly. The replication | |
| − | + | direction automatically switches if you migrate a guest to the replication | |
| − | time significantly. | + | target node. |
| − | |||
For example: VM100 is currently on nodeA and gets replicated to nodeB. | For example: VM100 is currently on nodeA and gets replicated to nodeB. | ||
You migrate it to nodeB, so now it gets automatically replicated back from | You migrate it to nodeB, so now it gets automatically replicated back from | ||
nodeB to nodeA. | nodeB to nodeA. | ||
If you migrate to a node where the guest is not replicated, the whole disk | If you migrate to a node where the guest is not replicated, the whole disk | ||
| − | data must send over. After the migration the replication job continues to | + | data must send over. After the migration, the replication job continues to |
replicate this guest to the configured nodes. | replicate this guest to the configured nodes. | ||
| − | High-Availability is allowed in combination with storage replication, but | + | High-Availability is allowed in combination with storage replication, but there |
| − | + | may be some data loss between the last synced time and the time a node failed. | |
| − | |||
| − | |||
| − | |||
| − | |||
| − | |||
Supported Storage Types | Supported Storage Types | ||
Table 1. Storage Types | Table 1. Storage Types | ||
| Line 51: | Line 45: | ||
yes | yes | ||
Schedule Format | Schedule Format | ||
| − | + | Replication uses calendar events for | |
| − | + | configuring the schedule. | |
| − | |||
| − | |||
| − | |||
| − | |||
| − | |||
| − | |||
| − | |||
| − | |||
| − | |||
| − | |||
| − | |||
| − | |||
| − | |||
| − | |||
| − | |||
| − | |||
| − | |||
| − | |||
| − | |||
| − | |||
| − | |||
| − | |||
| − | |||
| − | |||
| − | |||
| − | |||
| − | |||
| − | |||
| − | |||
| − | |||
| − | |||
| − | |||
| − | |||
| − | |||
| − | |||
| − | |||
| − | |||
| − | |||
| − | |||
| − | |||
| − | |||
| − | |||
| − | |||
| − | |||
| − | |||
| − | |||
| − | |||
| − | |||
| − | |||
| − | |||
| − | |||
| − | |||
| − | |||
| − | |||
| − | |||
| − | |||
| − | |||
| − | |||
| − | |||
| − | |||
| − | |||
| − | |||
| − | |||
| − | |||
| − | |||
| − | |||
| − | |||
| − | |||
| − | |||
| − | |||
| − | |||
Error Handling | Error Handling | ||
| − | If a replication job encounters problems it | + | If a replication job encounters problems, it is placed in an error state. |
| − | In this state the configured replication intervals get suspended | + | In this state, the configured replication intervals get suspended |
| − | temporarily. | + | temporarily. The failed replication is repeatedly tried again in a |
| − | + | 30 minute interval. | |
| + | Once this succeeds, the original schedule gets activated again. | ||
Possible issues | Possible issues | ||
| − | + | Some of the most common issues are in the following list. Depending on your | |
| − | setup there may be | + | setup there may be another cause. |
Network is not working. | Network is not working. | ||
No free space left on the replication target storage. | No free space left on the replication target storage. | ||
| − | Storage with same storage ID available on target node | + | Storage with same storage ID available on the target node |
| − | You can always use the replication log to | + | You can always use the replication log to find out what is causing the problem. |
| − | |||
Migrating a guest in case of Error | Migrating a guest in case of Error | ||
| − | In the case of a grave error a virtual guest may get stuck on a failed | + | In the case of a grave error, a virtual guest may get stuck on a failed |
node. You then need to move it manually to a working node again. | node. You then need to move it manually to a working node again. | ||
Example | Example | ||
| − | + | Let’s assume that you have two guests (VM 100 and CT 200) running on node A | |
and replicate to node B. | and replicate to node B. | ||
Node A failed and can not get back online. Now you have to migrate the guest | Node A failed and can not get back online. Now you have to migrate the guest | ||
| Line 148: | Line 71: | ||
check if that the cluster is quorate | check if that the cluster is quorate | ||
# pvecm status | # pvecm status | ||
| − | If you have no quorum we strongly advise to fix this first and make the | + | If you have no quorum, we strongly advise to fix this first and make the |
| − | node operable again. Only if this is not possible at the moment you may | + | node operable again. Only if this is not possible at the moment, you may |
use the following command to enforce quorum on the current node: | use the following command to enforce quorum on the current node: | ||
# pvecm expected 1 | # pvecm expected 1 | ||
| − | + | Avoid changes which affect the cluster if expected votes are set | |
| − | (for example adding/removing nodes, storages, virtual guests) | + | (for example adding/removing nodes, storages, virtual guests) at all costs. |
Only use it to get vital guests up and running again or to resolve the quorum | Only use it to get vital guests up and running again or to resolve the quorum | ||
issue itself. | issue itself. | ||
| Line 164: | Line 87: | ||
Remember to replace the VMIDs and node names with your respective values. | Remember to replace the VMIDs and node names with your respective values. | ||
Managing Jobs | Managing Jobs | ||
| − | You can use the web GUI to create, modify and remove replication jobs | + | You can use the web GUI to create, modify, and remove replication jobs |
| − | easily. Additionally the command line interface (CLI) tool pvesr can be | + | easily. Additionally, the command line interface (CLI) tool pvesr can be |
used to do this. | used to do this. | ||
You can find the replication panel on all levels (datacenter, node, virtual | You can find the replication panel on all levels (datacenter, node, virtual | ||
| − | guest) in the web GUI. They differ in | + | guest) in the web GUI. They differ in which jobs get shown: |
| − | + | all, node- or guest-specific jobs. | |
| − | + | When adding a new job, you need to specify the guest if not already selected | |
| − | + | as well as the target node. The replication | |
schedule can be set if the default of all | schedule can be set if the default of all | ||
| − | 15 minutes is not desired. You may | + | 15 minutes is not desired. You may impose a rate-limit on a replication |
| − | + | job. The rate limit can help to keep the load on the storage acceptable. | |
| − | A replication job is identified by | + | A replication job is identified by a cluster-wide unique ID. This ID is |
| − | composed of the VMID in addition to | + | composed of the VMID in addition to a job number. |
This ID must only be specified manually if the CLI tool is used. | This ID must only be specified manually if the CLI tool is used. | ||
Command Line Interface Examples | Command Line Interface Examples | ||
| − | Create a replication job which | + | Create a replication job which runs every 5 minutes with a limited bandwidth |
| − | 10 | + | of 10 Mbps (megabytes per second) for the guest with ID 100. |
# pvesr create-local-job 100-0 pve1 --schedule "*/5" --rate 10 | # pvesr create-local-job 100-0 pve1 --schedule "*/5" --rate 10 | ||
| − | Disable an active job with ID 100-0 | + | Disable an active job with ID 100-0. |
# pvesr disable 100-0 | # pvesr disable 100-0 | ||
| − | Enable a deactivated job with ID 100-0 | + | Enable a deactivated job with ID 100-0. |
# pvesr enable 100-0 | # pvesr enable 100-0 | ||
| − | Change the schedule interval of the job with ID 100-0 to once | + | Change the schedule interval of the job with ID 100-0 to once per hour. |
# pvesr update 100-0 --schedule '*/00' | # pvesr update 100-0 --schedule '*/00' | ||
</pvehide> | </pvehide> | ||
<!--PVE_IMPORT_END_MARKER--> | <!--PVE_IMPORT_END_MARKER--> | ||
Revision as of 12:46, 22 November 2022
The pvesr command-line tool manages the Proxmox VE storage replication framework. Storage replication brings redundancy for guests using local storage and reduces migration time.
It replicates guest volumes to another node so that all data is available without using shared storage. Replication uses snapshots to minimize traffic sent over the network. Therefore, new data is sent only incrementally after the initial full sync. In the case of a node failure, your guest data is still available on the replicated node.
The replication is done automatically in configurable intervals. The minimum replication interval is one minute, and the maximal interval once a week. The format used to specify those intervals is a subset of systemd calendar events, see Schedule Format section:
It is possible to replicate a guest to multiple target nodes, but not twice to the same target node.
Each replications bandwidth can be limited, to avoid overloading a storage or server.
Only changes since the last replication (so-called deltas) need to be transferred if the guest is migrated to a node to which it already is replicated. This reduces the time needed significantly. The replication direction automatically switches if you migrate a guest to the replication target node.
For example: VM100 is currently on nodeA and gets replicated to nodeB. You migrate it to nodeB, so now it gets automatically replicated back from nodeB to nodeA.
If you migrate to a node where the guest is not replicated, the whole disk data must send over. After the migration, the replication job continues to replicate this guest to the configured nodes.

|
High-Availability is allowed in combination with storage replication, but there may be some data loss between the last synced time and the time a node failed. |
Supported Storage Types
| Description | Plugin type | Snapshots | Stable |
|---|---|---|---|
ZFS (local) |
zfspool |
yes |
yes |
Schedule Format
Replication uses calendar events for configuring the schedule.
Error Handling
If a replication job encounters problems, it is placed in an error state. In this state, the configured replication intervals get suspended temporarily. The failed replication is repeatedly tried again in a 30 minute interval. Once this succeeds, the original schedule gets activated again.
Possible issues
Some of the most common issues are in the following list. Depending on your setup there may be another cause.
-
Network is not working.
-
No free space left on the replication target storage.
-
Storage with same storage ID available on the target node

|
You can always use the replication log to find out what is causing the problem. |
Migrating a guest in case of Error
In the case of a grave error, a virtual guest may get stuck on a failed node. You then need to move it manually to a working node again.
Example
Let’s assume that you have two guests (VM 100 and CT 200) running on node A and replicate to node B. Node A failed and can not get back online. Now you have to migrate the guest to Node B manually.
-
connect to node B over ssh or open its shell via the web UI
-
check if that the cluster is quorate
# pvecm status
-
If you have no quorum, we strongly advise to fix this first and make the node operable again. Only if this is not possible at the moment, you may use the following command to enforce quorum on the current node:
# pvecm expected 1

|
Avoid changes which affect the cluster if expected votes are set (for example adding/removing nodes, storages, virtual guests) at all costs. Only use it to get vital guests up and running again or to resolve the quorum issue itself. |
-
move both guest configuration files form the origin node A to node B:
# mv /etc/pve/nodes/A/qemu-server/100.conf /etc/pve/nodes/B/qemu-server/100.conf
# mv /etc/pve/nodes/A/lxc/200.conf /etc/pve/nodes/B/lxc/200.conf
-
Now you can start the guests again:
# qm start 100
# pct start 200
Remember to replace the VMIDs and node names with your respective values.
Managing Jobs
You can use the web GUI to create, modify, and remove replication jobs easily. Additionally, the command-line interface (CLI) tool pvesr can be used to do this.
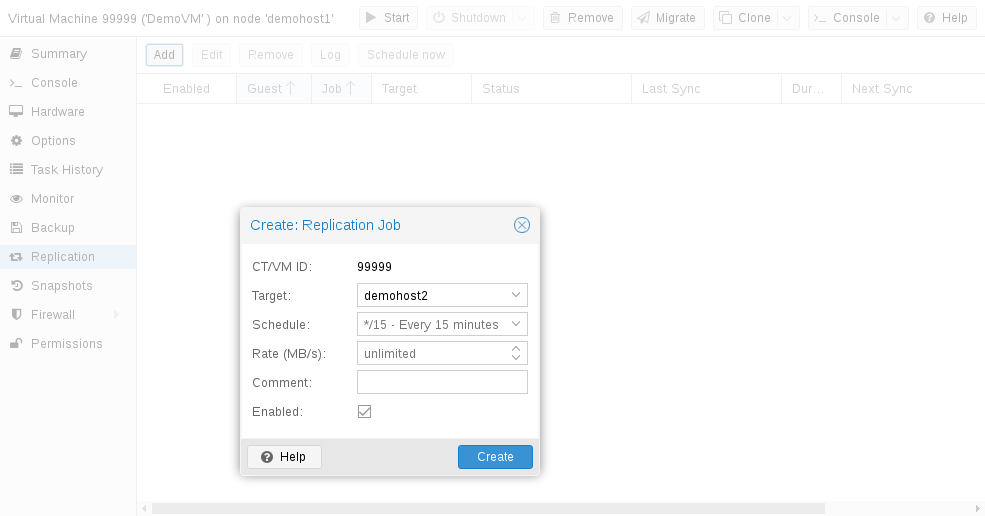
You can find the replication panel on all levels (datacenter, node, virtual guest) in the web GUI. They differ in which jobs get shown: all, node- or guest-specific jobs.
When adding a new job, you need to specify the guest if not already selected as well as the target node. The replication schedule can be set if the default of all 15 minutes is not desired. You may impose a rate-limit on a replication job. The rate limit can help to keep the load on the storage acceptable.
A replication job is identified by a cluster-wide unique ID. This ID is composed of the VMID in addition to a job number. This ID must only be specified manually if the CLI tool is used.
Command-line Interface Examples
Create a replication job which runs every 5 minutes with a limited bandwidth of 10 Mbps (megabytes per second) for the guest with ID 100.
# pvesr create-local-job 100-0 pve1 --schedule "*/5" --rate 10
Disable an active job with ID 100-0.
# pvesr disable 100-0
Enable a deactivated job with ID 100-0.
# pvesr enable 100-0
Change the schedule interval of the job with ID 100-0 to once per hour.
# pvesr update 100-0 --schedule '*/00'