Our modern society depends heavily on information provided by computers over the network. Mobile devices amplified that dependency, because people can access the network any time from anywhere. If you provide such services, it is very important that they are available most of the time.
We can mathematically define the availability as the ratio of (A), the total time a service is capable of being used during a given interval to (B), the length of the interval. It is normally expressed as a percentage of uptime in a given year.
| Availability % | Downtime per year |
|---|---|
99 |
3.65 days |
99.9 |
8.76 hours |
99.99 |
52.56 minutes |
99.999 |
5.26 minutes |
99.9999 |
31.5 seconds |
99.99999 |
3.15 seconds |
There are several ways to increase availability. The most elegant solution is to rewrite your software, so that you can run it on several hosts at the same time. The software itself needs to have a way to detect errors and do failover. If you only want to serve read-only web pages, then this is relatively simple. However, this is generally complex and sometimes impossible, because you cannot modify the software yourself. The following solutions works without modifying the software:
-
Use reliable “server” components

Computer components with the same functionality can have varying reliability numbers, depending on the component quality. Most vendors sell components with higher reliability as “server” components - usually at higher price. -
Eliminate single point of failure (redundant components)
-
use an uninterruptible power supply (UPS)
-
use redundant power supplies on the main boards
-
use ECC-RAM
-
use redundant network hardware
-
use RAID for local storage
-
use distributed, redundant storage for VM data
-
-
Reduce downtime
-
rapidly accessible administrators (24/7)
-
availability of spare parts (other nodes in a Proxmox VE cluster)
-
automatic error detection (provided by ha-manager)
-
automatic failover (provided by ha-manager)
-
Virtualization environments like Proxmox VE make it much easier to reach high availability because they remove the “hardware” dependency. They also support the setup and use of redundant storage and network devices, so if one host fails, you can simply start those services on another host within your cluster.
Better still, Proxmox VE provides a software stack called ha-manager, which can do that automatically for you. It is able to automatically detect errors and do automatic failover.
Proxmox VE ha-manager works like an “automated” administrator. First, you configure what resources (VMs, containers, …) it should manage. Then, ha-manager observes the correct functionality, and handles service failover to another node in case of errors. ha-manager can also handle normal user requests which may start, stop, relocate and migrate a service.
But high availability comes at a price. High quality components are more expensive, and making them redundant doubles the costs at least. Additional spare parts increase costs further. So you should carefully calculate the benefits, and compare with those additional costs.

|
Increasing availability from 99% to 99.9% is relatively simple. But increasing availability from 99.9999% to 99.99999% is very hard and costly. ha-manager has typical error detection and failover times of about 2 minutes, so you can get no more than 99.999% availability. |
Requirements
You must meet the following requirements before you start with HA:
-
at least three cluster nodes (to get reliable quorum)
-
shared storage for VMs and containers
-
hardware redundancy (everywhere)
-
use reliable “server” components
-
hardware watchdog - if not available we fall back to the linux kernel software watchdog (softdog)
-
optional hardware fencing devices
Resources
We call the primary management unit handled by ha-manager a resource. A resource (also called “service”) is uniquely identified by a service ID (SID), which consists of the resource type and a type specific ID, for example vm:100. That example would be a resource of type vm (virtual machine) with the ID 100.
For now we have two important resources types - virtual machines and containers. One basic idea here is that we can bundle related software into such a VM or container, so there is no need to compose one big service from other services, as was done with rgmanager. In general, a HA managed resource should not depend on other resources.
Management Tasks
This section provides a short overview of common management tasks. The first step is to enable HA for a resource. This is done by adding the resource to the HA resource configuration. You can do this using the GUI, or simply use the command line tool, for example:
# ha-manager add vm:100
The HA stack now tries to start the resources and keep them running. Please note that you can configure the “requested” resources state. For example you may want the HA stack to stop the resource:
# ha-manager set vm:100 --state stopped
and start it again later:
# ha-manager set vm:100 --state started
You can also use the normal VM and container management commands. They automatically forward the commands to the HA stack, so
# qm start 100
simply sets the requested state to started. The same applies to qm stop, which sets the requested state to stopped.
|
|
The HA stack works fully asynchronous and needs to communicate with other cluster members. Therefore, it takes some seconds until you see the result of such actions. |
To view the current HA resource configuration use:
# ha-manager config
vm:100
        state stopped
And you can view the actual HA manager and resource state with:
# ha-manager status
quorum OK
master node1 (active, Wed Nov 23 11:07:23 2016)
lrm elsa (active, Wed Nov 23 11:07:19 2016)
service vm:100 (node1, started)
You can also initiate resource migration to other nodes:
# ha-manager migrate vm:100 node2
This uses online migration and tries to keep the VM running. Online migration needs to transfer all used memory over the network, so it is sometimes faster to stop the VM, then restart it on the new node. This can be done using the relocate command:
# ha-manager relocate vm:100 node2
Finally, you can remove the resource from the HA configuration using the following command:
# ha-manager remove vm:100
|
|
This does not start or stop the resource. |
But all HA related tasks can be done in the GUI, so there is no need to use the command line at all.
How It Works
This section provides a detailed description of the Proxmox VE HA manager internals. It describes all involved daemons and how they work together. To provide HA, two daemons run on each node:
- pve-ha-lrm
-
The local resource manager (LRM), which controls the services running on the local node. It reads the requested states for its services from the current manager status file and executes the respective commands.
- pve-ha-crm
-
The cluster resource manager (CRM), which makes the cluster-wide decisions. It sends commands to the LRM, processes the results, and moves resources to other nodes if something fails. The CRM also handles node fencing.
|
|
Locks in the LRM & CRM Locks are provided by our distributed configuration file system (pmxcfs).
They are used to guarantee that each LRM is active once and working. As an
LRM only executes actions when it holds its lock, we can mark a failed node
as fenced if we can acquire its lock. This then lets us recover any failed
HA services securely without any interference from the now unknown failed node.
This all gets supervised by the CRM which currently holds the manager master
lock. |
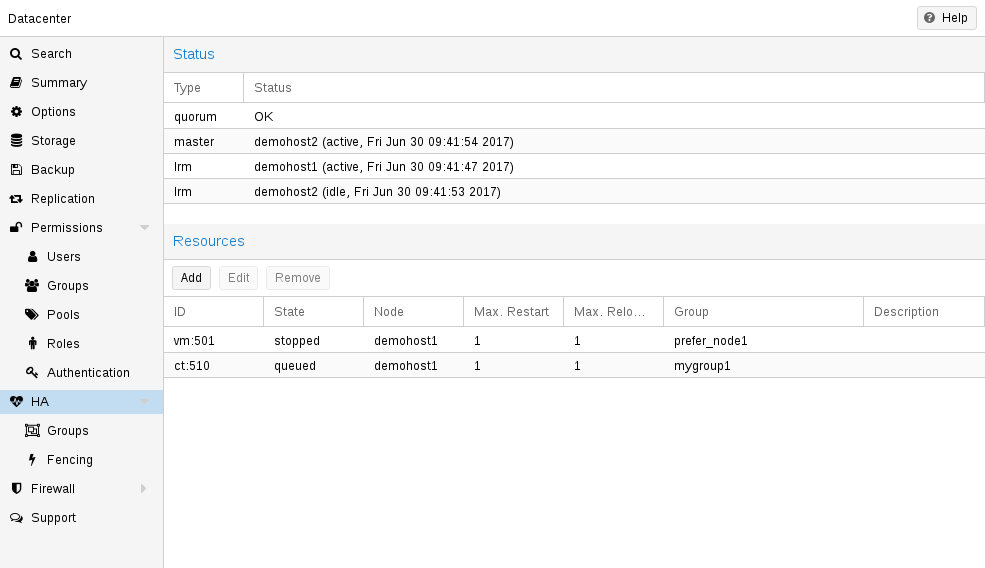
Service States
The CRM uses a service state enumeration to record the current service state. This state is displayed on the GUI and can be queried using the ha-manager command line tool:
# ha-manager status
quorum OK
master elsa (active, Mon Nov 21 07:23:29 2016)
lrm elsa (active, Mon Nov 21 07:23:22 2016)
service ct:100 (elsa, stopped)
service ct:102 (elsa, started)
service vm:501 (elsa, started)
Here is the list of possible states:
- stopped
-
Service is stopped (confirmed by LRM). If the LRM detects a stopped service is still running, it will stop it again.
- request_stop
-
Service should be stopped. The CRM waits for confirmation from the LRM.
- stopping
-
Pending stop request. But the CRM did not get the request so far.
- started
-
Service is active an LRM should start it ASAP if not already running. If the Service fails and is detected to be not running the LRM restarts it (see Start Failure Policy).
- starting
-
Pending start request. But the CRM has not got any confirmation from the LRM that the service is running.
- fence
-
Wait for node fencing (service node is not inside quorate cluster partition). As soon as node gets fenced successfully the service will be recovered to another node, if possible (see Fencing).
- freeze
-
Do not touch the service state. We use this state while we reboot a node, or when we restart the LRM daemon (see Package Updates).
- ignored
-
Act as if the service were not managed by HA at all. Useful, when full control over the service is desired temporarily, without removing it from the HA configuration.
- migrate
-
Migrate service (live) to other node.
- error
-
Service is disabled because of LRM errors. Needs manual intervention (see Error Recovery).
- queued
-
Service is newly added, and the CRM has not seen it so far.
- disabled
-
Service is stopped and marked as disabled
Local Resource Manager
The local resource manager (pve-ha-lrm) is started as a daemon on boot and waits until the HA cluster is quorate and thus cluster-wide locks are working.
It can be in three states:
- wait for agent lock
-
The LRM waits for our exclusive lock. This is also used as idle state if no service is configured.
- active
-
The LRM holds its exclusive lock and has services configured.
- lost agent lock
-
The LRM lost its lock, this means a failure happened and quorum was lost.
After the LRM gets in the active state it reads the manager status file in /etc/pve/ha/manager_status and determines the commands it has to execute for the services it owns. For each command a worker gets started, these workers are running in parallel and are limited to at most 4 by default. This default setting may be changed through the datacenter configuration key max_worker. When finished the worker process gets collected and its result saved for the CRM.
|
|
Maximum Concurrent Worker Adjustment Tips The default value of at most 4 concurrent workers may be unsuited for
a specific setup. For example, 4 live migrations may occur at the same
time, which can lead to network congestions with slower networks and/or
big (memory wise) services. Also, ensure that in the worst case, congestion is
at a minimum, even if this means lowering the max_worker value. On the
contrary, if you have a particularly powerful, high-end setup you may also want
to increase it. |
Each command requested by the CRM is uniquely identifiable by a UID. When the worker finishes, its result will be processed and written in the LRM status file /etc/pve/nodes/<nodename>/lrm_status. There the CRM may collect it and let its state machine - respective to the commands output - act on it.
The actions on each service between CRM and LRM are normally always synced. This means that the CRM requests a state uniquely marked by a UID, the LRM then executes this action one time and writes back the result, which is also identifiable by the same UID. This is needed so that the LRM does not execute an outdated command. The only exceptions to this behaviour are the stop and error commands; these two do not depend on the result produced and are executed always in the case of the stopped state and once in the case of the error state.
|
|
Read the Logs The HA Stack logs every action it makes. This helps to understand what
and also why something happens in the cluster. Here its important to see
what both daemons, the LRM and the CRM, did. You may use
journalctl -u pve-ha-lrm on the node(s) where the service is and
the same command for the pve-ha-crm on the node which is the current master. |
Cluster Resource Manager
The cluster resource manager (pve-ha-crm) starts on each node and waits there for the manager lock, which can only be held by one node at a time. The node which successfully acquires the manager lock gets promoted to the CRM master.
It can be in three states:
- wait for agent lock
-
The CRM waits for our exclusive lock. This is also used as idle state if no service is configured
- active
-
The CRM holds its exclusive lock and has services configured
- lost agent lock
-
The CRM lost its lock, this means a failure happened and quorum was lost.
Its main task is to manage the services which are configured to be highly available and try to always enforce the requested state. For example, a service with the requested state started will be started if its not already running. If it crashes it will be automatically started again. Thus the CRM dictates the actions the LRM needs to execute.
When a node leaves the cluster quorum, its state changes to unknown. If the current CRM can then secure the failed node’s lock, the services will be stolen and restarted on another node.
When a cluster member determines that it is no longer in the cluster quorum, the LRM waits for a new quorum to form. As long as there is no quorum the node cannot reset the watchdog. This will trigger a reboot after the watchdog times out (this happens after 60 seconds).
HA Simulator
By using the HA simulator you can test and learn all functionalities of the Proxmox VE HA solutions.
By default, the simulator allows you to watch and test the behaviour of a real-world 3 node cluster with 6 VMs. You can also add or remove additional VMs or Container.
You do not have to setup or configure a real cluster, the HA simulator runs out of the box.
Install with apt:
apt install pve-ha-simulator
You can even install the package on any Debian-based system without any other Proxmox VE packages. For that you will need to download the package and copy it to the system you want to run it on for installation. When you install the package with apt from the local file system it will also resolve the required dependencies for you.
To start the simulator on a remote machine you must have an X11 redirection to your current system.
If you are on a Linux machine you can use:
ssh root@<IPofPVE> -Y
On Windows it works with mobaxterm.
After connecting to an existing Proxmox VE with the simulator installed or installing it on your local Debian-based system manually, you can try it out as follows.
First you need to create a working directory where the simulator saves its current state and writes its default config:
mkdir working
Then, simply pass the created directory as a parameter to pve-ha-simulator:
pve-ha-simulator working/
You can then start, stop, migrate the simulated HA services, or even check out what happens on a node failure.
Configuration
The HA stack is well integrated into the Proxmox VE API. So, for example, HA can be configured via the ha-manager command line interface, or the Proxmox VE web interface - both interfaces provide an easy way to manage HA. Automation tools can use the API directly.
All HA configuration files are within /etc/pve/ha/, so they get automatically distributed to the cluster nodes, and all nodes share the same HA configuration.
Resources
The resource configuration file /etc/pve/ha/resources.cfg stores the list of resources managed by ha-manager. A resource configuration inside that list looks like this:
<type>: <name>
        <property> <value>
        ...
It starts with a resource type followed by a resource specific name, separated with colon. Together this forms the HA resource ID, which is used by all ha-manager commands to uniquely identify a resource (example: vm:100 or ct:101). The next lines contain additional properties:
- comment: <string>
-
Description.
- group: <string>
-
The HA group identifier.
- max_relocate: <integer> (0 - N) (default = 1)
-
Maximal number of service relocate tries when a service failes to start.
- max_restart: <integer> (0 - N) (default = 1)
-
Maximal number of tries to restart the service on a node after its start failed.
- state: <disabled | enabled | ignored | started | stopped> (default = started)
-
Requested resource state. The CRM reads this state and acts accordingly. Please note that enabled is just an alias for started.
- started
-
The CRM tries to start the resource. Service state is set to started after successful start. On node failures, or when start fails, it tries to recover the resource. If everything fails, service state it set to error.
- stopped
-
The CRM tries to keep the resource in stopped state, but it still tries to relocate the resources on node failures.
- disabled
-
The CRM tries to put the resource in stopped state, but does not try to relocate the resources on node failures. The main purpose of this state is error recovery, because it is the only way to move a resource out of the error state.
- ignored
-
The resource gets removed from the manager status and so the CRM and the LRM do not touch the resource anymore. All Proxmox VE API calls affecting this resource will be executed, directly bypassing the HA stack. CRM commands will be thrown away while there source is in this state. The resource will not get relocated on node failures.
Here is a real world example with one VM and one container. As you see, the syntax of those files is really simple, so it is even possible to read or edit those files using your favorite editor:
vm: 501
    state started
    max_relocate 2

ct: 102
    # Note: use default settings for everything
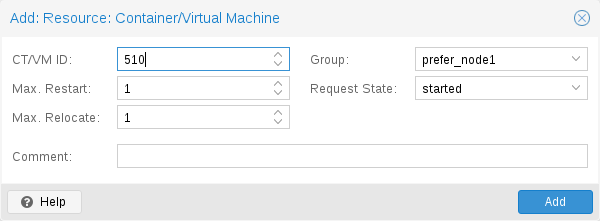
The above config was generated using the ha-manager command line tool:
# ha-manager add vm:501 --state started --max_relocate 2
# ha-manager add ct:102
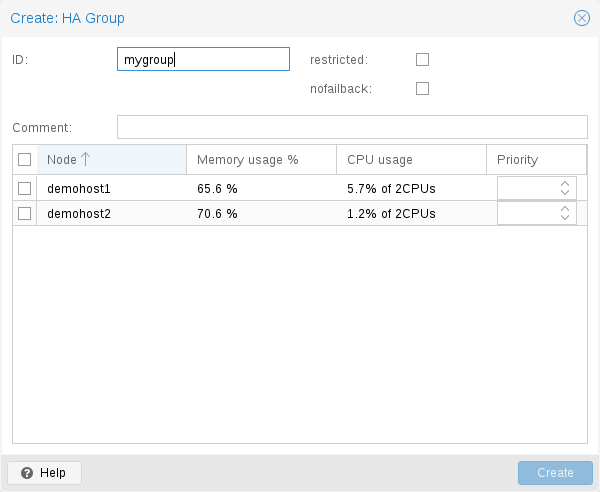
Groups
The HA group configuration file /etc/pve/ha/groups.cfg is used to define groups of cluster nodes. A resource can be restricted to run only on the members of such group. A group configuration look like this:
group: <group>
       nodes <node_list>
       <property> <value>
       ...
- comment: <string>
-
Description.
- nodes: <node>[:<pri>]{,<node>[:<pri>]}*
-
List of cluster node members, where a priority can be given to each node. A resource bound to a group will run on the available nodes with the highest priority. If there are more nodes in the highest priority class, the services will get distributed to those nodes. The priorities have a relative meaning only.
- nofailback: <boolean> (default = 0)
-
The CRM tries to run services on the node with the highest priority. If a node with higher priority comes online, the CRM migrates the service to that node. Enabling nofailback prevents that behavior.
- restricted: <boolean> (default = 0)
-
Resources bound to restricted groups may only run on nodes defined by the group. The resource will be placed in the stopped state if no group node member is online. Resources on unrestricted groups may run on any cluster node if all group members are offline, but they will migrate back as soon as a group member comes online. One can implement a preferred node behavior using an unrestricted group with only one member.
A common requirement is that a resource should run on a specific node. Usually the resource is able to run on other nodes, so you can define an unrestricted group with a single member:
# ha-manager groupadd prefer_node1 --nodes node1
For bigger clusters, it makes sense to define a more detailed failover behavior. For example, you may want to run a set of services on node1 if possible. If node1 is not available, you want to run them equally split on node2 and node3. If those nodes also fail, the services should run on node4. To achieve this you could set the node list to:
# ha-manager groupadd mygroup1 -nodes "node1:2,node2:1,node3:1,node4"
Another use case is if a resource uses other resources only available on specific nodes, lets say node1 and node2. We need to make sure that HA manager does not use other nodes, so we need to create a restricted group with said nodes:
# ha-manager groupadd mygroup2 -nodes "node1,node2" -restricted
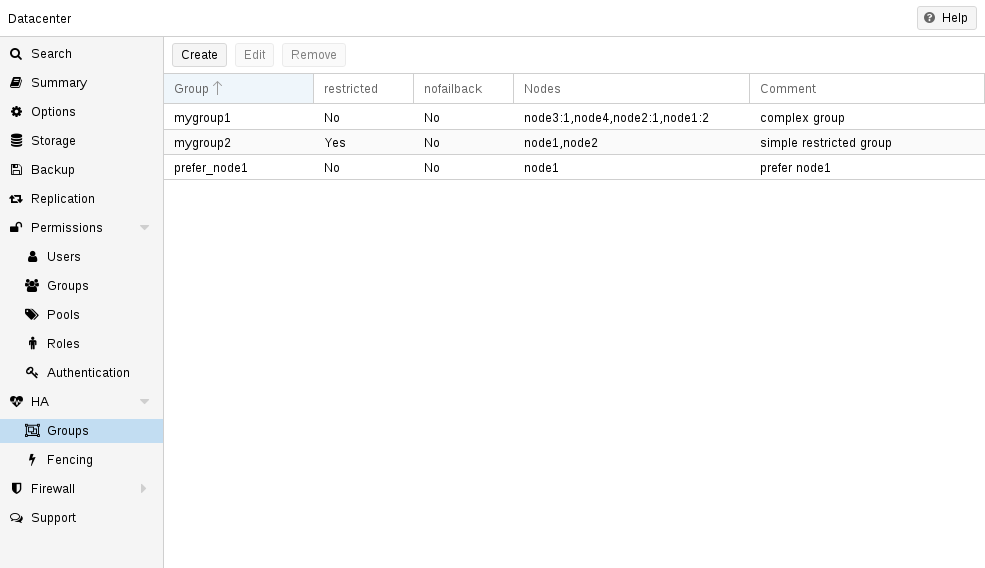
The above commands created the following group configuration file:
group: prefer_node1
       nodes node1

group: mygroup1
       nodes node2:1,node4,node1:2,node3:1

group: mygroup2
       nodes node2,node1
       restricted 1
The nofailback options is mostly useful to avoid unwanted resource movements during administration tasks. For example, if you need to migrate a service to a node which doesn’t have the highest priority in the group, you need to tell the HA manager not to instantly move this service back by setting the nofailback option.
Another scenario is when a service was fenced and it got recovered to another node. The admin tries to repair the fenced node and brings it up online again to investigate the cause of failure and check if it runs stably again. Setting the nofailback flag prevents the recovered services from moving straight back to the fenced node.
Fencing
On node failures, fencing ensures that the erroneous node is guaranteed to be offline. This is required to make sure that no resource runs twice when it gets recovered on another node. This is a really important task, because without this, it would not be possible to recover a resource on another node.
If a node did not get fenced, it would be in an unknown state where it may have still access to shared resources. This is really dangerous! Imagine that every network but the storage one broke. Now, while not reachable from the public network, the VM still runs and writes to the shared storage.
If we then simply start up this VM on another node, we would get a dangerous race condition, because we write from both nodes. Such conditions can destroy all VM data and the whole VM could be rendered unusable. The recovery could also fail if the storage protects against multiple mounts.
How Proxmox VE Fences
There are different methods to fence a node, for example, fence devices which cut off the power from the node or disable their communication completely. Those are often quite expensive and bring additional critical components into a system, because if they fail you cannot recover any service.
We thus wanted to integrate a simpler fencing method, which does not require additional external hardware. This can be done using watchdog timers.
-
external power switches
-
isolate nodes by disabling complete network traffic on the switch
-
self fencing using watchdog timers
Watchdog timers have been widely used in critical and dependable systems since the beginning of microcontrollers. They are often simple, independent integrated circuits which are used to detect and recover from computer malfunctions.
During normal operation, ha-manager regularly resets the watchdog timer to prevent it from elapsing. If, due to a hardware fault or program error, the computer fails to reset the watchdog, the timer will elapse and trigger a reset of the whole server (reboot).
Recent server motherboards often include such hardware watchdogs, but these need to be configured. If no watchdog is available or configured, we fall back to the Linux Kernel softdog. While still reliable, it is not independent of the servers hardware, and thus has a lower reliability than a hardware watchdog.
Configure Hardware Watchdog
By default, all hardware watchdog modules are blocked for security reasons. They are like a loaded gun if not correctly initialized. To enable a hardware watchdog, you need to specify the module to load in /etc/default/pve-ha-manager, for example:
# select watchdog module (default is softdog)
WATCHDOG_MODULE=iTCO_wdt
This configuration is read by the watchdog-mux service, which loads the specified module at startup.
Recover Fenced Services
After a node failed and its fencing was successful, the CRM tries to move services from the failed node to nodes which are still online.
The selection of nodes, on which those services gets recovered, is influenced by the resource group settings, the list of currently active nodes, and their respective active service count.
The CRM first builds a set out of the intersection between user selected nodes (from group setting) and available nodes. It then choose the subset of nodes with the highest priority, and finally select the node with the lowest active service count. This minimizes the possibility of an overloaded node.

|
On node failure, the CRM distributes services to the remaining nodes. This increases the service count on those nodes, and can lead to high load, especially on small clusters. Please design your cluster so that it can handle such worst case scenarios. |
Start Failure Policy
The start failure policy comes into effect if a service failed to start on a node one or more times. It can be used to configure how often a restart should be triggered on the same node and how often a service should be relocated, so that it has an attempt to be started on another node. The aim of this policy is to circumvent temporary unavailability of shared resources on a specific node. For example, if a shared storage isn’t available on a quorate node anymore, for instance due to network problems, but is still available on other nodes, the relocate policy allows the service to start nonetheless.
There are two service start recover policy settings which can be configured specific for each resource.
- max_restart
-
Maximum number of attempts to restart a failed service on the actual node. The default is set to one.
- max_relocate
-
Maximum number of attempts to relocate the service to a different node. A relocate only happens after the max_restart value is exceeded on the actual node. The default is set to one.
|
|
The relocate count state will only reset to zero when the service had at least one successful start. That means if a service is re-started without fixing the error only the restart policy gets repeated. |
Error Recovery
If, after all attempts, the service state could not be recovered, it gets placed in an error state. In this state, the service won’t get touched by the HA stack anymore. The only way out is disabling a service:
# ha-manager set vm:100 --state disabled
This can also be done in the web interface.
To recover from the error state you should do the following:
-
bring the resource back into a safe and consistent state (e.g.: kill its process if the service could not be stopped)
-
disable the resource to remove the error flag
-
fix the error which led to this failures
-
after you fixed all errors you may request that the service starts again
Package Updates
When updating the ha-manager, you should do one node after the other, never all at once for various reasons. First, while we test our software thoroughly, a bug affecting your specific setup cannot totally be ruled out. Updating one node after the other and checking the functionality of each node after finishing the update helps to recover from eventual problems, while updating all at once could result in a broken cluster and is generally not good practice.
Also, the Proxmox VE HA stack uses a request acknowledge protocol to perform actions between the cluster and the local resource manager. For restarting, the LRM makes a request to the CRM to freeze all its services. This prevents them from getting touched by the Cluster during the short time the LRM is restarting. After that, the LRM may safely close the watchdog during a restart. Such a restart happens normally during a package update and, as already stated, an active master CRM is needed to acknowledge the requests from the LRM. If this is not the case the update process can take too long which, in the worst case, may result in a reset triggered by the watchdog.
Node Maintenance
It is sometimes necessary to shutdown or reboot a node to do maintenance tasks, such as to replace hardware, or simply to install a new kernel image. This is also true when using the HA stack. The behaviour of the HA stack during a shutdown can be configured.
Shutdown Policy
Below you will find a description of the different HA policies for a node shutdown. Currently Conditional is the default due to backward compatibility. Some users may find that Migrate behaves more as expected.
Migrate
Once the Local Resource manager (LRM) gets a shutdown request and this policy is enabled, it will mark itself as unavailable for the current HA manager. This triggers a migration of all HA Services currently located on this node. The LRM will try to delay the shutdown process, until all running services get moved away. But, this expects that the running services can be migrated to another node. In other words, the service must not be locally bound, for example by using hardware passthrough. As non-group member nodes are considered as runnable target if no group member is available, this policy can still be used when making use of HA groups with only some nodes selected. But, marking a group as restricted tells the HA manager that the service cannot run outside of the chosen set of nodes. If all of those nodes are unavailable, the shutdown will hang until you manually intervene. Once the shut down node comes back online again, the previously displaced services will be moved back, if they were not already manually migrated in-between.
|
|
The watchdog is still active during the migration process on shutdown. If the node loses quorum it will be fenced and the services will be recovered. |
If you start a (previously stopped) service on a node which is currently being maintained, the node needs to be fenced to ensure that the service can be moved and started on another available node.
Failover
This mode ensures that all services get stopped, but that they will also be recovered, if the current node is not online soon. It can be useful when doing maintenance on a cluster scale, where live-migrating VMs may not be possible if too many nodes are powered off at a time, but you still want to ensure HA services get recovered and started again as soon as possible.
Freeze
This mode ensures that all services get stopped and frozen, so that they won’t get recovered until the current node is online again.
Conditional
The Conditional shutdown policy automatically detects if a shutdown or a reboot is requested, and changes behaviour accordingly.
A shutdown (poweroff) is usually done if it is planned for the node to stay down for some time. The LRM stops all managed services in this case. This means that other nodes will take over those services afterwards.
|
|
Recent hardware has large amounts of memory (RAM). So we stop all resources, then restart them to avoid online migration of all that RAM. If you want to use online migration, you need to invoke that manually before you shutdown the node. |
Node reboots are initiated with the reboot command. This is usually done after installing a new kernel. Please note that this is different from “shutdown”, because the node immediately starts again.
The LRM tells the CRM that it wants to restart, and waits until the CRM puts all resources into the freeze state (same mechanism is used for Package Updates). This prevents those resources from being moved to other nodes. Instead, the CRM starts the resources after the reboot on the same node.
Manual Resource Movement
Last but not least, you can also manually move resources to other nodes, before you shutdown or restart a node. The advantage is that you have full control, and you can decide if you want to use online migration or not.
|
|
Please do not kill services like pve-ha-crm, pve-ha-lrm or watchdog-mux. They manage and use the watchdog, so this can result in an immediate node reboot or even reset. |