NVIDIA vGPU on Proxmox VE
Introduction
NVIDIA vGPU is a technology that enables the use of a supported[1] single physical GPU by multiple Virtual Machines.
This article provides a test report and how-to for using NVIDIA vGPU on Proxmox VE. It got tested using an RTX A5000.
Disclaimer
At the time of writing, Proxmox VE is not an officially supported platform for NVIDIA vGPU, this means that even with valid vGPU licenses you may not be eligible for NVIDIA enterprise support for this use-case. That said, as of 2024, Ubuntu is a supported platform for NVIDIA vGPU. As Proxmox VE derives their kernel from the Ubuntu kernel, there shouldn't be too much difference.
Note that while we are partly using consumer hardware in this article, for the best experience in production workloads we recommend using proper enterprise-grade hardware. Check NVIDIA's support page for compatible hardware [2] [1].
Hardware Setup
We're using the following hardware configuration for our test:
| CPU | Intel Core i7-12700K |
| Motherboard | ASUS PRIME Z690-A |
| Memory | 128 GB DDR5 Memory: 4x Crucial CT32G48C40U5 |
| GPU | PNY NVIDIA RTX A5000 |
Some supported NVIDIA GPUs don't have vGPU enabled out of the box and need to have their display ports disabled. This is the case with our RTX A5000, and can be achieved by using their display mode selector tool [3]. For a list of GPUs where this is necessary check their documentation.
The following Proxmox VE, kernel and driver versions were tested for installation:
(Note that newer versions in one vGPU Software Branch should also work for the same or older kernel versions)
| pve-manager | kernel | vGPU Software Branch | NVIDIA Host drivers |
|---|---|---|---|
| 7.2-7 | 5.15.39-2-pve | 14.1 | 510.73.06 |
| 7.2-7 | 5.15.39-2-pve | 14.2 | 510.85.03 |
| 7.4-3 | 5.15.107-2-pve | 15.2 | 525.105.14 |
| 7.4-17 | 6.2.16-20-bpo11-pve | 16.0 | 535.54.06 |
| 8.1.4 | 6.5.11-8-pve | 16.3 | 535.154.02 |
Generally it's recommended to use the latest stable and supported version for Proxmox VE and the NVIDIA drivers.
Prerequisites
You need to make sure that your system is suited for PCIe passthrough, see the PCI(e) Passhtrough documentation.
Additionally, make sure you enable the following features in your BIOS/UEFI
- VT-d for Intel, or AMD-v for AMD (sometimes named IOMMU)
- SR-IOV (may not be necessary for pre-Ampere GPUs)
- Above 4G decoding
- PCI AER (Advanced Error Reporting)
- PCI ASPM (Active State Power Management)
The names and location of these options may vary from BIOS to BIOS, so check your vendor's documentation.
Make especially sure that the IOMMU options are activated for your kernel and in your BIOS.
Preparation
Before actually installing the host drivers, there are a few steps to be done on the host.
First, make sure that you have configured the correct repositories and updated your hosts to the currently supported versions.
Next, you want to blacklist the nouveau drivers.
To do that add blacklist nouveau to a file in /etc/modprobe.d, e.g. by doing
echo "blacklist nouveau" >> /etc/modprobe.d/blacklist.conf
After that update your initramfs and reboot your host.
As we want to install the driver with dkms support, you must also install the dkms prerequisistes with:
apt update
apt install dkms libc6-dev proxmox-default-headers --no-install-recommends
Note: If you don't have the default kernel version installed, but e.g. an opt-in kernel, use the appropriate proxmox-headers-X.Y package instead of proxmox-default-headers.
|
Host Driver Installation
| Note: The driver/file versions depicted in this section are only an example, use the correct file names for the chosen driver you're installing. |
To begin you need the appropriate host and guest drivers. See their support page on how to get them
[4].
Choose Linux KVM as target hypervisor.
In our case we got the host driver:
NVIDIA-Linux-x86_64-525.105.14-vgpu-kvm.run
To start the installation run the installer, we recommend using the --dkms option, ensuring that the module gets rebuilt after a kernel upgrade:
# chmod +x NVIDIA-Linux-x86_64-525.105.14-vgpu-kvm.run
# ./NVIDIA-Linux-x86_64-525.105.14-vgpu-kvm.run --dkms
Follow the steps of the installer, after that you need to reboot your system, for example with
# reboot
Enabling SR-IOV
On some NVIDIA GPUs (for example those based on the Ampere architecture), you must first enable SR-IOV before
you can use vGPUs. You can do that with the sriov-manage script from NVIDIA.
# /usr/lib/nvidia/sriov-manage -e <pciid|ALL>
Since that setting gets lost on reboot, it might be a good idea to write a cronjob or systemd service to enable it on reboot.
Here is an example systemd service for enabling SR-IOV on all found NVIDIA GPUs:
[Unit]
Description=Enable NVIDIA SR-IOV
After=network.target nvidia-vgpud.service nvidia-vgpu-mgr.service
Before=pve-guests.service

[Service]
Type=oneshot
ExecStart=/usr/lib/nvidia/sriov-manage -e ALL

[Install]
WantedBy=multi-user.target
Depending on the actual hardware, it might be necessary to give the nvidia-vgpud.service a bit more time to start, you can do that by adding
ExecStartPre=/bin/sleep 5
just before the ExecStart line in the service file (replace '5' by an appropriate amount of seconds)
This will run after the nvidia-daemons were started, but before the Proxmox VE virtual guest auto start-up.
You can save this in /etc/systemd/system/nvidia-sriov.service. Then enable and start it with:
# systemctl daemon-reload
# systemctl enable --now nvidia-sriov.service
Verify that there are multiple virtual functions for your device with:
# lspci -d 10de:
In our case there are now 24 virtual functions in addition to the physical card (01:00.0):
01:00.0 3D controller: NVIDIA Corporation GA102GL [RTX A5000] (rev a1)
01:00.4 3D controller: NVIDIA Corporation GA102GL [RTX A5000] (rev a1)
01:00.5 3D controller: NVIDIA Corporation GA102GL [RTX A5000] (rev a1)
01:00.6 3D controller: NVIDIA Corporation GA102GL [RTX A5000] (rev a1)
01:00.7 3D controller: NVIDIA Corporation GA102GL [RTX A5000] (rev a1)
01:01.0 3D controller: NVIDIA Corporation GA102GL [RTX A5000] (rev a1)
01:01.1 3D controller: NVIDIA Corporation GA102GL [RTX A5000] (rev a1)
01:01.2 3D controller: NVIDIA Corporation GA102GL [RTX A5000] (rev a1)
01:01.3 3D controller: NVIDIA Corporation GA102GL [RTX A5000] (rev a1)
01:01.4 3D controller: NVIDIA Corporation GA102GL [RTX A5000] (rev a1)
01:01.5 3D controller: NVIDIA Corporation GA102GL [RTX A5000] (rev a1)
01:01.6 3D controller: NVIDIA Corporation GA102GL [RTX A5000] (rev a1)
01:01.7 3D controller: NVIDIA Corporation GA102GL [RTX A5000] (rev a1)
01:02.0 3D controller: NVIDIA Corporation GA102GL [RTX A5000] (rev a1)
01:02.1 3D controller: NVIDIA Corporation GA102GL [RTX A5000] (rev a1)
01:02.2 3D controller: NVIDIA Corporation GA102GL [RTX A5000] (rev a1)
01:02.3 3D controller: NVIDIA Corporation GA102GL [RTX A5000] (rev a1)
01:02.4 3D controller: NVIDIA Corporation GA102GL [RTX A5000] (rev a1)
01:02.5 3D controller: NVIDIA Corporation GA102GL [RTX A5000] (rev a1)
01:02.6 3D controller: NVIDIA Corporation GA102GL [RTX A5000] (rev a1)
01:02.7 3D controller: NVIDIA Corporation GA102GL [RTX A5000] (rev a1)
01:03.0 3D controller: NVIDIA Corporation GA102GL [RTX A5000] (rev a1)
01:03.1 3D controller: NVIDIA Corporation GA102GL [RTX A5000] (rev a1)
01:03.2 3D controller: NVIDIA Corporation GA102GL [RTX A5000] (rev a1)
01:03.3 3D controller: NVIDIA Corporation GA102GL [RTX A5000] (rev a1)
Guest Configuration
General Setup
First, set up a VM like you normally would, without adding a vGPU.
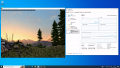
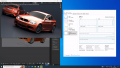
After you have configured the VM to your liking, shut down the VM and add a vGPU by selecting one of the virtual functions, and selecting the appropriate mediated device type.
For example:
CLI:
# qm set VMID -hostpci0 01:00.4,mdev=nvidia-660
GUI:

To find the correct mediated device type, you can use sysfs. Here is an example shell
script to print the type, then the name (which corresponds to the NVIDIA documentation) and the
description, which contains helpful information (such as the maximum available instances).
Adapt the PCI path to your needs:
#!/bin/sh
set -e

for i in /sys/bus/pci/devices/0000:01:00.4/mdev_supported_types/*; do
    basename "$i"
    cat "$i/name"
    cat "$i/description"
    echo
done
Since pve-manager version 7.2-8 and libpve-common-perl version 7.2-3, the GUI shows the correct name for the type.
If your qemu-server version is below 7.2-4, you must add an additional parameter to the vm:
# qm set VMID -args '-uuid <UUID-OF-THE-MDEV>'
The UUID of the mediated device is auto-generated from the VMID and the hostpciX index of the config, where the hostpci index gets set as the first part and the VMID as the last. If you use hostpci2 on VM 12345 for example, the generated UUID will be:
00000002-0000-0000-0000-000000012345
After that, you can start the VM and continue with the guest configuration. We installed a Windows 10 and Ubuntu 22.04 VM, but it's similar for other supported operating systems.
Windows 10
First install and configure a desktop sharing software that matches your requirements. Some examples of such software include:
- VNC
many different options, some free, some commercial - Remote Desktop
built into Windows itself - Parsec
Costs money for commercial use, allows using hardware accelerated encoding - RustDesk
free and open source, but relatively new as of 2022
We used simple Windows built-in remote desktop for testing.

Then you can install the Windows guest driver that is published by NVIDIA. Refer to their documentation[5]to find a compatible guest driver to host driver mapping. In our case this was the file
528.89_grid_win10_win11_server2019_server2022_dch_64bit_international.exe
Start the installer and follow the instructions, then, after it finished restart the guest as prompted.
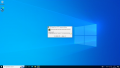
Starting NVIDIA driver installation
Accepting the license agreement

Finishing the installation


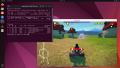
From this point on, the integrated noVNC console of PVE will not be usable anymore, so use your desktop sharing software to connect to the guest. Now you can use the vGPU for starting 3D applications such as Blender, 3D games, etc.
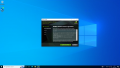
Unigine Valley
SuperTuxKart
Blender


Ubuntu 22.04 Desktop
Before installing the guest driver, install and configure a desktop sharing software, for example:
- VNC
many options. We use x11vnc here, which is free and open source, but does not currently provide hardware accelerated encoding - NoMachine
provides hardware accelerated encoding, but is not open source and costs money for business use - RustDesk
free and open source, but relatively new as of 2022
We installed x11vnc in this example. While we're showing how to install and configure it, this is not the only way to achieve the goal of having properly configured desktop sharing.
Since Ubuntu 22.04 ships GDM3 + Gnome + Wayland per default, you first need to switch the login manager to one that uses X.org. We successfully tested LightDM here, but others may work as well.
# apt install lightdm
Select 'LightDM' as default login manager when prompted. After that install x11vnc with
# apt install x11vnc
We then added a systemd service that starts the vnc server on the x.org server provided by lightm in /etc/systemd/system/x11vnc.service
[Unit]
Description=Start x11vnc
After=multi-user.target

[Service]
Type=simple
ExecStart=/usr/bin/x11vnc -display :0 -auth /var/run/lightdm/root/:0 -forever -loop -repeat -rfbauth /etc/x11vnc.passwd -rfbport 5900 -shared -noxdamage

[Install]
WantedBy=multi-user.target
You can set the password by executing:
# x11vnc -storepasswd /etc/x11vnc.passwd
# chmod 0400 /etc/x11vnc.passwd
After setting up LightDM and x11vnc and restarting the VM, you can connect via VNC.
Now, install the .deb package that NVIDIA provides for Ubuntu. Check the NVIDIA documentation[5] for a compatible guest driver to host driver mapping.
In our case this was nvidia-linux-grid-525_525.105.17_amd64.deb, and we directly installed from the local file using apt.
For that to work you must prefix the relative path, for example ./ if the .deb file is located in the current directory.
# apt install ./nvidia-linux-grid-525_525.105.17_amd64.deb
Then you must use NVIDIA's tools to configure the x.org confiuration with:
# nvidia-xconfig
Now you can reboot and use a VNC client to connect and use the vGPU for 3D applications.

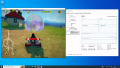
Unigine Valley
SuperTuxKart

Blender


| Note: If you want to use CUDA on a Linux Guest, you must install the CUDA Toolkit manually[6].
Check the NVIDIA documentation which version of CUDA is supported for your vGPU drivers. In our case we needed to install CUDA 11.6 (only the toolkit, not the driver) with the file: cuda_11.6.2_510.47.03_linux.run |
Guest vGPU Licensing
To use the vGPU unrestricted, you must adhere to NVIDIA's licensing. Check the NVIDIA documentation[7] for how to do that. Make sure the guest time is properly synced, otherwise the guest will not be able to request a license for the vGPU.
Notes
- ↑ 1.0 1.1 NVIDIA GPUs supported by vGPU https://docs.nvidia.com/grid/gpus-supported-by-vgpu.html
- ↑ NVIDIA vGPU Certified Servers https://www.nvidia.com/en-us/data-center/resources/vgpu-certified-servers/
- ↑ NVIDIA displaymodeselector tool https://developer.nvidia.com/displaymodeselector
- ↑ Getting your NVIDIA GRID Software. https://docs.nvidia.com/grid/latest/grid-software-quick-start-guide/index.html#getting-your-nvidia-grid-software
- ↑ 5.0 5.1 NVIDIA Virtual GPU (vGPU) Software Documentation https://docs.nvidia.com/grid/
- ↑ NVIDIA CUDA Toolkit Download https://developer.nvidia.com/cuda-downloads
- ↑ NVIDIA GRID Licensing User Guide. https://docs.nvidia.com/grid/latest/grid-licensing-user-guide/index.html