NVIDIA vGPU on Proxmox VE
Introduction
NVIDIA vGPU Software enables multiple virtual machines to use a single supported[1] physical GPU.
This article describes how to use NVIDIA vGPU software with the Proxmox Virtual Environment (Proxmox VE). The instructions were tested using an RTX A5000.
More information can also be found in the NVIDIA documentation[2][3].
Support
Beginning with NVIDIA vGPU Software 18, Proxmox Virtual Environment is an officially supported platform.
To be eligible for support tickets, you must have an active and valid NVIDIA vGPU entitlement as well as an active and valid Proxmox VE subscription on your cluster, with level Basic, Standard or Premium. See the Proxmox VE Subscription Agreement[4] and the Proxmox Support Offerings[5] for more details.
For a list of supported hardware, see NVIDIA's Qualified System Catalog [6].
To get support, open a ticket on the Proxmox Server Solutions Support Portal.
Hardware Setup
For optimal performance in production workloads, we recommend using appropriate enterprise-grade hardware.
All GPUs on NVIDIAs list of supported GPUs are supported on Proxmox VE. Please refer to NVIDIA's support page to verify server and version compatibility [7] [6] [1].
Some Workstation NVIDIA GPUs do not have vGPU enabled by default, even though they support vGPU, like the RTX A5000. To enable vGPU for these models, switch the display mode using the NVIDIA Display Mode Selector Tool[8]. This will disable the display ports.
For a list of GPUs where this is necessary check their documentation[9]. Note that this should be the exception and should only be necessary for workstation GPUs.
Software Versions
The installation is supported on the following versions of Proxmox VE, Linux kernel, and NVIDIA drivers:
| pve-manager | Kernel | vGPU Software Branch | NVIDIA Host drivers |
|---|---|---|---|
| 8.3.4 | 6.8.12-8-pve | 18.0 | 570.124.03 |
| 8.3.4 | 6.11.11-1-pve | 18.0 | 570.124.03 |
| Older, now outdated, tested versions. | |||
|---|---|---|---|
| pve-manager | Kernel | vGPU Software Branch | NVIDIA Host drivers |
| 7.2-7 | 5.15.39-2-pve | 14.1 | 510.73.06 |
| 7.2-7 | 5.15.39-2-pve | 14.2 | 510.85.03 |
| 7.4-3 | 5.15.107-2-pve | 15.2 | 525.105.14 |
| 7.4-17 | 6.2.16-20-bpo11-pve | 16.0 | 535.54.06 |
| 8.1.4 | 6.5.11-8-pve | 16.3 | 535.154.02 |
| 8.1.4 | 6.5.13-1-pve | 16.3 | 535.154.02 |
| 8.2.8 | 6.8.12-4-pve | 17.3 | 550.90.05 |
| 8.2.8 | 6.11.0-1-pve | 17.3 | 550.90.05 |
| 8.2.8 | 6.8.12-4-pve | 17.4 | 550.127.06 |
| 8.2.8 | 6.11.0-1-pve | 17.4 | 550.127.06 |
Note: With 6.8+ based kernels / GRID version 17.3+, the lower level interface of the driver changed and requires qemu-server ≥ 8.2.6 to be installed on the host.
|
It is recommended to use the latest stable and supported version of Proxmox VE and NVIDIA drivers. However, newer versions in one vGPU Software Branch should also work for the same or older kernel version.
A mapping of which NVIDIA vGPU software version corresponds to which driver version is available in the official documentation [10].
Since version 16.0, certain cards are no longer supported by the NVIDIA vGPU driver, but are supported by NVIDIA AI Enterprise [1] [11]. The NVIDIA AI Enterprise driver behaves similarly to the vGPU driver. Therefore, the following steps should also apply.
Note that vGPU and NVIDIA AI Enterprise are different products with different licenses, and NVIDIA AI Enterprise is currently not officially supported with Proxmox VE.
Preparation
Before actually installing the host drivers, there are a few steps that need to be done on the Proxmox VE host.
| Note: If you need to use a root shell, you can, open one by connecting via SSH or using the node shell on the Proxmox VE web interface. |
Enable PCIe Passthrough
Make sure that your system is compatible with PCIe passthrough. See the PCI(e) Passthrough documentation for details.
Additionally, confirm that the following features are enabled in your firmware settings (BIOS/UEFI):
- VT-d for Intel, or AMD-v for AMD (sometimes named IOMMU)
- SR-IOV (this may not be necessary for older pre-Ampere GPU generations)
- Above 4G decoding
- Alternative Routing ID Interpretation (ARI) (not necessary for pre-Ampere GPUs)
The firmware of your host might use different naming. If you are unable to locate some of these options, refer to the documentation provided by your firmware or motherboard manufacturer.
| Note: It is crucial to ensure that both the IOMMU options are enabled in your firmware and the kernel. See General Requirements for PCI(e) Passthrough for how to do that. |
Setup Proxmox VE Repositories
Proxmox VE ships with the enterprise repository set up by default, as this repository provides better tested software and is recommended for production use.
The enterprise repository needs a valid subscription per node. For evaluation or non-production use cases, you can switch to the public no-subscription repository. Packages in the no-subscription repository get updated more frequently but are not as well tested. There is no difference in available features.
You can use the Repositories management panel in the Proxmox VE web UI for managing package repositories, see the documentation for details.
Update to Latest Package Versions
Proxmox VE uses a rolling release model and should be updated frequently to ensure that your Proxmox VE installation has the latest bug and security fixes, and features available.
You can update your Proxmox VE node using the Updates panel on the web UI.
Prepare using pve-nvidia-vgpu-helper
Since pve-manager version 8.3.4 the pve-nvidia-vgpu-helper tool is included. If you're on an older version, please upgrade to the latest version or install it manually with
apt install pve-nvidia-vgpu-helper
The pve-nvidia-vgpu-helper tool will set up some basics, like blacklisting the nouveau driver, installing header packages, DKMS and so on.
You can start the setup with
pve-nvidia-vgpu-helper setup
You will be asked if you want to install missing packages, answer 'y'. Once all the required packages have been successfully installed, you should see this message
All done, you can continue with the NVIDIA vGPU driver installation.
If the nouveau driver was loaded previously, you have to reboot after this step so it isn't loaded afterward.
Note: If you install an opt-in kernel later, you have to also install the corresponding proxmox-header-X.Y package for DKMS to work.
|
Host Driver Installation
| Note: The driver/file versions shown in this section are examples only; use the correct file names for the selected driver you're installing. |
| Note: If you're using Secure boot, please refer to the Chapter Secure Boot before continuing. |
To get started, you will need the appropriate host and guest drivers; see the NVIDIA Virtual GPU Software Quick Start Guide[12] for instructions on how to obtain them.
Choose Linux KVM as target hypervisor when downloading.
In our case, we got the following host driver file:
NVIDIA-Linux-x86_64-525.105.14-vgpu-kvm.run
Copy this file over to your Proxmox VE node, for example with SCP or an SSH file copy tool. If you are on Windows, WinSCP can be used for this step.
To start the installation, you need to make the installer executable first, and then pass the --dkms option when running it, to ensure that the module is rebuilt after a kernel upgrade:
chmod +x NVIDIA-Linux-x86_64-525.105.14-vgpu-kvm.run
./NVIDIA-Linux-x86_64-525.105.14-vgpu-kvm.run --dkms
Follow the steps of the installer.
When you're asked if you want to register the kernel module sources with DKMS, answer 'yes'.
After the installer has finished successfully, you will need to reboot your system, either using the web interface or by executing reboot.
Enabling SR-IOV
On newer NVIDIA GPUs (based on the Ampere architecture and beyond), you must first enable SR-IOV before being able to use vGPU.
This can be done manually with the sriov-manage script from NVIDIA (this is lost on reboot).
Alternatively, the pve-nvidia-vgpu-helper package comes with a systemd service template which calls it automatically on every boot.
To enable it, use
systemctl enable --now pve-nvidia-sriov@ALL.service
You can replace ALL with a specific PCI ID (like 0000:01:00.0) if you only want to enable it for a specific card.
This will then run before the NVIDIA vGPU daemons and the Proxmox VE virtual guest auto start-up.
Due to the --now parameter, it will be started immediately.
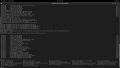
Verify that there are multiple virtual functions for your device with:
# lspci -d 10de:
In our case, there are now 24 virtual functions in addition to the physical card (01:00.0):
01:00.0 3D controller: NVIDIA Corporation GA102GL [RTX A5000] (rev a1)
01:00.4 3D controller: NVIDIA Corporation GA102GL [RTX A5000] (rev a1)
01:00.5 3D controller: NVIDIA Corporation GA102GL [RTX A5000] (rev a1)
01:00.6 3D controller: NVIDIA Corporation GA102GL [RTX A5000] (rev a1)
01:00.7 3D controller: NVIDIA Corporation GA102GL [RTX A5000] (rev a1)
01:01.0 3D controller: NVIDIA Corporation GA102GL [RTX A5000] (rev a1)
01:01.1 3D controller: NVIDIA Corporation GA102GL [RTX A5000] (rev a1)
01:01.2 3D controller: NVIDIA Corporation GA102GL [RTX A5000] (rev a1)
01:01.3 3D controller: NVIDIA Corporation GA102GL [RTX A5000] (rev a1)
01:01.4 3D controller: NVIDIA Corporation GA102GL [RTX A5000] (rev a1)
01:01.5 3D controller: NVIDIA Corporation GA102GL [RTX A5000] (rev a1)
01:01.6 3D controller: NVIDIA Corporation GA102GL [RTX A5000] (rev a1)
01:01.7 3D controller: NVIDIA Corporation GA102GL [RTX A5000] (rev a1)
01:02.0 3D controller: NVIDIA Corporation GA102GL [RTX A5000] (rev a1)
01:02.1 3D controller: NVIDIA Corporation GA102GL [RTX A5000] (rev a1)
01:02.2 3D controller: NVIDIA Corporation GA102GL [RTX A5000] (rev a1)
01:02.3 3D controller: NVIDIA Corporation GA102GL [RTX A5000] (rev a1)
01:02.4 3D controller: NVIDIA Corporation GA102GL [RTX A5000] (rev a1)
01:02.5 3D controller: NVIDIA Corporation GA102GL [RTX A5000] (rev a1)
01:02.6 3D controller: NVIDIA Corporation GA102GL [RTX A5000] (rev a1)
01:02.7 3D controller: NVIDIA Corporation GA102GL [RTX A5000] (rev a1)
01:03.0 3D controller: NVIDIA Corporation GA102GL [RTX A5000] (rev a1)
01:03.1 3D controller: NVIDIA Corporation GA102GL [RTX A5000] (rev a1)
01:03.2 3D controller: NVIDIA Corporation GA102GL [RTX A5000] (rev a1)
01:03.3 3D controller: NVIDIA Corporation GA102GL [RTX A5000] (rev a1)
Create a PCI Resource Mapping
For convenience and privilege separation, you can now create resource mappings for PCI devices. This can contain multiple PCI IDs, such as all virtual functions. The first available ID is automatically selected when the guest is started. Go to Datacenter → Resource mappings to create a new one. For details, see Resource Mapping
In the resource mapping you need to enable 'Use with mediated devices'[13] and select all relevant devices. For GPUs with SR-IOV (Ampere and later), this means the virtual functions which the card exposes. For example, using an RTX A5000 card, we want to select all virtual functions:

Guest Configuration
General Setup
First, set up a VM as you normally would, without adding a vGPU. This can be done either with the Virtual Machine wizard in the Web UI or via the CLI tool qm. For guest specific notes, see for example
Windows 11 guest best practices.
Please note that all Linux commands shown are assumed to be run as a privileged user. For example, directly as the root user, or prefixed with sudo.
Remote Desktop Software
Since the built-in VNC and SPICE console cannot display the virtual display provided by the vGPU, you need some kind of remote desktop software installed in the guest to access the guest. There are many options available, see the NVIDIA documentation[2] or Wikipedia Comparison of Remote Desktop Software for examples.
We show how to enable two examples here, Remote Desktop for Windows 10/11, and VNC (via x11vnc) on Linux:
Remote Desktop on Windows 10/11
To enable Remote Desktop on Windows 10/11, go to Settings → System → Remote Desktop and enable the Remote Desktop option.


VNC on Linux via x11vnc (Ubuntu/Rocky Linux)
Note that this is just an example; how you want to configure remote desktops on Linux will depend on your use case.
Ubuntu 24.04 and Rocky Linux 9 ship with GDM3 + Gnome per default, which make it a bit harder to share the screen with x11vnc. So the first step is to install a different display manager. We successfully tested LightDM here, but others may work as well.
Note that for Rocky linux you might need to enable the EPEL repository beforehand with:
# dnf install epel-release
First, we install and activate the new display manager:
Ubuntu:
# apt install lightdm
Select 'LightDM' as default login manager when prompted.
Rocky Linux:
# dnf install lightdm
# systemctl disable --now gdm.service
# systemctl enable --now lightdm.service
After that install x11vnc with
Ubuntu:
# apt install x11vnc
Rocky Linux:
# dnf install x11vnc
We then added a systemd service that starts the VNC server on the x.org server provided by LightDM in /etc/systemd/system/x11vnc.service
[Unit]
Description=Start x11vnc
After=multi-user.target

[Service]
Type=simple
ExecStart=/usr/bin/x11vnc -display :0 -auth /var/run/lightdm/root/:0 -forever -loop -repeat -rfbauth /etc/x11vnc.passwd -rfbport 5900 -shared -noxdamage

[Install]
WantedBy=multi-user.target
You can set the password by executing:
# x11vnc -storepasswd /etc/x11vnc.passwd
# chmod 0400 /etc/x11vnc.passwd
On Rocky Linux, you might need to allow VNC in the firewall:
# firewall-cmd --permanent --add-port=5900/tcp
After setting up LightDM and x11vnc and restarting the VM, you should now be able to connect via VNC.
vGPU Configuration
After configuring the VM to your liking, shut down the VM and add a vGPU by selecting one of the virtual functions and selecting the appropriate mediated device type.
For example:
Via the CLI:
qm set VMID -hostpci0 01:00.4,mdev=nvidia-660
Via the web interface:

To find the correct mediated device type, you can use pvesh get /nodes/NODENAME/hardware/pci/MAPPINGNAME/mdev.
This will query sysfs for all supported types that can be created. Note that, depending on the driver and kernel versions in use, not all models may be visible here, but only those that are currently available.
NVIDIA Guest Driver Installation
Windows 10/11
Refer to their documentation[10] to find a compatible guest driver to host driver mapping. For example:
553.24_grid_win10_win11_server2022_dch_64bit_international.exe
Start the installer and follow the instructions, then, after it finished, restart the guest as prompted.
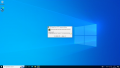
Starting NVIDIA driver installation on Windows 10
Accepting the license agreement on Windows 10

Finishing the installation on Windows 10


Starting NVIDIA driver installation on Windows 11
Accepting the license agreement on Windows 11
Finishing the installation on Windows 11


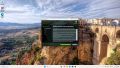
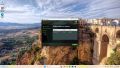
From this point on, Proxmox VE's built-in noVNC console will no longer work, so use your desktop sharing software to connect to the Guest. Now you can use the vGPU for starting 3D applications such as Blender, 3D games, etc.
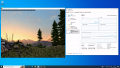
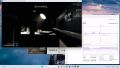
Unigine Valley on Windows 10
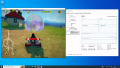
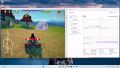
SuperTuxKart on Windows 10
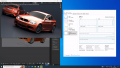
Blender on Windows 10
Blender on Windows 11
Unigine Superposition on Windows 11
SuperTuxKart on Windows 11


Ubuntu Desktop
To install the NVIDIA driver on Ubuntu, use apt to install the .deb package that NVIDIA provides for Ubuntu.
Check the NVIDIA documentation[10] for a compatible guest driver to host driver mapping.
In our case, this was nvidia-linux-grid-550_550.127.05_amd64.deb.
For that to work you must prefix the relative path, for example ./ if the .deb file is located in the current directory.
# apt install ./nvidia-linux-grid-550_550.127.05_amd64.deb
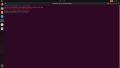
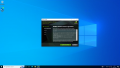
List NVIDIA driver files
Start NVIDIA driver installation
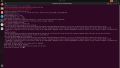
Finished NVIDIA driver installation


Then you must use NVIDIA's tools to configure the x.org configuration with:
# nvidia-xconfig
Now you can reboot and use a VNC client to connect and use the vGPU for 3D applications.
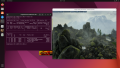
Unigine Valley (Ubuntu 22.04)
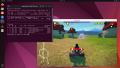
SuperTuxKart (Ubuntu 22.04)

Blender (Ubuntu 22.04)

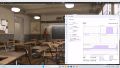
Unigine Superposition (Ubuntu 24.04)

SuperTuxKart (Ubuntu 24.04)
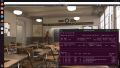
Blender Classroom (Ubuntu 24.04)


Rocky Linux
To install the NVIDIA driver on Rocky Linux, use dnf to install the .rpm package that NVIDIA provides for Red Hat based distributions.
Check the NVIDIA documentation[10] for a compatible guest driver to host driver mapping.
In our case, this was nvidia-linux-grid-550-550.127.05-1.x86_64.rpm.
If the file is located in the current directory, run:
# dnf install nvidia-linux-grid-550-550.127.05-1.x86_64.rpm

Start driver installation
Finished driver installation


Then you must use NVIDIA's tools to configure the x.org configuration with:
# nvidia-xconfig
Now you can reboot and use a VNC client to connect and use the vGPU for 3D applications.

Blender Classroom render

Unigine Superposition

SuperTuxKart


CUDA on Linux
If you want to use CUDA on a Linux Guest, you might need to install the CUDA Toolkit manually[14]. Check the NVIDIA documentation which version of CUDA is supported for your vGPU drivers.
Guest vGPU Licensing
To use the vGPU without restriction, you must adhere to NVIDIA's licensing. Check the NVIDIA vGPU documentation[15] for instructions on how to do so.
For setting up a DLS (Delegated License Service), see NVIDIAs DLS Documentation[16].
Tip: Ensure that the guest system time is properly synchronized using NTP. Otherwise, the guest will be unable to request a license for the vGPU.
Troubleshooting
A warning like the following might get logged by QEMU on VM startup. This usually only happens on consumer hardware which does not support PCIe AER[17] error recovery properly, it generally should not have any adverse effects on normal operation, but PCIe link errors might not be (soft-)recoverable in such cases.
kvm: -device vfio-pci,host=0000:09:00.5,id=hostpci0,bus=ich9-pcie-port-1,addr=0x0: warning: vfio 0000:09:00.5: Could not enable error recovery for the device
Known Issues
Windows 10/11 'Fast Startup'
In Windows 10/11 'fast startup' is enabled by default. When enabled, a shutdown via ACPI or the start menu will use 'hybrid shutdown'. The next boot will fail with a blue screen and the vGPU will be disabled.
Disable 'fast boot' in Windows to prevent this. In the Control Panel → Power Options → Choose what the power button does → Uncheck 'fast startup'.
Alternatively, disable hybrid shutdown in a command prompt with admin privileges:
Powercfg -h off
Secure Boot
When booting the host with secure boot, kernel modules must be signed with a trusted key. We will show you how to set up your host so that the NVIDIA driver is signed and ready to load. For more details, see Secure Boot Setup. To be able to enroll the keys into the UEFI, make sure you have access to the physical display output during boot. This is necessary for confirming the key import. On servers, this can usually be achieved with IPMI/iKVM/etc.
Before installing the NVIDIA Host driver, we need to install a few prerequisites to enroll the DKMS signing key into UEFI:
apt install shim-signed grub-efi-amd64-signed mokutil
Now you can install the NVIDIA driver, but with an additional parameter:
./NVIDIA-Linux-x86_64-525.105.14-vgpu-kvm.run --dkms --skip-module-load
When asked if the installer should sign the module, select 'no'.
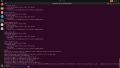
After the installer is finished, we now want to rebuild the kernel modules with DKMS, which will sign the kernel module for us with a generated key. First, check what module version is installed with:
dkms status
Which will output a line like this:
nvidia/550.144.02, 6.8.12-6-pve, x86_64: installed
You need to rebuild and reinstall the listed module with (replace the version with the one on your system)
dkms build -m nvidia -v 550.144.02 --force
dkms install -m nvidia -v 550.144.02 --force
This will ensure that the modules are signed with the DKMS key located in /var/lib/dkms/mok.pub If you have not already done so, enroll the DKMS key as described in Using DKMS with Secure Boot.
You should then be able to load the signed NVIDIA kernel module. You can verify this by checking if the PCI devices have their driver loaded, e.g. with
lspci -d 10de: -nnk
It should say
Kernel driver in use: nvidia
You can now continue with the next step after the driver installation.
Notes
- ↑ Jump up to: 1.0 1.1 1.2 NVIDIA GPUs supported by vGPU https://docs.nvidia.com/vgpu/gpus-supported-by-vgpu.html
- ↑ Jump up to: 2.0 2.1 Latest NVIDIA vGPU Documentation https://docs.nvidia.com/vgpu/latest/index.html
- ↑ NVIDIA vGPU Linux with KVM Documenation https://docs.nvidia.com/vgpu/latest/grid-vgpu-release-notes-generic-linux-kvm/index.html
- ↑ Proxmox VE Subscription Agreement https://www.proxmox.com/en/downloads/proxmox-virtual-environment/agreements/proxmox-ve-subscription-agreement
- ↑ Proxmox VE Subscriptions https://www.proxmox.com/en/products/proxmox-virtual-environment/pricing
- ↑ Jump up to: 6.0 6.1 NVIDIA Qualified System Catalog https://marketplace.nvidia.com/en-us/enterprise/qualified-system-catalog/
- ↑ NVIDIA vGPU Support Matrix https://docs.nvidia.com/vgpu/latest/product-support-matrix/index.html
- ↑ NVIDIA Display Mode Selector Tool https://developer.nvidia.com/displaymodeselector
- ↑ Latest NVIDIA vGPU user guide: Switching the Mode of a GPU that Supports Multiple Display Modes https://docs.nvidia.com/vgpu/latest/grid-vgpu-user-guide/index.html#displaymodeselector
- ↑ Jump up to: 10.0 10.1 10.2 10.3 NVIDIA vGPU Driver versions https://docs.nvidia.com/vgpu/#driver-versions
- ↑ NVIDIA GPUs supported by NVIDIA AI Enterprise https://docs.nvidia.com/ai-enterprise/latest/product-support-matrix/index.html
- ↑ Getting your NVIDIA vGPU Software: https://docs.nvidia.com/vgpu/latest/grid-software-quick-start-guide/index.html#getting-your-nvidia-grid-software
- ↑ Mediated Devices https://pve.proxmox.com/wiki/PCI(e)_Passthrough#_mediated_devices_vgpu_gvt_g
- ↑ NVIDIA CUDA Toolkit Download https://developer.nvidia.com/cuda-downloads
- ↑ NVIDIA vGPU Licensing User Guide: https://docs.nvidia.com/vgpu/latest/grid-licensing-user-guide/index.html
- ↑ NVIDIA DLS Documentation https://docs.nvidia.com/license-system/latest/
- ↑ PCI Express Advanced Error Reporting Driver Guide: https://www.kernel.org/doc/html/v6.12-rc4/PCI/pcieaer-howto.html