The Proxmox VE storage model is very flexible. Virtual machine images can either be stored on one or several local storages, or on shared storage like NFS or iSCSI (NAS, SAN). There are no limits, and you may configure as many storage pools as you like. You can use all storage technologies available for Debian Linux.
One major benefit of storing VMs on shared storage is the ability to live-migrate running machines without any downtime, as all nodes in the cluster have direct access to VM disk images. There is no need to copy VM image data, so live migration is very fast in that case.
The storage library (package libpve-storage-perl) uses a flexible plugin system to provide a common interface to all storage types. This can be easily adopted to include further storage types in the future.
Storage Types
There are basically two different classes of storage types:
- File level storage
-
File level based storage technologies allow access to a fully featured (POSIX) file system. They are in general more flexible than any Block level storage (see below), and allow you to store content of any type. ZFS is probably the most advanced system, and it has full support for snapshots and clones.
- Block level storage
-
Allows to store large raw images. It is usually not possible to store other files (ISO, backups, ..) on such storage types. Most modern block level storage implementations support snapshots and clones. RADOS and GlusterFS are distributed systems, replicating storage data to different nodes.
| Description | PVE type | Level | Shared | Snapshots | Stable |
|---|---|---|---|---|---|
ZFS (local) |
zfspool |
file |
no |
yes |
yes |
Directory |
dir |
file |
no |
no1 |
yes |
NFS |
nfs |
file |
yes |
no1 |
yes |
CIFS |
cifs |
file |
yes |
no1 |
yes |
Proxmox Backup |
pbs |
both |
yes |
n/a |
yes |
GlusterFS |
glusterfs |
file |
yes |
no1 |
yes |
CephFS |
cephfs |
file |
yes |
yes |
yes |
LVM |
lvm |
block |
no2 |
no |
yes |
LVM-thin |
lvmthin |
block |
no |
yes |
yes |
iSCSI/kernel |
iscsi |
block |
yes |
no |
yes |
iSCSI/libiscsi |
iscsidirect |
block |
yes |
no |
yes |
Ceph/RBD |
rbd |
block |
yes |
yes |
yes |
ZFS over iSCSI |
zfs |
block |
yes |
yes |
yes |
1: On file based storages, snapshots are possible with the qcow2 format.
2: It is possible to use LVM on top of an iSCSI or FC-based storage. That way you get a shared LVM storage.
Thin Provisioning
A number of storages, and the Qemu image format qcow2, support thin provisioning. With thin provisioning activated, only the blocks that the guest system actually use will be written to the storage.
Say for instance you create a VM with a 32GB hard disk, and after installing the guest system OS, the root file system of the VM contains 3 GB of data. In that case only 3GB are written to the storage, even if the guest VM sees a 32GB hard drive. In this way thin provisioning allows you to create disk images which are larger than the currently available storage blocks. You can create large disk images for your VMs, and when the need arises, add more disks to your storage without resizing the VMs' file systems.
All storage types which have the “Snapshots” feature also support thin provisioning.

|
If a storage runs full, all guests using volumes on that storage receive IO errors. This can cause file system inconsistencies and may corrupt your data. So it is advisable to avoid over-provisioning of your storage resources, or carefully observe free space to avoid such conditions. |
Storage Configuration
All Proxmox VE related storage configuration is stored within a single text file at /etc/pve/storage.cfg. As this file is within /etc/pve/, it gets automatically distributed to all cluster nodes. So all nodes share the same storage configuration.
Sharing storage configuration makes perfect sense for shared storage, because the same “shared” storage is accessible from all nodes. But it is also useful for local storage types. In this case such local storage is available on all nodes, but it is physically different and can have totally different content.
Storage Pools
Each storage pool has a <type>, and is uniquely identified by its <STORAGE_ID>. A pool configuration looks like this:
<type>: <STORAGE_ID>
        <property> <value>
        <property> <value>
        <property>
        ...
The <type>: <STORAGE_ID> line starts the pool definition, which is then followed by a list of properties. Most properties require a value. Some have reasonable defaults, in which case you can omit the value.
To be more specific, take a look at the default storage configuration after installation. It contains one special local storage pool named local, which refers to the directory /var/lib/vz and is always available. The Proxmox VE installer creates additional storage entries depending on the storage type chosen at installation time.
dir: local
        path /var/lib/vz
        content iso,vztmpl,backup

# default image store on LVM based installation
lvmthin: local-lvm
        thinpool data
        vgname pve
        content rootdir,images

# default image store on ZFS based installation
zfspool: local-zfs
        pool rpool/data
        sparse
        content images,rootdir
Common Storage Properties
A few storage properties are common among different storage types.
- nodes
-
List of cluster node names where this storage is usable/accessible. One can use this property to restrict storage access to a limited set of nodes.
- content
-
A storage can support several content types, for example virtual disk images, cdrom iso images, container templates or container root directories. Not all storage types support all content types. One can set this property to select what this storage is used for.
- images
-
KVM-Qemu VM images.
- rootdir
-
Allow to store container data.
- vztmpl
-
Container templates.
- backup
-
Backup files (vzdump).
- iso
-
ISO images
- snippets
-
Snippet files, for example guest hook scripts
- shared
-
Mark storage as shared.
- disable
-
You can use this flag to disable the storage completely.
- maxfiles
-
Deprecated, please use prune-backups instead. Maximum number of backup files per VM. Use 0 for unlimited.
- prune-backups
-
Retention options for backups. For details, see Backup Retention.
- format
-
Default image format (raw|qcow2|vmdk)

|
It is not advisable to use the same storage pool on different Proxmox VE clusters. Some storage operation need exclusive access to the storage, so proper locking is required. While this is implemented within a cluster, it does not work between different clusters. |
Volumes
We use a special notation to address storage data. When you allocate data from a storage pool, it returns such a volume identifier. A volume is identified by the <STORAGE_ID>, followed by a storage type dependent volume name, separated by colon. A valid <VOLUME_ID> looks like:
local:230/example-image.raw
local:iso/debian-501-amd64-netinst.iso
local:vztmpl/debian-5.0-joomla_1.5.9-1_i386.tar.gz
iscsi-storage:0.0.2.scsi-14f504e46494c4500494b5042546d2d646744372d31616d61
To get the file system path for a <VOLUME_ID> use:
pvesm path <VOLUME_ID>
Volume Ownership
There exists an ownership relation for image type volumes. Each such volume is owned by a VM or Container. For example volume local:230/example-image.raw is owned by VM 230. Most storage backends encodes this ownership information into the volume name.
When you remove a VM or Container, the system also removes all associated volumes which are owned by that VM or Container.
Using the Command Line Interface
It is recommended to familiarize yourself with the concept behind storage pools and volume identifiers, but in real life, you are not forced to do any of those low level operations on the command line. Normally, allocation and removal of volumes is done by the VM and Container management tools.
Nevertheless, there is a command line tool called pvesm (“Proxmox VE Storage Manager”), which is able to perform common storage management tasks.
Examples
Add storage pools
pvesm add <TYPE> <STORAGE_ID> <OPTIONS>
pvesm add dir <STORAGE_ID> --path <PATH>
pvesm add nfs <STORAGE_ID> --path <PATH> --server <SERVER> --export <EXPORT>
pvesm add lvm <STORAGE_ID> --vgname <VGNAME>
pvesm add iscsi <STORAGE_ID> --portal <HOST[:PORT]> --target <TARGET>
Disable storage pools
pvesm set <STORAGE_ID> --disable 1
Enable storage pools
pvesm set <STORAGE_ID> --disable 0
Change/set storage options
pvesm set <STORAGE_ID> <OPTIONS>
pvesm set <STORAGE_ID> --shared 1
pvesm set local --format qcow2
pvesm set <STORAGE_ID> --content iso
Remove storage pools. This does not delete any data, and does not disconnect or unmount anything. It just removes the storage configuration.
pvesm remove <STORAGE_ID>
Allocate volumes
pvesm alloc <STORAGE_ID> <VMID> <name> <size> [--format <raw|qcow2>]
Allocate a 4G volume in local storage. The name is auto-generated if you pass an empty string as <name>
pvesm alloc local <VMID> '' 4G
Free volumes
pvesm free <VOLUME_ID>
|
|
This really destroys all volume data. |
List storage status
pvesm status
List storage contents
pvesm list <STORAGE_ID> [--vmid <VMID>]
List volumes allocated by VMID
pvesm list <STORAGE_ID> --vmid <VMID>
List iso images
pvesm list <STORAGE_ID> --iso
List container templates
pvesm list <STORAGE_ID> --vztmpl
Show file system path for a volume
pvesm path <VOLUME_ID>
Exporting the volume local:103/vm-103-disk-0.qcow2 to the file target. This is mostly used internally with pvesm import. The stream format qcow2+size is different to the qcow2 format. Consequently, the exported file cannot simply be attached to a VM. This also holds for the other formats.
pvesm export local:103/vm-103-disk-0.qcow2 qcow2+size target --with-snapshots 1
Directory Backend
Storage pool type: dir
Proxmox VE can use local directories or locally mounted shares for storage. A directory is a file level storage, so you can store any content type like virtual disk images, containers, templates, ISO images or backup files.

|
You can mount additional storages via standard linux /etc/fstab, and then define a directory storage for that mount point. This way you can use any file system supported by Linux. |
This backend assumes that the underlying directory is POSIX compatible, but nothing else. This implies that you cannot create snapshots at the storage level. But there exists a workaround for VM images using the qcow2 file format, because that format supports snapshots internally.

|
Some storage types do not support O_DIRECT, so you can’t use cache mode none with such storages. Simply use cache mode writeback instead. |
We use a predefined directory layout to store different content types into different sub-directories. This layout is used by all file level storage backends.
| Content type | Subdir |
|---|---|
VM images |
images/<VMID>/ |
ISO images |
template/iso/ |
Container templates |
template/cache/ |
Backup files |
dump/ |
Snippets |
snippets/ |
Configuration
This backend supports all common storage properties, and adds an additional property called path to specify the directory. This needs to be an absolute file system path.
dir: backup
        path /mnt/backup
        content backup
        maxfiles 7
Above configuration defines a storage pool called backup. That pool can be used to store up to 7 backups (maxfiles 7) per VM. The real path for the backup files is /mnt/backup/dump/....
File naming conventions
This backend uses a well defined naming scheme for VM images:
vm-<VMID>-<NAME>.<FORMAT>
- <VMID>
-
This specifies the owner VM.
- <NAME>
-
This can be an arbitrary name (ascii) without white space. The backend uses disk-[N] as default, where [N] is replaced by an integer to make the name unique.
- <FORMAT>
-
Specifies the image format (raw|qcow2|vmdk).
When you create a VM template, all VM images are renamed to indicate that they are now read-only, and can be used as a base image for clones:
base-<VMID>-<NAME>.<FORMAT>
|
|
Such base images are used to generate cloned images. So it is important that those files are read-only, and never get modified. The backend changes the access mode to 0444, and sets the immutable flag (chattr +i) if the storage supports that. |
Storage Features
As mentioned above, most file systems do not support snapshots out of the box. To workaround that problem, this backend is able to use qcow2 internal snapshot capabilities.
Same applies to clones. The backend uses the qcow2 base image feature to create clones.
| Content types | Image formats | Shared | Snapshots | Clones |
|---|---|---|---|---|
images rootdir vztmpl iso backup snippets |
raw qcow2 vmdk subvol |
no |
qcow2 |
qcow2 |
Examples
Please use the following command to allocate a 4GB image on storage local:
# pvesm alloc local 100 vm-100-disk10.raw 4G
Formatting '/var/lib/vz/images/100/vm-100-disk10.raw', fmt=raw size=4294967296
successfully created 'local:100/vm-100-disk10.raw'
|
|
The image name must conform to above naming conventions. |
The real file system path is shown with:
# pvesm path local:100/vm-100-disk10.raw
/var/lib/vz/images/100/vm-100-disk10.raw
And you can remove the image with:
# pvesm free local:100/vm-100-disk10.raw
NFS Backend
Storage pool type: nfs
The NFS backend is based on the directory backend, so it shares most properties. The directory layout and the file naming conventions are the same. The main advantage is that you can directly configure the NFS server properties, so the backend can mount the share automatically. There is no need to modify /etc/fstab. The backend can also test if the server is online, and provides a method to query the server for exported shares.
Configuration
The backend supports all common storage properties, except the shared flag, which is always set. Additionally, the following properties are used to configure the NFS server:
- server
-
Server IP or DNS name. To avoid DNS lookup delays, it is usually preferable to use an IP address instead of a DNS name - unless you have a very reliable DNS server, or list the server in the local /etc/hosts file.
- export
-
NFS export path (as listed by pvesm nfsscan).
You can also set NFS mount options:
- path
-
The local mount point (defaults to /mnt/pve/<STORAGE_ID>/).
- options
-
NFS mount options (see man nfs).
nfs: iso-templates
        path /mnt/pve/iso-templates
        server 10.0.0.10
        export /space/iso-templates
        options vers=3,soft
        content iso,vztmpl
|
|
After an NFS request times out, NFS request are retried indefinitely by default. This can lead to unexpected hangs on the client side. For read-only content, it is worth to consider the NFS soft option, which limits the number of retries to three. |
Storage Features
NFS does not support snapshots, but the backend uses qcow2 features to implement snapshots and cloning.
| Content types | Image formats | Shared | Snapshots | Clones |
|---|---|---|---|---|
images rootdir vztmpl iso backup snippets |
raw qcow2 vmdk |
yes |
qcow2 |
qcow2 |
Examples
You can get a list of exported NFS shares with:
# pvesm nfsscan <server>
CIFS Backend
Storage pool type: cifs
The CIFS backend extends the directory backend, so that no manual setup of a CIFS mount is needed. Such a storage can be added directly through the Proxmox VE API or the WebUI, with all our backend advantages, like server heartbeat check or comfortable selection of exported shares.
Configuration
The backend supports all common storage properties, except the shared flag, which is always set. Additionally, the following CIFS special properties are available:
- server
-
Server IP or DNS name. Required.
|
|
To avoid DNS lookup delays, it is usually preferable to use an IP address instead of a DNS name - unless you have a very reliable DNS server, or list the server in the local /etc/hosts file. |
- share
-
CIFS share to use (get available ones with pvesm scan cifs <address> or the WebUI). Required.
- username
-
The username for the CIFS storage. Optional, defaults to ‘guest’.
- password
-
The user password. Optional. It will be saved in a file only readable by root (/etc/pve/priv/storage/<STORAGE-ID>.pw).
- domain
-
Sets the user domain (workgroup) for this storage. Optional.
- smbversion
-
SMB protocol Version. Optional, default is 3. SMB1 is not supported due to security issues.
- path
-
The local mount point. Optional, defaults to /mnt/pve/<STORAGE_ID>/.
cifs: backup
        path /mnt/pve/backup
        server 10.0.0.11
        share VMData
        content backup
        username anna
        smbversion 3
Storage Features
CIFS does not support snapshots on a storage level. But you may use qcow2 backing files if you still want to have snapshots and cloning features available.
| Content types | Image formats | Shared | Snapshots | Clones |
|---|---|---|---|---|
images rootdir vztmpl iso backup snippets |
raw qcow2 vmdk |
yes |
qcow2 |
qcow2 |
Examples
You can get a list of exported CIFS shares with:
# pvesm scan cifs <server> [--username <username>] [--password]
Then you could add this share as a storage to the whole Proxmox VE cluster with:
# pvesm add cifs <storagename> --server <server> --share <share> [--username <username>] [--password]
Proxmox Backup Server
Storage pool type: pbs
This backend allows direct integration of a Proxmox Backup Server into Proxmox VE like any other storage. A Proxmox Backup storage can be added directly through the Proxmox VE API, CLI or the webinterface.
Configuration
The backend supports all common storage properties, except the shared flag, which is always set. Additionally, the following special properties to Proxmox Backup Server are available:
- server
-
Server IP or DNS name. Required.
- username
-
The username for the Proxmox Backup Server storage. Required.
|
|
Do not forget to add the realm to the username. For example, root@pam or archiver@pbs. |
- password
-
The user password. The value will be saved in a file under /etc/pve/priv/storage/<STORAGE-ID>.pw with access restricted to the root user. Required.
- datastore
-
The ID of the Proxmox Backup Server datastore to use. Required.
- fingerprint
-
The fingerprint of the Proxmox Backup Server API TLS certificate. You can get it in the Servers Dashboard or using the proxmox-backup-manager cert info command. Required for self-signed certificates or any other one where the host does not trusts the servers CA.
- encryption-key
-
A key to encrypt the backup data from the client side. Currently only non-password protected (no key derive function (kdf)) are supported. Will be saved in a file under /etc/pve/priv/storage/<STORAGE-ID>.enc with access restricted to the root user. Use the magic value autogen to automatically generate a new one using proxmox-backup-client key create --kdf none <path>. Optional.
pbs: backup
        datastore main
        server enya.proxmox.com
        content backup
        fingerprint 09:54:ef:..snip..:88:af:47:fe:4c:3b:cf:8b:26:88:0b:4e:3c:b2
        maxfiles 0
        username archiver@pbs
Storage Features
Proxmox Backup Server only supports backups, they can be block-level or file-level based. Proxmox VE uses block-level for virtual machines and file-level for container.
| Content types | Image formats | Shared | Snapshots | Clones |
|---|---|---|---|---|
backup |
n/a |
yes |
n/a |
n/a |
Encryption
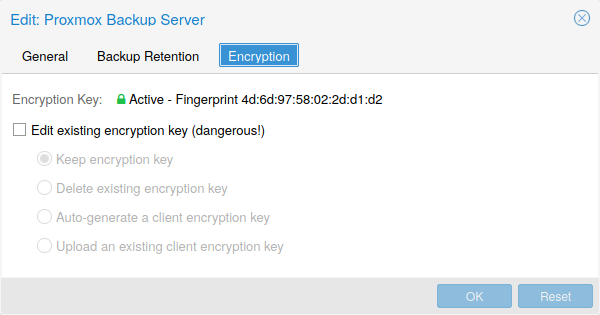
Optionally, you can configure client-side encryption with AES-256 in GCM mode. Encryption can be configured either via the web interface, or on the CLI with the encryption-key option (see above). The key will be saved in the file /etc/pve/priv/storage/<STORAGE-ID>.enc, which is only accessible by the root user.
|
|
Without their key, backups will be inaccessible. Thus, you should keep keys ordered and in a place that is separate from the contents being backed up. It can happen, for example, that you back up an entire system, using a key on that system. If the system then becomes inaccessible for any reason and needs to be restored, this will not be possible as the encryption key will be lost along with the broken system. |
It is recommended that you keep your key safe, but easily accessible, in order for quick disaster recovery. For this reason, the best place to store it is in your password manager, where it is immediately recoverable. As a backup to this, you should also save the key to a USB drive and store that in a secure place. This way, it is detached from any system, but is still easy to recover from, in case of emergency. Finally, in preparation for the worst case scenario, you should also consider keeping a paper copy of your key locked away in a safe place. The paperkey subcommand can be used to create a QR encoded version of your key. The following command sends the output of the paperkey command to a text file, for easy printing.
# proxmox-backup-client key paperkey /etc/pve/priv/storage/<STORAGE-ID>.enc --output-format text > qrkey.txt
Because the encryption is managed on the client side, you can use the same datastore on the server for unencrypted backups and encrypted backups, even if they are encrypted with different keys. However, deduplication between backups with different keys is not possible, so it is often better to create separate datastores.
|
|
Do not use encryption if there is no benefit from it, for example, when you are running the server locally in a trusted network. It is always easier to recover from unencrypted backups. |
Example: Add Storage over CLI
Then you could add this share as a storage to the whole Proxmox VE cluster with:
# pvesm add pbs <id> --server <server> --datastore <datastore> --username <username> --fingerprint 00:B4:... --password
GlusterFS Backend
Storage pool type: glusterfs
GlusterFS is a scalable network file system. The system uses a modular design, runs on commodity hardware, and can provide a highly available enterprise storage at low costs. Such system is capable of scaling to several petabytes, and can handle thousands of clients.
|
|
After a node/brick crash, GlusterFS does a full rsync to make sure data is consistent. This can take a very long time with large files, so this backend is not suitable to store large VM images. |
Configuration
The backend supports all common storage properties, and adds the following GlusterFS specific options:
- server
-
GlusterFS volfile server IP or DNS name.
- server2
-
Backup volfile server IP or DNS name.
- volume
-
GlusterFS Volume.
- transport
-
GlusterFS transport: tcp, unix or rdma
glusterfs: Gluster
        server 10.2.3.4
        server2 10.2.3.5
        volume glustervol
        content images,iso
File naming conventions
The directory layout and the file naming conventions are inherited from the dir backend.
Storage Features
The storage provides a file level interface, but no native snapshot/clone implementation.
| Content types | Image formats | Shared | Snapshots | Clones |
|---|---|---|---|---|
images vztmpl iso backup snippets |
raw qcow2 vmdk |
yes |
qcow2 |
qcow2 |
Local ZFS Pool Backend
Storage pool type: zfspool
This backend allows you to access local ZFS pools (or ZFS file systems inside such pools).
Configuration
The backend supports the common storage properties content, nodes, disable, and the following ZFS specific properties:
- pool
-
Select the ZFS pool/filesystem. All allocations are done within that pool.
- blocksize
-
Set ZFS blocksize parameter.
- sparse
-
Use ZFS thin-provisioning. A sparse volume is a volume whose reservation is not equal to the volume size.
- mountpoint
-
The mount point of the ZFS pool/filesystem. Changing this does not affect the mountpoint property of the dataset seen by zfs. Defaults to /<pool>.
zfspool: vmdata
        pool tank/vmdata
        content rootdir,images
        sparse
File naming conventions
The backend uses the following naming scheme for VM images:
vm-<VMID>-<NAME>      // normal VM images
base-<VMID>-<NAME>    // template VM image (read-only)
subvol-<VMID>-<NAME>  // subvolumes (ZFS filesystem for containers)
- <VMID>
-
This specifies the owner VM.
- <NAME>
-
This can be an arbitrary name (ascii) without white space. The backend uses disk[N] as default, where [N] is replaced by an integer to make the name unique.
Storage Features
ZFS is probably the most advanced storage type regarding snapshot and cloning. The backend uses ZFS datasets for both VM images (format raw) and container data (format subvol). ZFS properties are inherited from the parent dataset, so you can simply set defaults on the parent dataset.
| Content types | Image formats | Shared | Snapshots | Clones |
|---|---|---|---|---|
images rootdir |
raw subvol |
no |
yes |
yes |
Examples
It is recommended to create an extra ZFS file system to store your VM images:
# zfs create tank/vmdata
To enable compression on that newly allocated file system:
# zfs set compression=on tank/vmdata
You can get a list of available ZFS filesystems with:
# pvesm zfsscan
LVM Backend
Storage pool type: lvm
LVM is a light software layer on top of hard disks and partitions. It can be used to split available disk space into smaller logical volumes. LVM is widely used on Linux and makes managing hard drives easier.
Another use case is to put LVM on top of a big iSCSI LUN. That way you can easily manage space on that iSCSI LUN, which would not be possible otherwise, because the iSCSI specification does not define a management interface for space allocation.
Configuration
The LVM backend supports the common storage properties content, nodes, disable, and the following LVM specific properties:
- vgname
-
LVM volume group name. This must point to an existing volume group.
- base
-
Base volume. This volume is automatically activated before accessing the storage. This is mostly useful when the LVM volume group resides on a remote iSCSI server.
- saferemove
-
Zero-out data when removing LVs. When removing a volume, this makes sure that all data gets erased.
- saferemove_throughput
-
Wipe throughput (cstream -t parameter value).
lvm: myspace
        vgname myspace
        content rootdir,images
File naming conventions
The backend use basically the same naming conventions as the ZFS pool backend.
vm-<VMID>-<NAME> // normal VM images
Storage Features
LVM is a typical block storage, but this backend does not support snapshots and clones. Unfortunately, normal LVM snapshots are quite inefficient, because they interfere with all writes on the entire volume group during snapshot time.
One big advantage is that you can use it on top of a shared storage, for example, an iSCSI LUN. The backend itself implements proper cluster-wide locking.
|
|
The newer LVM-thin backend allows snapshots and clones, but does not support shared storage. |
| Content types | Image formats | Shared | Snapshots | Clones |
|---|---|---|---|---|
images rootdir |
raw |
possible |
no |
no |
Examples
List available volume groups:
# pvesm lvmscan
LVM thin Backend
Storage pool type: lvmthin
LVM normally allocates blocks when you create a volume. LVM thin pools instead allocates blocks when they are written. This behaviour is called thin-provisioning, because volumes can be much larger than physically available space.
You can use the normal LVM command line tools to manage and create LVM thin pools (see man lvmthin for details). Assuming you already have a LVM volume group called pve, the following commands create a new LVM thin pool (size 100G) called data:
lvcreate -L 100G -n data pve
lvconvert --type thin-pool pve/data
Configuration
The LVM thin backend supports the common storage properties content, nodes, disable, and the following LVM specific properties:
- vgname
-
LVM volume group name. This must point to an existing volume group.
- thinpool
-
The name of the LVM thin pool.
lvmthin: local-lvm
        thinpool data
        vgname pve
        content rootdir,images
File naming conventions
The backend use basically the same naming conventions as the ZFS pool backend.
vm-<VMID>-<NAME> // normal VM images
Storage Features
LVM thin is a block storage, but fully supports snapshots and clones efficiently. New volumes are automatically initialized with zero.
It must be mentioned that LVM thin pools cannot be shared across multiple nodes, so you can only use them as local storage.
| Content types | Image formats | Shared | Snapshots | Clones |
|---|---|---|---|---|
images rootdir |
raw |
no |
yes |
yes |
Examples
List available LVM thin pools on volume group pve:
# pvesm lvmthinscan pve
Open-iSCSI initiator
Storage pool type: iscsi
iSCSI is a widely employed technology used to connect to storage servers. Almost all storage vendors support iSCSI. There are also open source iSCSI target solutions available, e.g. OpenMediaVault, which is based on Debian.
To use this backend, you need to install the Open-iSCSI (open-iscsi) package. This is a standard Debian package, but it is not installed by default to save resources.
# apt-get install open-iscsi
Low-level iscsi management task can be done using the iscsiadm tool.
Configuration
The backend supports the common storage properties content, nodes, disable, and the following iSCSI specific properties:
- portal
-
iSCSI portal (IP or DNS name with optional port).
- target
-
iSCSI target.
iscsi: mynas
     portal 10.10.10.1
     target iqn.2006-01.openfiler.com:tsn.dcb5aaaddd
     content none
|
|
If you want to use LVM on top of iSCSI, it make sense to set content none. That way it is not possible to create VMs using iSCSI LUNs directly. |
File naming conventions
The iSCSI protocol does not define an interface to allocate or delete data. Instead, that needs to be done on the target side and is vendor specific. The target simply exports them as numbered LUNs. So Proxmox VE iSCSI volume names just encodes some information about the LUN as seen by the linux kernel.
Storage Features
iSCSI is a block level type storage, and provides no management interface. So it is usually best to export one big LUN, and setup LVM on top of that LUN. You can then use the LVM plugin to manage the storage on that iSCSI LUN.
| Content types | Image formats | Shared | Snapshots | Clones |
|---|---|---|---|---|
images none |
raw |
yes |
no |
no |
Examples
Scan a remote iSCSI portal, and returns a list of possible targets:
pvesm scan iscsi <HOST[:PORT]>
User Mode iSCSI Backend
Storage pool type: iscsidirect
This backend provides basically the same functionality as the Open-iSCSI backed, but uses a user-level library (package libiscsi2) to implement it.
It should be noted that there are no kernel drivers involved, so this can be viewed as performance optimization. But this comes with the drawback that you cannot use LVM on top of such iSCSI LUN. So you need to manage all space allocations at the storage server side.
Configuration
The user mode iSCSI backend uses the same configuration options as the Open-iSCSI backed.
iscsidirect: faststore
     portal 10.10.10.1
     target iqn.2006-01.openfiler.com:tsn.dcb5aaaddd
Storage Features
|
|
This backend works with VMs only. Containers cannot use this driver. |
| Content types | Image formats | Shared | Snapshots | Clones |
|---|---|---|---|---|
images |
raw |
yes |
no |
no |
Ceph RADOS Block Devices (RBD)
Storage pool type: rbd
Ceph is a distributed object store and file system designed to provide excellent performance, reliability and scalability. RADOS block devices implement a feature rich block level storage, and you get the following advantages:
-
thin provisioning
-
resizable volumes
-
distributed and redundant (striped over multiple OSDs)
-
full snapshot and clone capabilities
-
self healing
-
no single point of failure
-
scalable to the exabyte level
-
kernel and user space implementation available
|
|
For smaller deployments, it is also possible to run Ceph services directly on your Proxmox VE nodes. Recent hardware has plenty of CPU power and RAM, so running storage services and VMs on same node is possible. |
Configuration
This backend supports the common storage properties nodes, disable, content, and the following rbd specific properties:
- monhost
-
List of monitor daemon IPs. Optional, only needed if Ceph is not running on the PVE cluster.
- pool
-
Ceph pool name.
- username
-
RBD user ID. Optional, only needed if Ceph is not running on the PVE cluster. Note that only the user ID should be used. The "client." type prefix must be left out.
- krbd
-
Enforce access to rados block devices through the krbd kernel module. Optional.
|
|
Containers will use krbd independent of the option value. |
rbd: ceph-external
        monhost 10.1.1.20 10.1.1.21 10.1.1.22
        pool ceph-external
        content images
        username admin
|
|
You can use the rbd utility to do low-level management tasks. |
Authentication
If you use cephx authentication, you need to copy the keyfile from your external Ceph cluster to a Proxmox VE host.
Create the directory /etc/pve/priv/ceph with
mkdir /etc/pve/priv/ceph
Then copy the keyring
scp <cephserver>:/etc/ceph/ceph.client.admin.keyring /etc/pve/priv/ceph/<STORAGE_ID>.keyring
The keyring must be named to match your <STORAGE_ID>. Copying the keyring generally requires root privileges.
If Ceph is installed locally on the PVE cluster, this is done automatically by pveceph or in the GUI.
Storage Features
The rbd backend is a block level storage, and implements full snapshot and clone functionality.
| Content types | Image formats | Shared | Snapshots | Clones |
|---|---|---|---|---|
images rootdir |
raw |
yes |
yes |
yes |
Ceph Filesystem (CephFS)
Storage pool type: cephfs
CephFS implements a POSIX-compliant filesystem, using a Ceph storage cluster to store its data. As CephFS builds upon Ceph, it shares most of its properties. This includes redundancy, scalability, self-healing, and high availability.
|
|
Proxmox VE can manage Ceph setups, which makes configuring a CephFS storage easier. As modern hardware offers a lot of processing power and RAM, running storage services and VMs on same node is possible without a significant performance impact. |
To use the CephFS storage plugin, you must replace the stock Debian Ceph client, by adding our Ceph repository. Once added, run apt update, followed by apt dist-upgrade, in order to get the newest packages.
|
|
Please ensure that there are no other Ceph repositories configured. Otherwise the installation will fail or there will be mixed package versions on the node, leading to unexpected behavior. |
Configuration
This backend supports the common storage properties nodes, disable, content, as well as the following cephfs specific properties:
- monhost
-
List of monitor daemon addresses. Optional, only needed if Ceph is not running on the PVE cluster.
- path
-
The local mount point. Optional, defaults to /mnt/pve/<STORAGE_ID>/.
- username
-
Ceph user id. Optional, only needed if Ceph is not running on the PVE cluster, where it defaults to admin.
- subdir
-
CephFS subdirectory to mount. Optional, defaults to /.
- fuse
-
Access CephFS through FUSE, instead of the kernel client. Optional, defaults to 0.
cephfs: cephfs-external
        monhost 10.1.1.20 10.1.1.21 10.1.1.22
        path /mnt/pve/cephfs-external
        content backup
        username admin
|
|
Don’t forget to set up the client’s secret key file, if cephx was not disabled. |
Authentication
If you use cephx authentication, which is enabled by default, you need to copy the secret from your external Ceph cluster to a Proxmox VE host.
Create the directory /etc/pve/priv/ceph with
mkdir /etc/pve/priv/ceph
Then copy the secret
scp cephfs.secret <proxmox>:/etc/pve/priv/ceph/<STORAGE_ID>.secret
The secret must be renamed to match your <STORAGE_ID>. Copying the secret generally requires root privileges. The file must only contain the secret key itself, as opposed to the rbd backend which also contains a [client.userid] section.
A secret can be received from the Ceph cluster (as Ceph admin) by issuing the command below, where userid is the client ID that has been configured to access the cluster. For further information on Ceph user management, see the Ceph docs [1].
ceph auth get-key client.userid > cephfs.secret
If Ceph is installed locally on the PVE cluster, that is, it was set up using pveceph, this is done automatically.
Storage Features
The cephfs backend is a POSIX-compliant filesystem, on top of a Ceph cluster.
| Content types | Image formats | Shared | Snapshots | Clones |
|---|---|---|---|---|
vztmpl iso backup snippets |
none |
yes |
yes[1] |
no |
[1] While no known bugs exist, snapshots are not yet guaranteed to be stable, as they lack sufficient testing.