The following sections will focus on common virtualization tasks and explain the Proxmox VE specifics regarding the administration and management of the host machine.
Proxmox VE is based on Debian GNU/Linux with additional repositories to provide the Proxmox VE related packages. This means that the full range of Debian packages is available including security updates and bug fixes. Proxmox VE provides its own Linux kernel based on the Ubuntu kernel. It has all the necessary virtualization and container features enabled and includes ZFS and several extra hardware drivers.
For other topics not included in the following sections, please refer to the Debian documentation. The Debian Administrator's Handbook is available online, and provides a comprehensive introduction to the Debian operating system (see [Hertzog13]).
Package Repositories
Proxmox VE uses APT as its package management tool like any other Debian-based system.
Proxmox VE automatically checks for package updates on a daily basis. The root@pam user is notified via email about available updates. From the GUI, the Changelog button can be used to see more details about an selected update.
Repositories in Proxmox VE
Repositories are a collection of software packages, they can be used to install new software, but are also important to get new updates.

|
You need valid Debian and Proxmox repositories to get the latest security updates, bug fixes and new features. |
APT Repositories are defined in the file /etc/apt/sources.list in the legacy single-line format and in .sources files placed in /etc/apt/sources.list.d/ for the modern deb822 multi-line format, see Repository Formats for details.
Repository Management
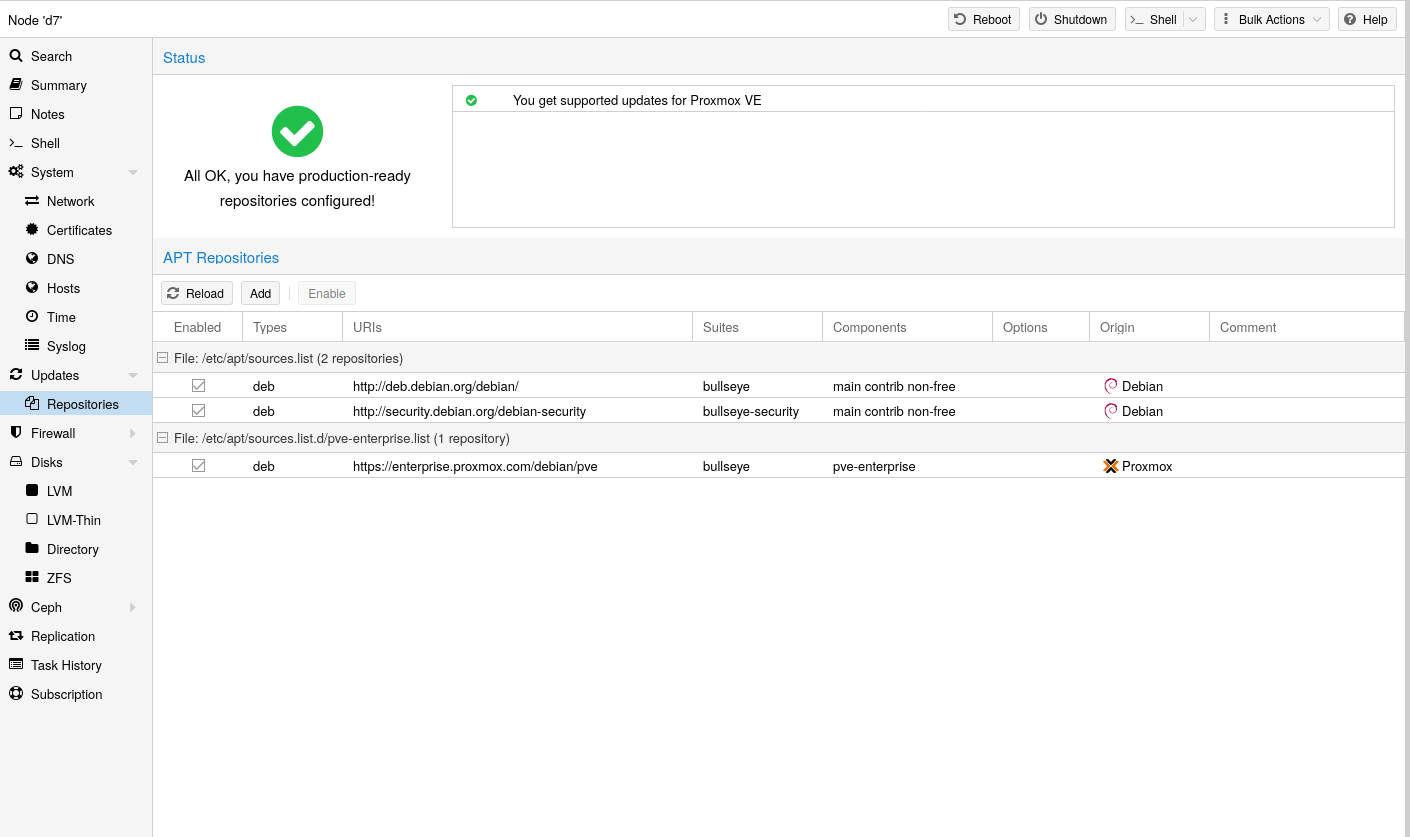
Since Proxmox VE 7, you can check the repository state in the web interface. The node summary panel shows a high level status overview, while the separate Repository panel shows in-depth status and list of all configured repositories.
Basic repository management, for example, activating or deactivating a repository, is also supported.
The available packages from a repository are acquired by running apt update. Updates can be installed directly using apt, or via the GUI (Node → Updates).
Repository Formats
Package repositories can be configured in the source list /etc/apt/sources.list and the files contained in /etc/apt/sources.list.d/.
There are two formats supported:
- single line
-
In a single-line sources.list file, each line defines a package repository. Empty lines are ignored. A # character anywhere on a line marks the remainder of that line as a comment. This is the legacy format. Since Debian 13 Trixie apt will complain about using this format. You can automatically migrate most repositories using the apt modernize-sources command.
- deb822
-
In the multi-line format repo.sources file each entry consists of multiple lines of key-value pairs. A file can include multiple entries by separating each group with a blank line. This is the modern format.
Debian Base Repositories
Types: deb deb-src
URIs: http://deb.debian.org/debian/
Suites: trixie trixie-updates
Components: main non-free-firmware
Signed-By: /usr/share/keyrings/debian-archive-keyring.gpg

Types: deb deb-src
URIs: http://security.debian.org/debian-security/
Suites: trixie-security
Components: main non-free-firmware
Signed-By: /usr/share/keyrings/debian-archive-keyring.gpg
Proxmox VE Enterprise Repository
This is the recommended repository and available for all Proxmox VE subscription users. It contains the most stable packages and is suitable for production use. The pve-enterprise repository is enabled by default:
Types: deb
URIs: https://enterprise.proxmox.com/debian/pve
Suites: trixie
Components: pve-enterprise
Signed-By: /usr/share/keyrings/proxmox-archive-keyring.gpg
Please note that you need a valid subscription key to access the pve-enterprise repository. We offer different support levels, which you can find further details about at https://proxmox.com/en/proxmox-virtual-environment/pricing.
|
|
You can disable this repository by commenting out the above line using a # (at the start of the line). This prevents error messages if your host does not have a subscription key. Please configure the pve-no-subscription repository in that case. |
Proxmox VE No-Subscription Repository
As the name suggests, you do not need a subscription key to access this repository. It can be used for testing and non-production use. It’s not recommended to use this on production servers, as these packages are not always as heavily tested and validated.
We recommend to configure this repository in /etc/apt/sources.list.d/proxmox.sources.
Types: deb
URIs: http://download.proxmox.com/debian/pve
Suites: trixie
Components: pve-no-subscription
Signed-By: /usr/share/keyrings/proxmox-archive-keyring.gpg
|
|
Remember that you will always need the base Debian repositories in addition to a Proxmox VE Proxmox repository |
Proxmox VE Test Repository
This repository contains the latest packages and is primarily used by developers to test new features. To configure it, add the following stanza to the file /etc/apt/sources.list.d/proxmox.sources:
Types: deb
URIs: http://download.proxmox.com/debian/pve
Suites: trixie
Components: pve-test
Signed-By: /usr/share/keyrings/proxmox-archive-keyring.gpg

|
The pve-test repository should (as the name implies) only be used for testing new features or bug fixes. |
Ceph Repositories
Ceph-related packages are kept up to date with a preconfigured Ceph enterprise repository. Preinstalled packages enable connecting to an external Ceph cluster and adding its RBD or CephFS pools as storage. You can also build a hyper-converged infrastructure (HCI) by running Ceph on top of the Proxmox VE cluster.
Information from this chapter is helpful in the following cases:
- Installing Ceph to build an HCI
-
Decide on a below described repository and recent Ceph release, which you can then select in the web-based wizard or the CLI tool.
- Already running the HCI and want to upgrade to the succeeding Ceph major release
-
Please follow the related Ceph upgrade guide.
- Already running the HCI and want to upgrade to the succeeding Proxmox VE major release
-
In an HCI each Proxmox VE major release requires a corresponding minimum Ceph major release, please follow the related Proxmox VE upgrade guide.
- Not running an HCI but using an external Ceph cluster
-
To install newer packages used to connect to Ceph, apply available system updates, decide on a repository and Ceph release listed below, add it to your node via the Repository panel, apply newly available system updates, verify the result by running ceph --version and disable the old Ceph repository.
To read the latest version of the admin guide for your Proxmox VE release, make sure that all system updates are installed and that this page has been reloaded.
enterprise |
no-subscription |
test |
||
ceph-squid |
2026-09 (v19.2) |
recommended |
available |
available |
The content of the ceph.sources file below serves as a reference (prior to Proxmox VE 9 the file ceph.list was used). To make changes, please follow the case that applies to your situation as described at the beginning of this subchapter. If you have disabled a repository in the web UI and also want to delist it, you can manually remove the corresponding entry from the file.
enterprise
This repository is recommended for production use and contains the most stable package versions. It is accessible if the Proxmox VE node has a valid subscription of any level. For details and included customer support levels visit:
Types: deb
URIs: https://enterprise.proxmox.com/debian/ceph-squid
Suites: trixie
Components: enterprise
Signed-By: /usr/share/keyrings/proxmox-archive-keyring.gpg
no-subscription
This repository is suitable for testing and for non-production use. It is freely accessible and does not require a valid subscription. After some time, its package versions are also made available in the enterprise repository.
Types: deb
URIs: http://download.proxmox.com/debian/ceph-squid
Suites: trixie
Components: no-subscription
Signed-By: /usr/share/keyrings/proxmox-archive-keyring.gpg
test
This repository contains the latest package versions and is primarily used by developers to test new features and bug fixes.
Types: deb
URIs: http://download.proxmox.com/debian/ceph-squid
Suites: trixie
Components: test
Signed-By: /usr/share/keyrings/proxmox-archive-keyring.gpg
|
|
The Ceph test repository should (as the name implies) only be used for testing new features or bug fixes. |
Debian Firmware Repository
Starting with Debian Bookworm (Proxmox VE 8) non-free firmware (as defined by DFSG) has been moved to the newly created Debian repository component non-free-firmware.
Since Proxmox VE 9 this repository is enabled by default for new installations to ensure they can get Early OS Microcode Updates.
You can also acquire need additional Runtime Firmware Files not already included in the pre-installed package pve-firmware.
To be able to install packages from this component, run editor /etc/apt/sources.list, append non-free-firmware to the end of each .debian.org repository line and run apt update.
If you upgraded your Proxmox VE 9 install from a previous version of Proxmox VE and have modernized your package repositories to the new deb822-style, you will need to adapt /etc/apt/sources.list.d/debian.sources instead. Run editor /etc/apt/sources.list.d/debian.sources and add non-free-firmware to the lines starting with Components: of each stanza.
|
|
Modernizing your package repositories is recommended. Otherwise, apt on Debian Trixie will complain. You can run apt modernize-sources to do so. |
SecureApt
The Release files in the repositories are signed with GnuPG. APT is using these signatures to verify that all packages are from a trusted source.
If you install Proxmox VE from an official ISO image, the key for verification is already installed.
If you install Proxmox VE on top of Debian, download and install the key with the following commands:
# wget https://enterprise.proxmox.com/debian/proxmox-archive-keyring-trixie.gpg -O /usr/share/keyrings/proxmox-archive-keyring.gpg
|
|
The wget command above adds the keyring for Proxmox releases based on Debian Trixie. Once the proxmox-archive-keyring package is installed, it will manage this file. At that point, the hashes below may no longer match the hashes of this file, as keys for new Proxmox releases get added or removed. This is intended, apt will ensure that only trusted keys are being used. Modifying this file is discouraged once proxmox-archive-keyring is installed. |
Verify the checksum afterwards with the sha512sum CLI tool:
# sha256sum /usr/share/keyrings/proxmox-archive-keyring.gpg
 136673be77aba35dcce385b28737689ad64fd785a797e57897589aed08db6e45 /usr/share/keyrings/proxmox-archive-keyring.gpg
or the md5sum CLI tool:
# md5sum /usr/share/keyrings/proxmox-archive-keyring.gpg
77c8b1166d15ce8350102ab1bca2fcbf /usr/share/keyrings/proxmox-archive-keyring.gpg
|
|
Make sure the path you install the key to matches the Signed-By: lines in your repository stanzas. |
System Software Updates
Proxmox provides updates on a regular basis for all repositories. To install updates use the web-based GUI or the following CLI commands:
# apt-get update
# apt-get dist-upgrade
For occasionally upgrading Ceph to its succeeding major release, see Ceph Repositories.
|
|
The APT package management system is very flexible and provides many features, see man apt-get, or [Hertzog13] for additional information. |

|
Regular updates are essential to get the latest patches and security related fixes. Major system upgrades are announced in the Proxmox VE Community Forum. |
Firmware Updates
Firmware updates from this chapter should be applied when running Proxmox VE on a bare-metal server. Whether configuring firmware updates is appropriate within guests, e.g. when using device pass-through, depends strongly on your setup and is therefore out of scope.
In addition to regular software updates, firmware updates are also important for reliable and secure operation.
When obtaining and applying firmware updates, a combination of available options is recommended to get them as early as possible or at all.
The term firmware is usually divided linguistically into microcode (for CPUs) and firmware (for other devices).
Persistent Firmware
This section is suitable for all devices. Updated microcode, which is usually included in a BIOS/UEFI update, is stored on the motherboard, whereas other firmware is stored on the respective device. This persistent method is especially important for the CPU, as it enables the earliest possible regular loading of the updated microcode at boot time.

|
With some updates, such as for BIOS/UEFI or storage controller, the device configuration could be reset. Please follow the vendor’s instructions carefully and back up the current configuration. |
Please check with your vendor which update methods are available.
-
Convenient update methods for servers can include Dell’s Lifecycle Manager or Service Packs from HPE.
-
Sometimes there are Linux utilities available as well. Examples are mlxup for NVIDIA ConnectX or bnxtnvm/niccli for Broadcom network cards.
-
LVFS is also an option if there is a cooperation with the hardware vendor and supported hardware in use. The technical requirement for this is that the system was manufactured after 2014 and is booted via UEFI.
Proxmox VE ships its own version of the fwupd package to enable Secure Boot Support with the Proxmox signing key. This package consciously dropped the dependency recommendation for the udisks2 package, due to observed issues with its use on hypervisors. That means you must explicitly configure the correct mount point of the EFI partition in /etc/fwupd/daemon.conf, for example:
# Override the location used for the EFI system partition (ESP) path.
EspLocation=/boot/efi
|
|
If the update instructions require a host reboot, make sure that it can be done safely. See also Node Maintenance. |
Runtime Firmware Files
This method stores firmware on the Proxmox VE operating system and will pass it to a device if its persisted firmware is less recent. It is supported by devices such as network and graphics cards, but not by those that rely on persisted firmware such as the motherboard and hard disks.
In Proxmox VE the package pve-firmware is already installed by default. Therefore, with the normal system updates (APT), included firmware of common hardware is automatically kept up to date.
An additional Debian Firmware Repository exists, but is not configured by default.
If you try to install an additional firmware package but it conflicts, APT will abort the installation. Perhaps the particular firmware can be obtained in another way.
CPU Microcode Updates
Microcode updates are intended to fix found security vulnerabilities and other serious CPU bugs. While the CPU performance can be affected, a patched microcode is usually still more performant than an unpatched microcode where the kernel itself has to do mitigations. Depending on the CPU type, it is possible that performance results of the flawed factory state can no longer be achieved without knowingly running the CPU in an unsafe state.
To get an overview of present CPU vulnerabilities and their mitigations, run lscpu. Current real-world known vulnerabilities can only show up if the Proxmox VE host is up to date, its version not end of life, and has at least been rebooted since the last kernel update.
Besides the recommended microcode update via persistent BIOS/UEFI updates, there is also an independent method via Early OS Microcode Updates. It is convenient to use and also quite helpful when the motherboard vendor no longer provides BIOS/UEFI updates. Regardless of the method in use, a reboot is always needed to apply a microcode update.
Set up Early OS Microcode Updates
To set up microcode updates that are applied early on boot by the Linux kernel, you need to:
-
Enable the Debian Firmware Repository
-
Get the latest available packages apt update (or use the web interface, under Node → Updates)
-
Install the CPU-vendor specific microcode package:
-
For Intel CPUs: apt install intel-microcode
-
For AMD CPUs: apt install amd64-microcode
-
-
Reboot the Proxmox VE host
Any future microcode update will also require a reboot to be loaded.
Microcode Version
To get the current running microcode revision for comparison or debugging purposes:
# grep microcode /proc/cpuinfo | uniq
microcode       : 0xf0
A microcode package has updates for many different CPUs. But updates specifically for your CPU might not come often. So, just looking at the date on the package won’t tell you when the company actually released an update for your specific CPU.
If you’ve installed a new microcode package and rebooted your Proxmox VE host, and this new microcode is newer than both, the version baked into the CPU and the one from the motherboard’s firmware, you’ll see a message in the system log saying "microcode updated early".
# dmesg | grep microcode
[    0.000000] microcode: microcode updated early to revision 0xf0, date = 2021-11-12
[    0.896580] microcode: Microcode Update Driver: v2.2.
Troubleshooting
For debugging purposes, the set up Early OS Microcode Update applied regularly at system boot can be temporarily disabled as follows:
-
make sure that the host can be rebooted safely
-
reboot the host to get to the GRUB menu (hold SHIFT if it is hidden)
-
at the desired Proxmox VE boot entry press E
-
go to the line which starts with linux and append separated by a space dis_ucode_ldr
-
press CTRL-X to boot this time without an Early OS Microcode Update
If a problem related to a recent microcode update is suspected, a package downgrade should be considered instead of package removal (apt purge <intel-microcode|amd64-microcode>). Otherwise, a too old persisted microcode might be loaded, even though a more recent one would run without problems.
A downgrade is possible if an earlier microcode package version is available in the Debian repository, as shown in this example:
# apt list -a intel-microcode
Listing... Done
intel-microcode/stable-security,now 3.20230808.1~deb12u1 amd64 [installed]
intel-microcode/stable 3.20230512.1 amd64
# apt install intel-microcode=3.202305*
...
Selected version '3.20230512.1' (Debian:12.1/stable [amd64]) for 'intel-microcode'
...
dpkg: warning: downgrading intel-microcode from 3.20230808.1~deb12u1 to 3.20230512.1
...
intel-microcode: microcode will be updated at next boot
...
Make sure (again) that the host can be rebooted safely. To apply an older microcode potentially included in the microcode package for your CPU type, reboot now.
|
|
It makes sense to hold the downgraded package for a while and try more recent versions again at a later time. Even if the package version is the same in the future, system updates may have fixed the experienced problem in the meantime. # apt-mark hold intel-microcode intel-microcode set on hold. # apt-mark unhold intel-microcode # apt update # apt full-upgrade |
Network Configuration
Proxmox VE is using the Linux network stack. This provides a lot of flexibility on how to set up the network on the Proxmox VE nodes. The configuration can be done either via the GUI, or by manually editing the file /etc/network/interfaces, which contains the whole network configuration. The interfaces(5) manual page contains the complete format description. All Proxmox VE tools try hard to keep direct user modifications, but using the GUI is still preferable, because it protects you from errors.
A Linux bridge interface (commonly called vmbrX) is needed to connect guests to the underlying physical network. It can be thought of as a virtual switch which the guests and physical interfaces are connected to. This section provides some examples on how the network can be set up to accommodate different use cases like redundancy with a bond, vlans or routed and NAT setups.
The Software Defined Network is an option for more complex virtual networks in Proxmox VE clusters.
|
|
It’s discouraged to use the traditional Debian tools ifup and ifdown if unsure, as they have some pitfalls like interrupting all guest traffic on ifdown vmbrX but not reconnecting those guest again when doing ifup on the same bridge later. |
Apply Network Changes
Proxmox VE does not write changes directly to /etc/network/interfaces. Instead, we write into a temporary file called /etc/network/interfaces.new, this way you can do many related changes at once. This also allows to ensure your changes are correct before applying, as a wrong network configuration may render a node inaccessible.
Live-Reload Network with ifupdown2
With the recommended ifupdown2 package (default for new installations since Proxmox VE 7.0), it is possible to apply network configuration changes without a reboot. If you change the network configuration via the GUI, you can click the Apply Configuration button. This will move changes from the staging interfaces.new file to /etc/network/interfaces and apply them live.
If you made manual changes directly to the /etc/network/interfaces file, you can apply them by running ifreload -a
|
|
If you installed Proxmox VE on top of Debian, or upgraded to Proxmox VE 7.0 from an older Proxmox VE installation, make sure ifupdown2 is installed: apt install ifupdown2 |
Naming Conventions
We currently use the following naming conventions for device names:
-
Ethernet devices: en*, systemd network interface names. This naming scheme is used for new Proxmox VE installations since version 5.0.
-
Ethernet devices: eth[N], where 0 ≤ N (eth0, eth1, …) This naming scheme is used for Proxmox VE hosts which were installed before the 5.0 release. When upgrading to 5.0, the names are kept as-is.
-
Bridge names: Commonly vmbr[N], where 0 ≤ N ≤ 4094 (vmbr0 - vmbr4094), but you can use any alphanumeric string that starts with a character and is at most 10 characters long.
-
Bonds: bond[N], where 0 ≤ N (bond0, bond1, …)
-
VLANs: Simply add the VLAN number to the device name, separated by a period (eno1.50, bond1.30)
This makes it easier to debug networks problems, because the device name implies the device type.
Systemd Network Interface Names
Systemd defines a versioned naming scheme for network device names. The scheme uses the two-character prefix en for Ethernet network devices. The next characters depends on the device driver, device location and other attributes. Some possible patterns are:
-
o<index>[n<phys_port_name>|d<dev_port>] — devices on board
-
s<slot>[f<function>][n<phys_port_name>|d<dev_port>] — devices by hotplug id
-
[P<domain>]p<bus>s<slot>[f<function>][n<phys_port_name>|d<dev_port>] — devices by bus id
-
x<MAC> — devices by MAC address
Some examples for the most common patterns are:
-
eno1 — is the first on-board NIC
-
enp3s0f1 — is function 1 of the NIC on PCI bus 3, slot 0
For a full list of possible device name patterns, see the systemd.net-naming-scheme(7) manpage.
A new version of systemd may define a new version of the network device naming scheme, which it then uses by default. Consequently, updating to a newer systemd version, for example during a major Proxmox VE upgrade, can change the names of network devices and require adjusting the network configuration. To avoid name changes due to a new version of the naming scheme, you can manually pin a particular naming scheme version (see below).
However, even with a pinned naming scheme version, network device names can still change due to kernel or driver updates. In order to avoid name changes for a particular network device altogether, you can manually override its name using a link file (see below).
For more information on network interface names, see Predictable Network Interface Names.
Pinning a specific naming scheme version
You can pin a specific version of the naming scheme for network devices by adding the net.naming-scheme=<version> parameter to the kernel command line. For a list of naming scheme versions, see the systemd.net-naming-scheme(7) manpage.
For example, to pin the version v252, which is the latest naming scheme version for a fresh Proxmox VE 8.0 installation, add the following kernel command-line parameter:
net.naming-scheme=v252
See also this section on editing the kernel command line. You need to reboot for the changes to take effect.
Overriding network device names
Using the pve-network-interface-pinning Tool
Proxmox VE provides a tool for automatically generating .link files for overriding the name of network devices. It also automatically replaces the occurences of the old interface name in the following files:
-
/etc/network/interfaces
-
/etc/pve/nodes/<nodename>/host.fw
-
/etc/pve/sdn/controllers.cfg
-
/etc/pve/sdn/fabrics.cfg
|
|
Since the generated mapping is local to the node it is generated on, interface names contained in the Firewall Datacenter configuration (/etc/pve/firewall/cluster.fw) are not automatically updated. |
The generated link files are stored in /usr/local/lib/systemd/network. For the configuration files a new file will be generated in the same place with a .new suffix. This way you can inspect the changes made to the configuration by using diff (or another diff viewer of your choice):
diff -y /etc/network/interfaces /etc/network/interfaces.new
If you see any problematic changes or want to revert the changes made by the pinning tool before rebooting, simply delete all .new files and the respective link files from /usr/local/lib/systemd/network.
The following command will generate a .link file for all physical network interfaces that do not yet have a .link file and update selected Proxmox VE configuration files (see above). The generated names will use the default prefix nic, so the resulting interface names will be nic1, nic2, …
pve-network-interface-pinning generate
You can override the default prefix with the --prefix flag:
pve-network-interface-pinning generate --prefix myprefix
It is also possible to pin only a specific interface:
pve-network-interface-pinning generate --interface enp1s0
When pinning a specific interface, you can specify the exact name that the interface should be pinned to:
pve-network-interface-pinning generate --interface enp1s0 --target-name if42
In order to apply the changes made by pve-network-interface-pinning to the network configuration, the node needs to be rebooted.
Manual method
You can manually assign a name to a particular network device using a custom systemd.link file. This overrides the name that would be assigned according to the latest network device naming scheme. This way, you can avoid naming changes due to kernel updates, driver updates or newer versions of the naming scheme.
Custom link files should be placed in /etc/systemd/network/ and named <n>-<id>.link, where n is a priority smaller than 99 and id is some identifier. A link file has two sections: [Match] determines which interfaces the file will apply to; [Link] determines how these interfaces should be configured, including their naming.
To assign a name to a particular network device, you need a way to uniquely and permanently identify that device in the [Match] section. One possibility is to match the device’s MAC address using the MACAddress option, as it is unlikely to change.
The [Match] section should also contain a Type option to make sure it only matches the expected physical interface, and not bridge/bond/VLAN interfaces with the same MAC address. In most setups, Type should be set to ether to match only Ethernet devices, but some setups may require other choices. See the systemd.link(5) manpage for more details.
Then, you can assign a name using the Name option in the [Link] section.
Link files are copied to the initramfs, so it is recommended to refresh the initramfs after adding, modifying, or removing a link file:
# update-initramfs -u -k all
For example, to assign the name enwan0 to the Ethernet device with MAC address aa:bb:cc:dd:ee:ff, create a file /etc/systemd/network/10-enwan0.link with the following contents:
[Match]
MACAddress=aa:bb:cc:dd:ee:ff
Type=ether

[Link]
Name=enwan0
Do not forget to adjust /etc/network/interfaces to use the new name, and refresh your initramfs as described above. You need to reboot the node for the change to take effect.
|
|
It is recommended to assign a name starting with en or eth so that Proxmox VE recognizes the interface as a physical network device which can then be configured via the GUI. Also, you should ensure that the name will not clash with other interface names in the future. One possibility is to assign a name that does not match any name pattern that systemd uses for network interfaces (see above), such as enwan0 in the example above. |
For more information on link files, see the systemd.link(5) manpage.
Choosing a network configuration
Depending on your current network organization and your resources you can choose either a bridged, routed, or masquerading networking setup.
Proxmox VE server in a private LAN, using an external gateway to reach the internet
The Bridged model makes the most sense in this case, and this is also the default mode on new Proxmox VE installations. Each of your Guest system will have a virtual interface attached to the Proxmox VE bridge. This is similar in effect to having the Guest network card directly connected to a new switch on your LAN, the Proxmox VE host playing the role of the switch.
Proxmox VE server at hosting provider, with public IP ranges for Guests
For this setup, you can use either a Bridged or Routed model, depending on what your provider allows.
Proxmox VE server at hosting provider, with a single public IP address
In that case the only way to get outgoing network accesses for your guest systems is to use Masquerading. For incoming network access to your guests, you will need to configure Port Forwarding.
For further flexibility, you can configure VLANs (IEEE 802.1q) and network bonding, also known as "link aggregation". That way it is possible to build complex and flexible virtual networks.
Default Configuration using a Bridge

Bridges are like physical network switches implemented in software. All virtual guests can share a single bridge, or you can create multiple bridges to separate network domains. Each host can have up to 4094 bridges.
The installation program creates a single bridge named vmbr0, which is connected to the first Ethernet card. The corresponding configuration in /etc/network/interfaces might look like this:
auto lo
iface lo inet loopback

iface eno1 inet manual

auto vmbr0
iface vmbr0 inet static
        address 192.168.10.2/24
        gateway 192.168.10.1
        bridge-ports eno1
        bridge-stp off
        bridge-fd 0
Virtual machines behave as if they were directly connected to the physical network. The network, in turn, sees each virtual machine as having its own MAC, even though there is only one network cable connecting all of these VMs to the network.
Routed Configuration
Most hosting providers do not support the above setup. For security reasons, they disable networking as soon as they detect multiple MAC addresses on a single interface.
|
|
Some providers allow you to register additional MACs through their management interface. This avoids the problem, but can be clumsy to configure because you need to register a MAC for each of your VMs. |
You can avoid the problem by “routing” all traffic via a single interface. This makes sure that all network packets use the same MAC address.

A common scenario is that you have a public IP (assume 198.51.100.5 for this example), and an additional IP block for your VMs (203.0.113.16/28). We recommend the following setup for such situations:
auto lo
iface lo inet loopback

auto eno0
iface eno0 inet static
        address  198.51.100.5/29
        gateway  198.51.100.1
        post-up echo 1 > /proc/sys/net/ipv4/ip_forward
        post-up echo 1 > /proc/sys/net/ipv4/conf/eno0/proxy_arp


auto vmbr0
iface vmbr0 inet static
        address  203.0.113.17/28
        bridge-ports none
        bridge-stp off
        bridge-fd 0
Masquerading (NAT) with iptables
Masquerading allows guests having only a private IP address to access the network by using the host IP address for outgoing traffic. Each outgoing packet is rewritten by iptables to appear as originating from the host, and responses are rewritten accordingly to be routed to the original sender.
auto lo
iface lo inet loopback

auto eno1
#real IP address
iface eno1 inet static
        address  198.51.100.5/24
        gateway  198.51.100.1

auto vmbr0
#private sub network
iface vmbr0 inet static
        address  10.10.10.1/24
        bridge-ports none
        bridge-stp off
        bridge-fd 0

        post-up   echo 1 > /proc/sys/net/ipv4/ip_forward
        post-up   iptables -t nat -A POSTROUTING -s '10.10.10.0/24' -o eno1 -j MASQUERADE
        post-down iptables -t nat -D POSTROUTING -s '10.10.10.0/24' -o eno1 -j MASQUERADE
|
|
In some masquerade setups with firewall enabled, conntrack zones might be needed for outgoing connections. Otherwise the firewall could block outgoing connections since they will prefer the POSTROUTING of the VM bridge (and not MASQUERADE). |
Adding these lines in the /etc/network/interfaces can fix this problem:
post-up   iptables -t raw -I PREROUTING -i fwbr+ -j CT --zone 1
post-down iptables -t raw -D PREROUTING -i fwbr+ -j CT --zone 1
For more information about this, refer to the following links:
Linux Bond
Bonding (also called NIC teaming or Link Aggregation) is a technique for binding multiple NIC’s to a single network device. It is possible to achieve different goals, like make the network fault-tolerant, increase the performance or both together.
High-speed hardware like Fibre Channel and the associated switching hardware can be quite expensive. By doing link aggregation, two NICs can appear as one logical interface, resulting in double speed. This is a native Linux kernel feature that is supported by most switches. If your nodes have multiple Ethernet ports, you can distribute your points of failure by running network cables to different switches and the bonded connection will failover to one cable or the other in case of network trouble.
Aggregated links can improve live-migration delays and improve the speed of replication of data between Proxmox VE Cluster nodes.
There are 7 modes for bonding:
-
Round-robin (balance-rr): Transmit network packets in sequential order from the first available network interface (NIC) slave through the last. This mode provides load balancing and fault tolerance.
-
Active-backup (active-backup): Only one NIC slave in the bond is active. A different slave becomes active if, and only if, the active slave fails. The single logical bonded interface’s MAC address is externally visible on only one NIC (port) to avoid distortion in the network switch. This mode provides fault tolerance.
-
XOR (balance-xor): Transmit network packets based on [(source MAC address XOR’d with destination MAC address) modulo NIC slave count]. This selects the same NIC slave for each destination MAC address. This mode provides load balancing and fault tolerance.
-
Broadcast (broadcast): Transmit network packets on all slave network interfaces. This mode provides fault tolerance.
-
IEEE 802.3ad Dynamic link aggregation (802.3ad)(LACP): Creates aggregation groups that share the same speed and duplex settings. Utilizes all slave network interfaces in the active aggregator group according to the 802.3ad specification.
-
Adaptive transmit load balancing (balance-tlb): Linux bonding driver mode that does not require any special network-switch support. The outgoing network packet traffic is distributed according to the current load (computed relative to the speed) on each network interface slave. Incoming traffic is received by one currently designated slave network interface. If this receiving slave fails, another slave takes over the MAC address of the failed receiving slave.
-
Adaptive load balancing (balance-alb): Includes balance-tlb plus receive load balancing (rlb) for IPV4 traffic, and does not require any special network switch support. The receive load balancing is achieved by ARP negotiation. The bonding driver intercepts the ARP Replies sent by the local system on their way out and overwrites the source hardware address with the unique hardware address of one of the NIC slaves in the single logical bonded interface such that different network-peers use different MAC addresses for their network packet traffic.
If your switch supports the LACP (IEEE 802.3ad) protocol, then we recommend using the corresponding bonding mode (802.3ad). Otherwise you should generally use the active-backup mode.
For the cluster network (Corosync) we recommend configuring it with multiple networks. Corosync does not need a bond for network redundancy as it can switch between networks by itself, if one becomes unusable. Some bond modes are known to be problematic for Corosync, see Corosync over Bonds.
The following bond configuration can be used as distributed/shared storage network. The benefit would be that you get more speed and the network will be fault-tolerant.
auto lo
iface lo inet loopback

iface eno1 inet manual

iface eno2 inet manual

iface eno3 inet manual

auto bond0
iface bond0 inet static
      bond-slaves eno1 eno2
      address  192.168.1.2/24
      bond-miimon 100
      bond-mode 802.3ad
      bond-xmit-hash-policy layer2+3

auto vmbr0
iface vmbr0 inet static
        address  10.10.10.2/24
        gateway  10.10.10.1
        bridge-ports eno3
        bridge-stp off
        bridge-fd 0

Another possibility is to use the bond directly as the bridge port. This can be used to make the guest network fault-tolerant.
auto lo
iface lo inet loopback

iface eno1 inet manual

iface eno2 inet manual

auto bond0
iface bond0 inet manual
      bond-slaves eno1 eno2
      bond-miimon 100
      bond-mode 802.3ad
      bond-xmit-hash-policy layer2+3

auto vmbr0
iface vmbr0 inet static
        address  10.10.10.2/24
        gateway  10.10.10.1
        bridge-ports bond0
        bridge-stp off
        bridge-fd 0
VLAN 802.1Q
A virtual LAN (VLAN) is a broadcast domain that is partitioned and isolated in the network at layer two. So it is possible to have multiple networks (4096) in a physical network, each independent of the other ones.
Each VLAN network is identified by a number often called tag. Network packages are then tagged to identify which virtual network they belong to.
VLAN for Guest Networks
Proxmox VE supports this setup out of the box. You can specify the VLAN tag when you create a VM. The VLAN tag is part of the guest network configuration. The networking layer supports different modes to implement VLANs, depending on the bridge configuration:
-
VLAN awareness on the Linux bridge: In this case, each guest’s virtual network card is assigned to a VLAN tag, which is transparently supported by the Linux bridge. Trunk mode is also possible, but that makes configuration in the guest necessary.
-
"traditional" VLAN on the Linux bridge: In contrast to the VLAN awareness method, this method is not transparent and creates a VLAN device with associated bridge for each VLAN. That is, creating a guest on VLAN 5 for example, would create two interfaces eno1.5 and vmbr0v5, which would remain until a reboot occurs.
-
Open vSwitch VLAN: This mode uses the OVS VLAN feature.
-
Guest configured VLAN: VLANs are assigned inside the guest. In this case, the setup is completely done inside the guest and can not be influenced from the outside. The benefit is that you can use more than one VLAN on a single virtual NIC.
VLAN on the Host
To allow host communication with an isolated network. It is possible to apply VLAN tags to any network device (NIC, Bond, Bridge). In general, you should configure the VLAN on the interface with the least abstraction layers between itself and the physical NIC.
For example, in a default configuration where you want to place the host management address on a separate VLAN.
auto lo
iface lo inet loopback

iface eno1 inet manual

iface eno1.5 inet manual

auto vmbr0v5
iface vmbr0v5 inet static
        address  10.10.10.2/24
        gateway  10.10.10.1
        bridge-ports eno1.5
        bridge-stp off
        bridge-fd 0

auto vmbr0
iface vmbr0 inet manual
        bridge-ports eno1
        bridge-stp off
        bridge-fd 0
auto lo
iface lo inet loopback

iface eno1 inet manual


auto vmbr0.5
iface vmbr0.5 inet static
        address  10.10.10.2/24
        gateway  10.10.10.1

auto vmbr0
iface vmbr0 inet manual
        bridge-ports eno1
        bridge-stp off
        bridge-fd 0
        bridge-vlan-aware yes
        bridge-vids 2-4094
The next example is the same setup but a bond is used to make this network fail-safe.
auto lo
iface lo inet loopback

iface eno1 inet manual

iface eno2 inet manual

auto bond0
iface bond0 inet manual
      bond-slaves eno1 eno2
      bond-miimon 100
      bond-mode 802.3ad
      bond-xmit-hash-policy layer2+3

iface bond0.5 inet manual

auto vmbr0v5
iface vmbr0v5 inet static
        address  10.10.10.2/24
        gateway  10.10.10.1
        bridge-ports bond0.5
        bridge-stp off
        bridge-fd 0

auto vmbr0
iface vmbr0 inet manual
        bridge-ports bond0
        bridge-stp off
        bridge-fd 0
Disabling IPv6 on the Node
Proxmox VE works correctly in all environments, irrespective of whether IPv6 is deployed or not. We recommend leaving all settings at the provided defaults.
Should you still need to disable support for IPv6 on your node, do so by creating an appropriate sysctl.conf (5) snippet file and setting the proper sysctls, for example adding /etc/sysctl.d/disable-ipv6.conf with content:
net.ipv6.conf.all.disable_ipv6 = 1
net.ipv6.conf.default.disable_ipv6 = 1
This method is preferred to disabling the loading of the IPv6 module on the kernel commandline.
Disabling MAC Learning on a Bridge
By default, MAC learning is enabled on a bridge to ensure a smooth experience with virtual guests and their networks.
But in some environments this can be undesired. Since Proxmox VE 7.3 you can disable MAC learning on the bridge by setting the ‘bridge-disable-mac-learning 1` configuration on a bridge in `/etc/network/interfaces’, for example:
# ...

auto vmbr0
iface vmbr0 inet static
        address  10.10.10.2/24
        gateway  10.10.10.1
        bridge-ports ens18
        bridge-stp off
        bridge-fd 0
        bridge-disable-mac-learning 1
Once enabled, Proxmox VE will manually add the configured MAC address from VMs and Containers to the bridges forwarding database to ensure that guest can still use the network - but only when they are using their actual MAC address.
Time Synchronization
The Proxmox VE cluster stack itself relies heavily on the fact that all the nodes have precisely synchronized time. Some other components, like Ceph, also won’t work properly if the local time on all nodes is not in sync.
Time synchronization between nodes can be achieved using the “Network Time Protocol” (NTP). As of Proxmox VE 7, chrony is used as the default NTP daemon, while Proxmox VE 6 uses systemd-timesyncd. Both come preconfigured to use a set of public servers.

|
If you upgrade your system to Proxmox VE 7, it is recommended that you manually install either chrony, ntp or openntpd. |
Using Custom NTP Servers
In some cases, it might be desired to use non-default NTP servers. For example, if your Proxmox VE nodes do not have access to the public internet due to restrictive firewall rules, you need to set up local NTP servers and tell the NTP daemon to use them.
For systems using chrony:
Specify which servers chrony should use in /etc/chrony/chrony.conf:
server ntp1.example.com iburst
server ntp2.example.com iburst
server ntp3.example.com iburst
Restart chrony:
# systemctl restart chronyd
Check the journal to confirm that the newly configured NTP servers are being used:
# journalctl --since -1h -u chrony
...
Aug 26 13:00:09 node1 systemd[1]: Started chrony, an NTP client/server.
Aug 26 13:00:15 node1 chronyd[4873]: Selected source 10.0.0.1 (ntp1.example.com)
Aug 26 13:00:15 node1 chronyd[4873]: System clock TAI offset set to 37 seconds
...
For systems using systemd-timesyncd:
Specify which servers systemd-timesyncd should use in /etc/systemd/timesyncd.conf:
[Time]
NTP=ntp1.example.com ntp2.example.com ntp3.example.com ntp4.example.com
Then, restart the synchronization service (systemctl restart systemd-timesyncd), and verify that your newly configured NTP servers are in use by checking the journal (journalctl --since -1h -u systemd-timesyncd):
...
Oct 07 14:58:36 node1 systemd[1]: Stopping Network Time Synchronization...
Oct 07 14:58:36 node1 systemd[1]: Starting Network Time Synchronization...
Oct 07 14:58:36 node1 systemd[1]: Started Network Time Synchronization.
Oct 07 14:58:36 node1 systemd-timesyncd[13514]: Using NTP server 10.0.0.1:123 (ntp1.example.com).
Oct 07 14:58:36 node1 systemd-timesyncd[13514]: interval/delta/delay/jitter/drift 64s/-0.002s/0.020s/0.000s/-31ppm
...
External Metric Server

In Proxmox VE, you can define external metric servers, which will periodically receive various stats about your hosts, virtual guests and storages.
Currently supported are:
-
Graphite (see https://graphiteapp.org )
-
InfluxDB (see https://www.influxdata.com/time-series-platform/influxdb/ )
The external metric server definitions are saved in /etc/pve/status.cfg, and can be edited through the web interface.
Graphite server configuration
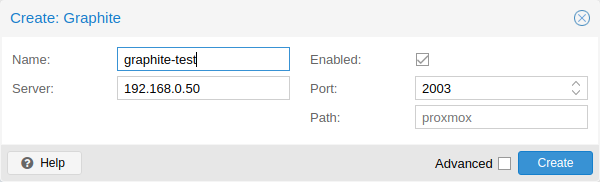
The default port is set to 2003 and the default graphite path is proxmox.
By default, Proxmox VE sends the data over UDP, so the graphite server has to be configured to accept this. Here the maximum transmission unit (MTU) can be configured for environments not using the standard 1500 MTU.
You can also configure the plugin to use TCP. In order not to block the important pvestatd statistic collection daemon, a timeout is required to cope with network problems.
Influxdb plugin configuration
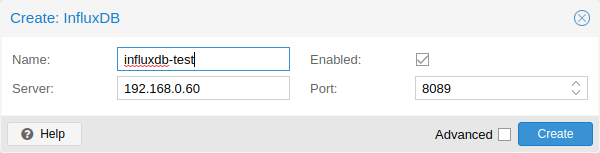
Proxmox VE sends the data over UDP, so the influxdb server has to be configured for this. The MTU can also be configured here, if necessary.
Here is an example configuration for influxdb (on your influxdb server):
[[udp]]
   enabled = true
   bind-address = "0.0.0.0:8089"
   database = "proxmox"
   batch-size = 1000
   batch-timeout = "1s"
With this configuration, your server listens on all IP addresses on port 8089, and writes the data in the proxmox database
Alternatively, the plugin can be configured to use the http(s) API of InfluxDB 2.x. InfluxDB 1.8.x does contain a forwards compatible API endpoint for this v2 API.
To use it, set influxdbproto to http or https (depending on your configuration). By default, Proxmox VE uses the organization proxmox and the bucket/db proxmox (They can be set with the configuration organization and bucket respectively).
Since InfluxDB’s v2 API is only available with authentication, you have to generate a token that can write into the correct bucket and set it.
In the v2 compatible API of 1.8.x, you can use user:password as token (if required), and can omit the organization since that has no meaning in InfluxDB 1.x.
You can also set the HTTP Timeout (default is 1s) with the timeout setting, as well as the maximum batch size (default 25000000 bytes) with the max-body-size setting (this corresponds to the InfluxDB setting with the same name).
Disk Health Monitoring
Although a robust and redundant storage is recommended, it can be very helpful to monitor the health of your local disks.
Starting with Proxmox VE 4.3, the package smartmontools [1] is installed and required. This is a set of tools to monitor and control the S.M.A.R.T. system for local hard disks.
You can get the status of a disk by issuing the following command:
# smartctl -a /dev/sdX
where /dev/sdX is the path to one of your local disks.
If the output says:
SMART support is: Disabled
you can enable it with the command:
# smartctl -s on /dev/sdX
For more information on how to use smartctl, please see man smartctl.
By default, the smartmontools daemon smartd is active and enabled, and scans any devices matching
-
/dev/sd[a-z]
-
/dev/sd[a-z][a-z]
-
/dev/hd[a-t]
-
or /dev/nvme[0-99]
every 30 minutes for errors and warnings, and sends an e-mail to root if it detects a problem.
For more information about how to configure smartd, please see man smartd and man smartd.conf.
If you use your hard disks with a hardware raid controller, there are most likely tools to monitor the disks in the raid array and the array itself. For more information about this, please refer to the vendor of your raid controller.
Logical Volume Manager (LVM)
Most people install Proxmox VE directly on a local disk. The Proxmox VE installation CD offers several options for local disk management, and the current default setup uses LVM. The installer lets you select a single disk for such setup, and uses that disk as physical volume for the Volume Group (VG) pve. The following output is from a test installation using a small 8GB disk:
# pvs
  PV         VG   Fmt  Attr PSize PFree
  /dev/sda3  pve  lvm2 a--  7.87g 876.00m

# vgs
  VG   #PV #LV #SN Attr   VSize VFree
  pve    1   3   0 wz--n- 7.87g 876.00m
The installer allocates three Logical Volumes (LV) inside this VG:
# lvs
  LV   VG   Attr       LSize   Pool Origin Data%  Meta%
  data pve  twi-a-tz--   4.38g             0.00   0.63
  root pve  -wi-ao----   1.75g
  swap pve  -wi-ao---- 896.00m
- root
-
Formatted as ext4, and contains the operating system.
- swap
-
Swap partition
- data
-
This volume uses LVM-thin, and is used to store VM images. LVM-thin is preferable for this task, because it offers efficient support for snapshots and clones.
For Proxmox VE versions up to 4.1, the installer creates a standard logical volume called “data”, which is mounted at /var/lib/vz.
Starting from version 4.2, the logical volume “data” is a LVM-thin pool, used to store block based guest images, and /var/lib/vz is simply a directory on the root file system.
Hardware
We highly recommend to use a hardware RAID controller (with BBU) for such setups. This increases performance, provides redundancy, and make disk replacements easier (hot-pluggable).
LVM itself does not need any special hardware, and memory requirements are very low.
Bootloader
We install two boot loaders by default. The first partition contains the standard GRUB boot loader. The second partition is an EFI System Partition (ESP), which makes it possible to boot on EFI systems and to apply persistent firmware updates from the user space.
Creating a Volume Group
Let’s assume we have an empty disk /dev/sdb, onto which we want to create a volume group named “vmdata”.
|
|
Please note that the following commands will destroy all existing data on /dev/sdb. |
First create a partition.
# sgdisk -N 1 /dev/sdb
Create a Physical Volume (PV) without confirmation and 250K metadatasize.
# pvcreate --metadatasize 250k -y -ff /dev/sdb1
Create a volume group named “vmdata” on /dev/sdb1
# vgcreate vmdata /dev/sdb1
Creating an extra LV for /var/lib/vz
This can be easily done by creating a new thin LV.
# lvcreate -n <Name> -V <Size[M,G,T]> <VG>/<LVThin_pool>
A real world example:
# lvcreate -n vz -V 10G pve/data
Now a filesystem must be created on the LV.
# mkfs.ext4 /dev/pve/vz
At last this has to be mounted.
|
|
be sure that /var/lib/vz is empty. On a default installation it’s not. |
To make it always accessible add the following line in /etc/fstab.
# echo '/dev/pve/vz /var/lib/vz ext4 defaults 0 2' >> /etc/fstab
ZFS on Linux
ZFS is a combined file system and logical volume manager designed by Sun Microsystems. Starting with Proxmox VE 3.4, the native Linux kernel port of the ZFS file system is introduced as optional file system and also as an additional selection for the root file system. There is no need for manually compile ZFS modules - all packages are included.
By using ZFS, its possible to achieve maximum enterprise features with low budget hardware, but also high performance systems by leveraging SSD caching or even SSD only setups. ZFS can replace cost intense hardware raid cards by moderate CPU and memory load combined with easy management.
-
Easy configuration and management with Proxmox VE GUI and CLI.
-
Reliable
-
Protection against data corruption
-
Data compression on file system level
-
Snapshots
-
Copy-on-write clone
-
Various raid levels: RAID0, RAID1, RAID10, RAIDZ-1, RAIDZ-2, RAIDZ-3, dRAID, dRAID2, dRAID3
-
Can use SSD for cache
-
Self healing
-
Continuous integrity checking
-
Designed for high storage capacities
-
Asynchronous replication over network
-
Open Source
-
Encryption
-
…
Hardware
ZFS depends heavily on memory, so you need at least 8GB to start. In practice, use as much as you can get for your hardware/budget. To prevent data corruption, we recommend the use of high quality ECC RAM.
If you use a dedicated cache and/or log disk, you should use an enterprise class SSD. This can increase the overall performance significantly.
|
|
Do not use ZFS on top of a hardware RAID controller which has its own cache management. ZFS needs to communicate directly with the disks. An HBA adapter or something like an LSI controller flashed in “IT” mode is more appropriate. |
If you are experimenting with an installation of Proxmox VE inside a VM (Nested Virtualization), don’t use virtio for disks of that VM, as they are not supported by ZFS. Use IDE or SCSI instead (also works with the virtio SCSI controller type).
Installation as Root File System
When you install using the Proxmox VE installer, you can choose ZFS for the root file system. You need to select the RAID type at installation time:
|
RAID0
|
Also called “striping”. The capacity of such volume is the sum of the capacities of all disks. But RAID0 does not add any redundancy, so the failure of a single drive makes the volume unusable. |
|
RAID1
|
Also called “mirroring”. Data is written identically to all disks. This mode requires at least 2 disks with the same size. The resulting capacity is that of a single disk. |
|
RAID10
|
A combination of RAID0 and RAID1. Requires at least 4 disks. |
|
RAIDZ-1
|
A variation on RAID-5, single parity. Requires at least 3 disks. |
|
RAIDZ-2
|
A variation on RAID-5, double parity. Requires at least 4 disks. |
|
RAIDZ-3
|
A variation on RAID-5, triple parity. Requires at least 5 disks. |
The installer automatically partitions the disks, creates a ZFS pool called rpool, and installs the root file system on the ZFS subvolume rpool/ROOT/pve-1.
Another subvolume called rpool/data is created to store VM images. In order to use that with the Proxmox VE tools, the installer creates the following configuration entry in /etc/pve/storage.cfg:
zfspool: local-zfs
        pool rpool/data
        sparse
        content images,rootdir
After installation, you can view your ZFS pool status using the zpool command:
# zpool status
  pool: rpool
 state: ONLINE
  scan: none requested
config:

        NAME        STATE     READ WRITE CKSUM
        rpool       ONLINE       0     0     0
          mirror-0  ONLINE       0     0     0
            sda2    ONLINE       0     0     0
            sdb2    ONLINE       0     0     0
          mirror-1  ONLINE       0     0     0
            sdc     ONLINE       0     0     0
            sdd     ONLINE       0     0     0

errors: No known data errors
The zfs command is used to configure and manage your ZFS file systems. The following command lists all file systems after installation:
# zfs list
NAME               USED  AVAIL  REFER  MOUNTPOINT
rpool             4.94G  7.68T    96K  /rpool
rpool/ROOT         702M  7.68T    96K  /rpool/ROOT
rpool/ROOT/pve-1   702M  7.68T   702M  /
rpool/data          96K  7.68T    96K  /rpool/data
rpool/swap        4.25G  7.69T    64K  -
ZFS RAID Level Considerations
There are a few factors to take into consideration when choosing the layout of a ZFS pool. The basic building block of a ZFS pool is the virtual device, or vdev. All vdevs in a pool are used equally and the data is striped among them (RAID0). Check the zpoolconcepts(7) manpage for more details on vdevs.
Performance
Each vdev type has different performance behaviors. The two parameters of interest are the IOPS (Input/Output Operations per Second) and the bandwidth with which data can be written or read.
A mirror vdev (RAID1) will approximately behave like a single disk in regard to both parameters when writing data. When reading data the performance will scale linearly with the number of disks in the mirror.
A common situation is to have 4 disks. When setting it up as 2 mirror vdevs (RAID10) the pool will have the write characteristics as two single disks in regard to IOPS and bandwidth. For read operations it will resemble 4 single disks.
A RAIDZ of any redundancy level will approximately behave like a single disk in regard to IOPS with a lot of bandwidth. How much bandwidth depends on the size of the RAIDZ vdev and the redundancy level.
A dRAID pool should match the performance of an equivalent RAIDZ pool.
For running VMs, IOPS is the more important metric in most situations.
Size, Space usage and Redundancy
While a pool made of mirror vdevs will have the best performance characteristics, the usable space will be 50% of the disks available. Less if a mirror vdev consists of more than 2 disks, for example in a 3-way mirror. At least one healthy disk per mirror is needed for the pool to stay functional.
The usable space of a RAIDZ type vdev of N disks is roughly N-P, with P being the RAIDZ-level. The RAIDZ-level indicates how many arbitrary disks can fail without losing data. A special case is a 4 disk pool with RAIDZ2. In this situation it is usually better to use 2 mirror vdevs for the better performance as the usable space will be the same.
Another important factor when using any RAIDZ level is how ZVOL datasets, which are used for VM disks, behave. For each data block the pool needs parity data which is at least the size of the minimum block size defined by the ashift value of the pool. With an ashift of 12 the block size of the pool is 4k. The default block size for a ZVOL is 8k. Therefore, in a RAIDZ2 each 8k block written will cause two additional 4k parity blocks to be written, 8k + 4k + 4k = 16k. This is of course a simplified approach and the real situation will be slightly different with metadata, compression and such not being accounted for in this example.
This behavior can be observed when checking the following properties of the ZVOL:
-
volsize
-
refreservation (if the pool is not thin provisioned)
-
used (if the pool is thin provisioned and without snapshots present)
# zfs get volsize,refreservation,used <pool>/vm-<vmid>-disk-X
volsize is the size of the disk as it is presented to the VM, while refreservation shows the reserved space on the pool which includes the expected space needed for the parity data. If the pool is thin provisioned, the refreservation will be set to 0. Another way to observe the behavior is to compare the used disk space within the VM and the used property. Be aware that snapshots will skew the value.
There are a few options to counter the increased use of space:
-
Increase the volblocksize to improve the data to parity ratio
-
Use mirror vdevs instead of RAIDZ
-
Use ashift=9 (block size of 512 bytes)
The volblocksize property can only be set when creating a ZVOL. The default value can be changed in the storage configuration. When doing this, the guest needs to be tuned accordingly and depending on the use case, the problem of write amplification is just moved from the ZFS layer up to the guest.
Using ashift=9 when creating the pool can lead to bad performance, depending on the disks underneath, and cannot be changed later on.
Mirror vdevs (RAID1, RAID10) have favorable behavior for VM workloads. Use them, unless your environment has specific needs and characteristics where RAIDZ performance characteristics are acceptable.
ZFS dRAID
In a ZFS dRAID (declustered RAID) the hot spare drive(s) participate in the RAID. Their spare capacity is reserved and used for rebuilding when one drive fails. This provides, depending on the configuration, faster rebuilding compared to a RAIDZ in case of drive failure. More information can be found in the official OpenZFS documentation. [2]
|
|
dRAID is intended for more than 10-15 disks in a dRAID. A RAIDZ setup should be better for a lower amount of disks in most use cases. |
|
|
The GUI requires one more disk than the minimum (i.e. dRAID1 needs 3). It expects that a spare disk is added as well. |
-
dRAID1 or dRAID: requires at least 2 disks, one can fail before data is lost
-
dRAID2: requires at least 3 disks, two can fail before data is lost
-
dRAID3: requires at least 4 disks, three can fail before data is lost
Additional information can be found on the manual page:
# man zpoolconcepts
Spares and Data
The number of spares tells the system how many disks it should keep ready in case of a disk failure. The default value is 0 spares. Without spares, rebuilding won’t get any speed benefits.
data defines the number of devices in a redundancy group. The default value is 8. Except when disks - parity - spares equal something less than 8, the lower number is used. In general, a smaller number of data devices leads to higher IOPS, better compression ratios and faster resilvering, but defining fewer data devices reduces the available storage capacity of the pool.
Bootloader
Proxmox VE uses proxmox-boot-tool to manage the bootloader configuration. See the chapter on Proxmox VE host bootloaders for details.
ZFS Administration
This section gives you some usage examples for common tasks. ZFS itself is really powerful and provides many options. The main commands to manage ZFS are zfs and zpool. Both commands come with great manual pages, which can be read with:
# man zpool
# man zfs
Create a new zpool
To create a new pool, at least one disk is needed. The ashift should have the same sector-size (2 power of ashift) or larger as the underlying disk.
# zpool create -f -o ashift=12 <pool> <device>
|
|
Pool names must adhere to the following rules:
|
To activate compression (see section Compression in ZFS):
# zfs set compression=lz4 <pool>
Create a new pool with RAID-0
Minimum 1 disk
# zpool create -f -o ashift=12 <pool> <device1> <device2>
Create a new pool with RAID-1
Minimum 2 disks
# zpool create -f -o ashift=12 <pool> mirror <device1> <device2>
Create a new pool with RAID-10
Minimum 4 disks
# zpool create -f -o ashift=12 <pool> mirror <device1> <device2> mirror <device3> <device4>
Create a new pool with RAIDZ-1
Minimum 3 disks
# zpool create -f -o ashift=12 <pool> raidz1 <device1> <device2> <device3>
Create a new pool with RAIDZ-2
Minimum 4 disks
# zpool create -f -o ashift=12 <pool> raidz2 <device1> <device2> <device3> <device4>
Please read the section for ZFS RAID Level Considerations to get a rough estimate on how IOPS and bandwidth expectations before setting up a pool, especially when wanting to use a RAID-Z mode.
Extend RAIDZ-N
|
|
This feature only works starting with Proxmox VE 9 (ZFS 2.3.3). |
Assuming you have an existing <pool> with a RAIDZ-N <raidzN-M> vdev, you can add a new physical disk <device> using the following syntax:
zpool attach <pool> <raidzN-M> <device>
You can verify general success by running zpool status <pool> and get verbose output for all attached disks by running zpool list <pool> -v. To inspect the new capacity of your pool run zfs list <pool>.
Create a new pool with cache (L2ARC)
It is possible to use a dedicated device, or partition, as second-level cache to increase the performance. Such a cache device will especially help with random-read workloads of data that is mostly static. As it acts as additional caching layer between the actual storage, and the in-memory ARC, it can also help if the ARC must be reduced due to memory constraints.
# zpool create -f -o ashift=12 <pool> <device> cache <cache-device>
Here only a single <device> and a single <cache-device> was used, but it is possible to use more devices, like it’s shown in Create a new pool with RAID.
Note that for cache devices no mirror or raid modi exist, they are all simply accumulated.
If any cache device produces errors on read, ZFS will transparently divert that request to the underlying storage layer.
Create a new pool with log (ZIL)
It is possible to use a dedicated drive, or partition, for the ZFS Intent Log (ZIL), it is mainly used to provide safe synchronous transactions, so often in performance critical paths like databases, or other programs that issue fsync operations more frequently.
The pool is used as default ZIL location, diverting the ZIL IO load to a separate device can, help to reduce transaction latencies while relieving the main pool at the same time, increasing overall performance.
For disks to be used as log devices, directly or through a partition, it’s recommend to:
-
use fast SSDs with power-loss protection, as those have much smaller commit latencies.
-
Use at least a few GB for the partition (or whole device), but using more than half of your installed memory won’t provide you with any real advantage.
# zpool create -f -o ashift=12 <pool> <device> log <log-device>
In the example above, a single <device> and a single <log-device> is used, but you can also combine this with other RAID variants, as described in the Create a new pool with RAID section.
You can also mirror the log device to multiple devices, this is mainly useful to ensure that performance doesn’t immediately degrades if a single log device fails.
If all log devices fail the ZFS main pool itself will be used again, until the log device(s) get replaced.
Add cache and log to an existing pool
If you have a pool without cache and log you can still add both, or just one of them, at any time.
For example, let’s assume you got a good enterprise SSD with power-loss protection that you want to use for improving the overall performance of your pool.
As the maximum size of a log device should be about half the size of the installed physical memory, it means that the ZIL will most likely only take up a relatively small part of the SSD, the remaining space can be used as cache.
First you have to create two GPT partitions on the SSD with parted or gdisk.
Then you’re ready to add them to a pool:
# zpool add -f <pool> log <device-part1> cache <device-part2>
Just replace <pool>, <device-part1> and <device-part2> with the pool name and the two /dev/disk/by-id/ paths to the partitions.
You can also add ZIL and cache separately.
# zpool add <pool> log <log-device>
Changing a failed device
# zpool replace -f <pool> <old-device> <new-device>
Depending on how Proxmox VE was installed it is either using systemd-boot or GRUB through proxmox-boot-tool [3] or plain GRUB as bootloader (see Host Bootloader). You can check by running:
# proxmox-boot-tool status
The first steps of copying the partition table, reissuing GUIDs and replacing the ZFS partition are the same. To make the system bootable from the new disk, different steps are needed which depend on the bootloader in use.
# sgdisk <healthy bootable device> -R <new device>
# sgdisk -G <new device>
# zpool replace -f <pool> <old zfs partition> <new zfs partition>
|
|
Use the zpool status -v command to monitor how far the resilvering process of the new disk has progressed. |
# proxmox-boot-tool format <new disk's ESP>
# proxmox-boot-tool init <new disk's ESP> [grub]
|
|
ESP stands for EFI System Partition, which is set up as partition #2 on bootable disks when using the Proxmox VE installer since version 5.4. For details, see Setting up a new partition for use as synced ESP. |
|
|
Make sure to pass grub as mode to proxmox-boot-tool init if proxmox-boot-tool status indicates your current disks are using GRUB, especially if Secure Boot is enabled! |
# grub-install <new disk>
|
|
Plain GRUB is only used on systems installed with Proxmox VE 6.3 or earlier, which have not been manually migrated to use proxmox-boot-tool yet. |
Configure E-Mail Notification
ZFS comes with an event daemon ZED, which monitors events generated by the ZFS kernel module. The daemon can also send emails on ZFS events like pool errors. Newer ZFS packages ship the daemon in a separate zfs-zed package, which should already be installed by default in Proxmox VE.
You can configure the daemon via the file /etc/zfs/zed.d/zed.rc with your favorite editor. The required setting for email notification is ZED_EMAIL_ADDR, which is set to root by default.
ZED_EMAIL_ADDR="root"
Please note Proxmox VE forwards mails to root to the email address configured for the root user.
Limit ZFS Memory Usage
ZFS uses 50 % of the host memory for the Adaptive Replacement Cache (ARC) by default. For new installations starting with Proxmox VE 8.1, the ARC usage limit will be set to 10 % of the installed physical memory, clamped to a maximum of 16 GiB. This value is written to /etc/modprobe.d/zfs.conf.
Allocating enough memory for the ARC is crucial for IO performance, so reduce it with caution. As a general rule of thumb, allocate at least 2 GiB Base + 1 GiB/TiB-Storage. For example, if you have a pool with 8 TiB of available storage space then you should use 10 GiB of memory for the ARC.
ZFS also enforces a minimum value of 64 MiB.
You can change the ARC usage limit for the current boot (a reboot resets this change again) by writing to the zfs_arc_max module parameter directly:
echo "$[10 * 1024*1024*1024]" >/sys/module/zfs/parameters/zfs_arc_max
To permanently change the ARC limits, add (or change if already present) the following line to /etc/modprobe.d/zfs.conf:
options zfs zfs_arc_max=8589934592
This example setting limits the usage to 8 GiB (8 * 230).
|
|
In case your desired zfs_arc_max value is lower than or equal to zfs_arc_min (which defaults to 1/32 of the system memory), zfs_arc_max will be ignored unless you also set zfs_arc_min to at most zfs_arc_max - 1. |
echo "$[8 * 1024*1024*1024 - 1]" >/sys/module/zfs/parameters/zfs_arc_min
echo "$[8 * 1024*1024*1024]" >/sys/module/zfs/parameters/zfs_arc_max
This example setting (temporarily) limits the usage to 8 GiB (8 * 230) on systems with more than 256 GiB of total memory, where simply setting zfs_arc_max alone would not work.
|
|
If your root file system is ZFS, you must update your initramfs every time this value changes: # update-initramfs -u -k all You must reboot to activate these changes. |
SWAP on ZFS
Swap-space created on a zvol may generate some troubles, like blocking the server or generating a high IO load, often seen when starting a Backup to an external Storage.
We strongly recommend to use enough memory, so that you normally do not run into low memory situations. Should you need or want to add swap, it is preferred to create a partition on a physical disk and use it as a swap device. You can leave some space free for this purpose in the advanced options of the installer. Additionally, you can lower the “swappiness” value. A good value for servers is 10:
# sysctl -w vm.swappiness=10
To make the swappiness persistent, open /etc/sysctl.conf with an editor of your choice and add the following line:
vm.swappiness = 10
| Value | Strategy |
|---|---|
vm.swappiness = 0 |
The kernel will swap only to avoid an out of memory condition |
vm.swappiness = 1 |
Minimum amount of swapping without disabling it entirely. |
vm.swappiness = 10 |
This value is sometimes recommended to improve performance when sufficient memory exists in a system. |
vm.swappiness = 60 |
The default value. |
vm.swappiness = 100 |
The kernel will swap aggressively. |
Encrypted ZFS Datasets
|
|
Native ZFS encryption in Proxmox VE is experimental. Known limitations and issues include Replication with encrypted datasets [4], as well as checksum errors when using Snapshots or ZVOLs. [5] |
ZFS on Linux version 0.8.0 introduced support for native encryption of datasets. After an upgrade from previous ZFS on Linux versions, the encryption feature can be enabled per pool:
# zpool get feature@encryption tank
NAME  PROPERTY            VALUE            SOURCE
tank  feature@encryption  disabled         local

# zpool set feature@encryption=enabled

# zpool get feature@encryption tank
NAME  PROPERTY            VALUE            SOURCE
tank  feature@encryption  enabled         local
|
|
There is currently no support for booting from pools with encrypted datasets using GRUB, and only limited support for automatically unlocking encrypted datasets on boot. Older versions of ZFS without encryption support will not be able to decrypt stored data. |
|
|
It is recommended to either unlock storage datasets manually after booting, or to write a custom unit to pass the key material needed for unlocking on boot to zfs load-key. |
|
|
Establish and test a backup procedure before enabling encryption of production data. If the associated key material/passphrase/keyfile has been lost, accessing the encrypted data is no longer possible. |
Encryption needs to be setup when creating datasets/zvols, and is inherited by default to child datasets. For example, to create an encrypted dataset tank/encrypted_data and configure it as storage in Proxmox VE, run the following commands:
# zfs create -o encryption=on -o keyformat=passphrase tank/encrypted_data
Enter passphrase:
Re-enter passphrase:

# pvesm add zfspool encrypted_zfs -pool tank/encrypted_data
All guest volumes/disks create on this storage will be encrypted with the shared key material of the parent dataset.
To actually use the storage, the associated key material needs to be loaded and the dataset needs to be mounted. This can be done in one step with:
# zfs mount -l tank/encrypted_data
Enter passphrase for 'tank/encrypted_data':
It is also possible to use a (random) keyfile instead of prompting for a passphrase by setting the keylocation and keyformat properties, either at creation time or with zfs change-key on existing datasets:
# dd if=/dev/urandom of=/path/to/keyfile bs=32 count=1

# zfs change-key -o keyformat=raw -o keylocation=file:///path/to/keyfile tank/encrypted_data
|
|
When using a keyfile, special care needs to be taken to secure the keyfile against unauthorized access or accidental loss. Without the keyfile, it is not possible to access the plaintext data! |
A guest volume created underneath an encrypted dataset will have its encryptionroot property set accordingly. The key material only needs to be loaded once per encryptionroot to be available to all encrypted datasets underneath it.
See the encryptionroot, encryption, keylocation, keyformat and keystatus properties, the zfs load-key, zfs unload-key and zfs change-key commands and the Encryption section from man zfs for more details and advanced usage.
Compression in ZFS
When compression is enabled on a dataset, ZFS tries to compress all new blocks before writing them and decompresses them on reading. Already existing data will not be compressed retroactively.
You can enable compression with:
# zfs set compression=<algorithm> <dataset>
We recommend using the lz4 algorithm, because it adds very little CPU overhead. Other algorithms like lzjb and gzip-N, where N is an integer from 1 (fastest) to 9 (best compression ratio), are also available. Depending on the algorithm and how compressible the data is, having compression enabled can even increase I/O performance.
You can disable compression at any time with:
# zfs set compression=off <dataset>
Again, only new blocks will be affected by this change.
ZFS Special Device
Since version 0.8.0 ZFS supports special devices. A special device in a pool is used to store metadata, deduplication tables, and optionally small file blocks.
A special device can improve the speed of a pool consisting of slow spinning hard disks with a lot of metadata changes. For example workloads that involve creating, updating or deleting a large number of files will benefit from the presence of a special device. ZFS datasets can also be configured to store whole small files on the special device which can further improve the performance. Use fast SSDs for the special device.
|
|
The redundancy of the special device should match the one of the pool, since the special device is a point of failure for the whole pool. |
|
|
Adding a special device to a pool cannot be undone! |
# zpool create -f -o ashift=12 <pool> mirror <device1> <device2> special mirror <device3> <device4>
# zpool add <pool> special mirror <device1> <device2>
ZFS datasets expose the special_small_blocks=<size> property. size can be 0 to disable storing small file blocks on the special device or a power of two in the range between 512B to 1M. After setting the property new file blocks smaller than size will be allocated on the special device.
|
|
If the value for special_small_blocks is greater than or equal to the recordsize (default 128K) of the dataset, all data will be written to the special device, so be careful! |
Setting the special_small_blocks property on a pool will change the default value of that property for all child ZFS datasets (for example all containers in the pool will opt in for small file blocks).
# zfs set special_small_blocks=4K <pool>
# zfs set special_small_blocks=4K <pool>/<filesystem>
# zfs set special_small_blocks=0 <pool>/<filesystem>
ZFS Pool Features
Changes to the on-disk format in ZFS are only made between major version changes and are specified through features. All features, as well as the general mechanism are well documented in the zpool-features(5) manpage.
Since enabling new features can render a pool not importable by an older version of ZFS, this needs to be done actively by the administrator, by running zpool upgrade on the pool (see the zpool-upgrade(8) manpage).
Unless you need to use one of the new features, there is no upside to enabling them.
In fact, there are some downsides to enabling new features:
-
A system with root on ZFS, that still boots using GRUB will become unbootable if a new feature is active on the rpool, due to the incompatible implementation of ZFS in GRUB.
-
The system will not be able to import any upgraded pool when booted with an older kernel, which still ships with the old ZFS modules.
-
Booting an older Proxmox VE ISO to repair a non-booting system will likewise not work.
|
|
Do not upgrade your rpool if your system is still booted with GRUB, as this will render your system unbootable. This includes systems installed before Proxmox VE 5.4, and systems booting with legacy BIOS boot (see how to determine the bootloader). |
# zpool upgrade <pool>
BTRFS
|
|
BTRFS integration is currently a technology preview in Proxmox VE. |
BTRFS is a modern copy on write file system natively supported by the Linux kernel, implementing features such as snapshots, built-in RAID and self healing via checksums for data and metadata. Starting with Proxmox VE 7.0, BTRFS is introduced as optional selection for the root file system.
-
Main system setup almost identical to the traditional ext4 based setup
-
Snapshots
-
Data compression on file system level
-
Copy-on-write clone
-
RAID0, RAID1 and RAID10
-
Protection against data corruption
-
Self healing
-
Natively supported by the Linux kernel
-
RAID levels 5/6 are experimental and dangerous, see BTRFS Status
Installation as Root File System
When you install using the Proxmox VE installer, you can choose BTRFS for the root file system. You need to select the RAID type at installation time:
|
RAID0
|
Also called “striping”. The capacity of such volume is the sum of the capacities of all disks. But RAID0 does not add any redundancy, so the failure of a single drive makes the volume unusable. |
|
RAID1
|
Also called “mirroring”. Data is written identically to all disks. This mode requires at least 2 disks with the same size. The resulting capacity is that of a single disk. |
|
RAID10
|
A combination of RAID0 and RAID1. Requires at least 4 disks. |
The installer automatically partitions the disks and creates an additional subvolume at /var/lib/pve/local-btrfs. In order to use that with the Proxmox VE tools, the installer creates the following configuration entry in /etc/pve/storage.cfg:
dir: local
        path /var/lib/vz
        content iso,vztmpl,backup
        disable

btrfs: local-btrfs
        path /var/lib/pve/local-btrfs
        content iso,vztmpl,backup,images,rootdir
This explicitly disables the default local storage in favor of a BTRFS specific storage entry on the additional subvolume.
The btrfs command is used to configure and manage the BTRFS file system, After the installation, the following command lists all additional subvolumes:
# btrfs subvolume list /
ID 256 gen 6 top level 5 path var/lib/pve/local-btrfs
BTRFS Administration
This section gives you some usage examples for common tasks.
Creating a BTRFS file system
To create BTRFS file systems, mkfs.btrfs is used. The -d and -m parameters are used to set the profile for metadata and data respectively. With the optional -L parameter, a label can be set.
Generally, the following modes are supported: single, raid0, raid1, raid10.
Create a BTRFS file system on a single disk /dev/sdb with the label My-Storage:
# mkfs.btrfs -m single -d single -L My-Storage /dev/sdb
Or create a RAID1 on the two partitions /dev/sdb1 and /dev/sdc1:
# mkfs.btrfs -m raid1 -d raid1 -L My-Storage /dev/sdb1 /dev/sdc1
Mounting a BTRFS file system
The new file-system can then be mounted either manually, for example:
 # mkdir /my-storage
 # mount /dev/sdb /my-storage
A BTRFS can also be added to /etc/fstab like any other mount point, automatically mounting it on boot. It’s recommended to avoid using block-device paths but use the UUID value the mkfs.btrfs command printed, especially there is more than one disk in a BTRFS setup.
For example:
# ... other mount points left out for brevity

# using the UUID from the mkfs.btrfs output is highly recommended
UUID=e2c0c3ff-2114-4f54-b767-3a203e49f6f3 /my-storage btrfs defaults 0 0
|
|
If you do not have the UUID available anymore you can use the blkid tool to list all properties of block-devices. |
Afterwards you can trigger the first mount by executing:
mount /my-storage
After the next reboot this will be automatically done by the system at boot.
Adding a BTRFS file system to Proxmox VE
You can add an existing BTRFS file system to Proxmox VE via the web interface, or using the CLI, for example:
pvesm add btrfs my-storage --path /my-storage
Creating a subvolume
Creating a subvolume links it to a path in the BTRFS file system, where it will appear as a regular directory.
# btrfs subvolume create /some/path
Afterwards /some/path will act like a regular directory.
Deleting a subvolume
Contrary to directories removed via rmdir, subvolumes do not need to be empty in order to be deleted via the btrfs command.
# btrfs subvolume delete /some/path
Creating a snapshot of a subvolume
BTRFS does not actually distinguish between snapshots and normal subvolumes, so taking a snapshot can also be seen as creating an arbitrary copy of a subvolume. By convention, Proxmox VE will use the read-only flag when creating snapshots of guest disks or subvolumes, but this flag can also be changed later on.
# btrfs subvolume snapshot -r /some/path /a/new/path
This will create a read-only "clone" of the subvolume on /some/path at /a/new/path. Any future modifications to /some/path cause the modified data to be copied before modification.
If the read-only (-r) option is left out, both subvolumes will be writable.
Enabling compression
By default, BTRFS does not compress data. To enable compression, the compress mount option can be added. Note that data already written will not be compressed after the fact.
By default, the rootfs will be listed in /etc/fstab as follows:
UUID=<uuid of your root file system> / btrfs defaults 0 1
You can simply append compress=zstd, compress=lzo, or compress=zlib to the defaults above like so:
UUID=<uuid of your root file system> / btrfs defaults,compress=zstd 0 1
This change will take effect after rebooting.
Proxmox Node Management
The Proxmox VE node management tool (pvenode) allows you to control node specific settings and resources.
Currently pvenode allows you to set a node’s description, run various bulk operations on the node’s guests, view the node’s task history, and manage the node’s SSL certificates, which are used for the API and the web GUI through pveproxy.
Wake-on-LAN
Wake-on-LAN (WoL) allows you to switch on a sleeping computer in the network, by sending a magic packet. At least one NIC must support this feature, and the respective option needs to be enabled in the computer’s firmware (BIOS/UEFI) configuration. The option name can vary from Enable Wake-on-Lan to Power On By PCIE Device; check your motherboard’s vendor manual, if you’re unsure. ethtool can be used to check the WoL configuration of <interface> by running:
ethtool <interface> | grep Wake-on
pvenode allows you to wake sleeping members of a cluster via WoL, using the command:
pvenode wakeonlan <node>
This broadcasts the WoL magic packet on UDP port 9, containing the MAC address of <node> obtained from the wakeonlan property. The node-specific wakeonlan property can be set using the following command:
pvenode config set -wakeonlan XX:XX:XX:XX:XX:XX
The interface via which to send the WoL packet is determined from the default route. It can be overwritten by setting the bind-interface via the following command:
pvenode config set -wakeonlan XX:XX:XX:XX:XX:XX,bind-interface=<iface-name>
The broadcast address (default 255.255.255.255) used when sending the WoL packet can further be changed by setting the broadcast-address explicitly using the following command:
pvenode config set -wakeonlan XX:XX:XX:XX:XX:XX,broadcast-address=<broadcast-address>
Task History
When troubleshooting server issues, for example, failed backup jobs, it can often be helpful to have a log of the previously run tasks. With Proxmox VE, you can access the nodes’s task history through the pvenode task command.
You can get a filtered list of a node’s finished tasks with the list subcommand. For example, to get a list of tasks related to VM 100 that ended with an error, the command would be:
pvenode task list --errors --vmid 100
The log of a task can then be printed using its UPID:
pvenode task log UPID:pve1:00010D94:001CA6EA:6124E1B9:vzdump:100:root@pam:
Bulk Guest Power Management
In case you have many VMs/containers, starting and stopping guests can be carried out in bulk operations with the startall and stopall subcommands of pvenode. By default, pvenode startall will only start VMs/containers which have been set to automatically start on boot (see Automatic Start and Shutdown of Virtual Machines), however, you can override this behavior with the --force flag. Both commands also have a --vms option, which limits the stopped/started guests to the specified VMIDs.
For example, to start VMs 100, 101, and 102, regardless of whether they have onboot set, you can use:
pvenode startall --vms 100,101,102 --force
To stop these guests (and any other guests that may be running), use the command:
pvenode stopall
|
|
The stopall command first attempts to perform a clean shutdown and then waits until either all guests have successfully shut down or an overridable timeout (3 minutes by default) has expired. Once that happens and the force-stop parameter is not explicitly set to 0 (false), all virtual guests that are still running are hard stopped. |
First Guest Boot Delay
In case your VMs/containers rely on slow-to-start external resources, for example an NFS server, you can also set a per-node delay between the time Proxmox VE boots and the time the first VM/container that is configured to autostart boots (see Automatic Start and Shutdown of Virtual Machines).
You can achieve this by setting the following (where 10 represents the delay in seconds):
pvenode config set --startall-onboot-delay 10
Bulk Guest Migration
In case an upgrade situation requires you to migrate all of your guests from one node to another, pvenode also offers the migrateall subcommand for bulk migration. By default, this command will migrate every guest on the system to the target node. It can however be set to only migrate a set of guests.
For example, to migrate VMs 100, 101, and 102, to the node pve2, with live-migration for local disks enabled, you can run:
pvenode migrateall pve2 --vms 100,101,102 --with-local-disks
RAM Usage Target for Ballooning
The target percentage for automatic memory allocation defaults to 80%. You can customize this target per node by setting the ballooning-target property. For example, to target 90% host memory usage instead:
pvenode config set --ballooning-target 90
Certificate Management
Certificates for Intra-Cluster Communication
Each Proxmox VE cluster creates by default its own (self-signed) Certificate Authority (CA) and generates a certificate for each node which gets signed by the aforementioned CA. These certificates are used for encrypted communication with the cluster’s pveproxy service and the Shell/Console feature if SPICE is used.
The CA certificate and key are stored in the Proxmox Cluster File System (pmxcfs).
Certificates for API and Web GUI
The REST API and web GUI are provided by the pveproxy service, which runs on each node.
You have the following options for the certificate used by pveproxy:
-
By default the node-specific certificate in /etc/pve/nodes/NODENAME/pve-ssl.pem is used. This certificate is signed by the cluster CA and therefore not automatically trusted by browsers and operating systems.
-
use an externally provided certificate (e.g. signed by a commercial CA).
-
use ACME (Let’s Encrypt) to get a trusted certificate with automatic renewal, this is also integrated in the Proxmox VE API and web interface.
For options 2 and 3 the file /etc/pve/local/pveproxy-ssl.pem (and /etc/pve/local/pveproxy-ssl.key, which needs to be without password) is used.
|
|
Keep in mind that /etc/pve/local is a node specific symlink to /etc/pve/nodes/NODENAME. |
Certificates are managed with the Proxmox VE Node management command (see the pvenode(1) manpage).
|
|
Do not replace or manually modify the automatically generated node certificate files in /etc/pve/local/pve-ssl.pem and /etc/pve/local/pve-ssl.key or the cluster CA files in /etc/pve/pve-root-ca.pem and /etc/pve/priv/pve-root-ca.key. |
Upload Custom Certificate
If you already have a certificate which you want to use for a Proxmox VE node you can upload that certificate simply over the web interface.
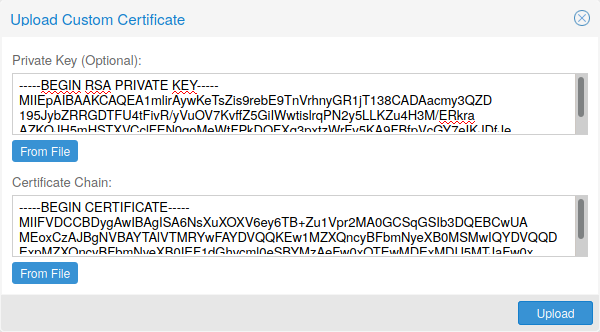
Note that the certificates key file, if provided, mustn’t be password protected.
Trusted certificates via Let’s Encrypt (ACME)
Proxmox VE includes an implementation of the Automatic Certificate Management Environment ACME protocol, allowing Proxmox VE admins to use an ACME provider like Let’s Encrypt for easy setup of TLS certificates which are accepted and trusted on modern operating systems and web browsers out of the box.
Currently, the two ACME endpoints implemented are the Let’s Encrypt (LE) production and its staging environment. Our ACME client supports validation of http-01 challenges using a built-in web server and validation of dns-01 challenges using a DNS plugin supporting all the DNS API endpoints acme.sh does.
ACME Account
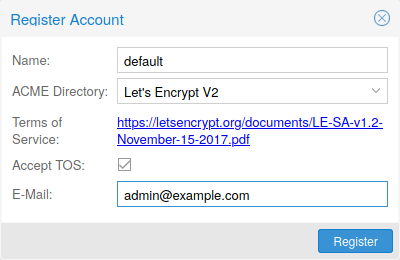
You need to register an ACME account per cluster with the endpoint you want to use. The email address used for that account will serve as contact point for renewal-due or similar notifications from the ACME endpoint.
You can register and deactivate ACME accounts over the web interface Datacenter -> ACME or using the pvenode command-line tool.
pvenode acme account register account-name mail@example.com
|
|
Because of rate-limits you should use LE staging for experiments or if you use ACME for the first time. |
ACME Plugins
The ACME plugins task is to provide automatic verification that you, and thus the Proxmox VE cluster under your operation, are the real owner of a domain. This is the basis building block for automatic certificate management.
The ACME protocol specifies different types of challenges, for example the http-01 where a web server provides a file with a certain content to prove that it controls a domain. Sometimes this isn’t possible, either because of technical limitations or if the address of a record to is not reachable from the public internet. The dns-01 challenge can be used in these cases. This challenge is fulfilled by creating a certain DNS record in the domain’s zone.
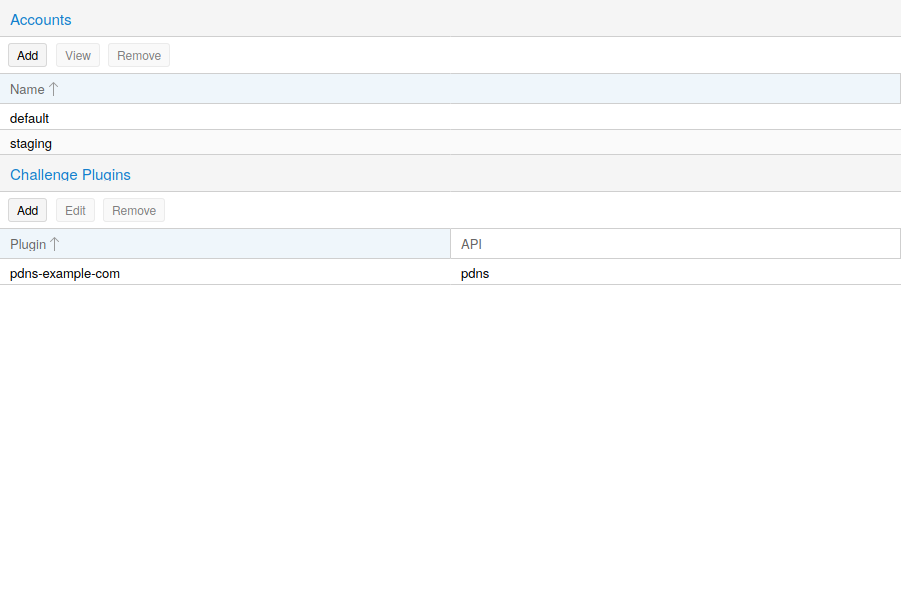
Proxmox VE supports both of those challenge types out of the box, you can configure plugins either over the web interface under Datacenter -> ACME, or using the pvenode acme plugin add command.
ACME Plugin configurations are stored in /etc/pve/priv/acme/plugins.cfg. A plugin is available for all nodes in the cluster.
Node Domains
Each domain is node specific. You can add new or manage existing domain entries under Node -> Certificates, or using the pvenode config command.
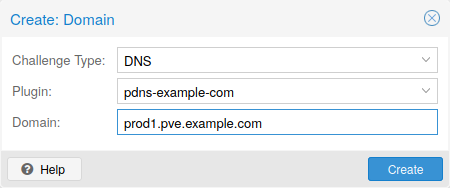
After configuring the desired domain(s) for a node and ensuring that the desired ACME account is selected, you can order your new certificate over the web interface. On success the interface will reload after 10 seconds.
Renewal will happen automatically.
ACME HTTP Challenge Plugin
There is always an implicitly configured standalone plugin for validating http-01 challenges via the built-in webserver spawned on port 80.
|
|
The name standalone means that it can provide the validation on it’s own, without any third party service. So, this plugin works also for cluster nodes. |
There are a few prerequisites to use it for certificate management with Let’s Encrypts ACME.
-
You have to accept the ToS of Let’s Encrypt to register an account.
-
Port 80 of the node needs to be reachable from the internet.
-
There must be no other listener on port 80.
-
The requested (sub)domain needs to resolve to a public IP of the Node.
ACME DNS API Challenge Plugin
On systems where external access for validation via the http-01 method is not possible or desired, it is possible to use the dns-01 validation method. This validation method requires a DNS server that allows provisioning of TXT records via an API.
Configuring ACME DNS APIs for validation
Proxmox VE re-uses the DNS plugins developed for the acme.sh [6] project, please refer to its documentation for details on configuration of specific APIs.
The easiest way to configure a new plugin with the DNS API is using the web interface (Datacenter -> ACME).
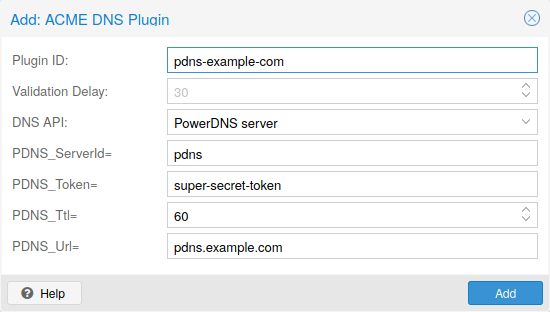
Choose DNS as challenge type. Then you can select your API provider, enter the credential data to access your account over their API. The validation delay determines the time in seconds between setting the DNS record and prompting the ACME provider to validate it, as providers often need some time to propagate the record in their infrastructure.
|
|
See the acme.sh How to use DNS API wiki for more detailed information about getting API credentials for your provider. |
As there are many DNS providers and API endpoints Proxmox VE automatically generates the form for the credentials for some providers. For the others you will see a bigger text area, simply copy all the credentials KEY=VALUE pairs in there.
DNS Validation through CNAME Alias
A special alias mode can be used to handle the validation on a different domain/DNS server, in case your primary/real DNS does not support provisioning via an API. Manually set up a permanent CNAME record for _acme-challenge.domain1.example pointing to _acme-challenge.domain2.example and set the alias property on the corresponding acmedomainX key in the Proxmox VE node configuration file to domain2.example to allow the DNS server of domain2.example to validate all challenges for domain1.example.
Combination of Plugins
Combining http-01 and dns-01 validation is possible in case your node is reachable via multiple domains with different requirements / DNS provisioning capabilities. Mixing DNS APIs from multiple providers or instances is also possible by specifying different plugin instances per domain.
|
|
Accessing the same service over multiple domains increases complexity and should be avoided if possible. |
Automatic renewal of ACME certificates
If a node has been successfully configured with an ACME-provided certificate (either via pvenode or via the GUI), the certificate will be automatically renewed by the pve-daily-update.service. Currently, renewal will be attempted if the certificate has expired already, or will expire in the next 30 days.
|
|
If you are using a custom directory that issues short-lived certificates, disabling the random delay for the pve-daily-update.timer unit might be advisable to avoid missing a certificate renewal after a reboot. |
ACME Examples with pvenode
Example: Sample pvenode invocation for using Let’s Encrypt certificates
root@proxmox:~# pvenode acme account register default mail@example.invalid
Directory endpoints:
0) Let's Encrypt V2 (https://acme-v02.api.letsencrypt.org/directory)
1) Let's Encrypt V2 Staging (https://acme-staging-v02.api.letsencrypt.org/directory)
2) Custom
Enter selection: 1

Terms of Service: https://letsencrypt.org/documents/LE-SA-v1.2-November-15-2017.pdf
Do you agree to the above terms? [y|N]y
...
Task OK
root@proxmox:~# pvenode config set --acme domains=example.invalid
root@proxmox:~# pvenode acme cert order
Loading ACME account details
Placing ACME order
...
Status is 'valid'!

All domains validated!
...
Downloading certificate
Setting pveproxy certificate and key
Restarting pveproxy
Task OK
Example: Setting up the OVH API for validating a domain
|
|
the account registration steps are the same no matter which plugins are used, and are not repeated here. |
|
|
OVH_AK and OVH_AS need to be obtained from OVH according to the OVH API documentation |
First you need to get all information so you and Proxmox VE can access the API.
root@proxmox:~# cat /path/to/api-token
OVH_AK=XXXXXXXXXXXXXXXX
OVH_AS=YYYYYYYYYYYYYYYYYYYYYYYYYYYYYYYY
root@proxmox:~# source /path/to/api-token
root@proxmox:~# curl -XPOST -H"X-Ovh-Application: $OVH_AK" -H "Content-type: application/json" \
https://eu.api.ovh.com/1.0/auth/credential  -d '{
  "accessRules": [
    {"method": "GET","path": "/auth/time"},
    {"method": "GET","path": "/domain"},
    {"method": "GET","path": "/domain/zone/*"},
    {"method": "GET","path": "/domain/zone/*/record"},
    {"method": "POST","path": "/domain/zone/*/record"},
    {"method": "POST","path": "/domain/zone/*/refresh"},
    {"method": "PUT","path": "/domain/zone/*/record/"},
    {"method": "DELETE","path": "/domain/zone/*/record/*"}
]
}'
{"consumerKey":"ZZZZZZZZZZZZZZZZZZZZZZZZZZZZZZZZ","state":"pendingValidation","validationUrl":"https://eu.api.ovh.com/auth/?credentialToken=AAAAAAAAAAAAAAAAAAAAAAAAAAAAAAAAAAAAAAAAAAAAAAAAAAAAAAAAAAAAAAAA"}

(open validation URL and follow instructions to link Application Key with account/Consumer Key)

root@proxmox:~# echo "OVH_CK=ZZZZZZZZZZZZZZZZZZZZZZZZZZZZZZZZ" >> /path/to/api-token
Now you can setup the the ACME plugin:
root@proxmox:~# pvenode acme plugin add dns example_plugin --api ovh --data /path/to/api_token
root@proxmox:~# pvenode acme plugin config example_plugin
┌────────┬──────────────────────────────────────────┐
│ key    │ value                                    │
╞════════╪══════════════════════════════════════════╡
│ api    │ ovh                                      │
├────────┼──────────────────────────────────────────┤
│ data   │ OVH_AK=XXXXXXXXXXXXXXXX                  │
│        │ OVH_AS=YYYYYYYYYYYYYYYYYYYYYYYYYYYYYYYY  │
│        │ OVH_CK=ZZZZZZZZZZZZZZZZZZZZZZZZZZZZZZZZ  │
├────────┼──────────────────────────────────────────┤
│ digest │ 867fcf556363ca1bea866863093fcab83edf47a1 │
├────────┼──────────────────────────────────────────┤
│ plugin │ example_plugin                           │
├────────┼──────────────────────────────────────────┤
│ type   │ dns                                      │
└────────┴──────────────────────────────────────────┘
At last you can configure the domain you want to get certificates for and place the certificate order for it:
root@proxmox:~# pvenode config set -acmedomain0 example.proxmox.com,plugin=example_plugin
root@proxmox:~# pvenode acme cert order
Loading ACME account details
Placing ACME order
Order URL: https://acme-staging-v02.api.letsencrypt.org/acme/order/11111111/22222222

Getting authorization details from 'https://acme-staging-v02.api.letsencrypt.org/acme/authz-v3/33333333'
The validation for example.proxmox.com is pending!
[Wed Apr 22 09:25:30 CEST 2020] Using OVH endpoint: ovh-eu
[Wed Apr 22 09:25:30 CEST 2020] Checking authentication
[Wed Apr 22 09:25:30 CEST 2020] Consumer key is ok.
[Wed Apr 22 09:25:31 CEST 2020] Adding record
[Wed Apr 22 09:25:32 CEST 2020] Added, sleep 10 seconds.
Add TXT record: _acme-challenge.example.proxmox.com
Triggering validation
Sleeping for 5 seconds
Status is 'valid'!
[Wed Apr 22 09:25:48 CEST 2020] Using OVH endpoint: ovh-eu
[Wed Apr 22 09:25:48 CEST 2020] Checking authentication
[Wed Apr 22 09:25:48 CEST 2020] Consumer key is ok.
Remove TXT record: _acme-challenge.example.proxmox.com

All domains validated!

Creating CSR
Checking order status
Order is ready, finalizing order
valid!

Downloading certificate
Setting pveproxy certificate and key
Restarting pveproxy
Task OK
Example: Switching from the staging to the regular ACME directory
Changing the ACME directory for an account is unsupported, but as Proxmox VE supports more than one account you can just create a new one with the production (trusted) ACME directory as endpoint. You can also deactivate the staging account and recreate it.
root@proxmox:~# pvenode acme account deactivate default
Renaming account file from '/etc/pve/priv/acme/default' to '/etc/pve/priv/acme/_deactivated_default_4'
Task OK

root@proxmox:~# pvenode acme account register default example@proxmox.com
Directory endpoints:
0) Let's Encrypt V2 (https://acme-v02.api.letsencrypt.org/directory)
1) Let's Encrypt V2 Staging (https://acme-staging-v02.api.letsencrypt.org/directory)
2) Custom
Enter selection: 0

Terms of Service: https://letsencrypt.org/documents/LE-SA-v1.2-November-15-2017.pdf
Do you agree to the above terms? [y|N]y
...
Task OK
Host Bootloader
Proxmox VE currently uses one of two bootloaders depending on the disk setup selected in the installer.
For EFI Systems installed with ZFS as the root filesystem systemd-boot is used, unless Secure Boot is enabled. All other deployments use the standard GRUB bootloader (this usually also applies to systems which are installed on top of Debian).
Partitioning Scheme Used by the Installer
The Proxmox VE installer creates 3 partitions on all disks selected for installation.
The created partitions are:
-
a 1 MB BIOS Boot Partition (gdisk type EF02)
-
a 512 MB EFI System Partition (ESP, gdisk type EF00)
-
a third partition spanning the set hdsize parameter or the remaining space used for the chosen storage type
Systems using ZFS as root filesystem are booted with a kernel and initrd image stored on the 512 MB EFI System Partition. For legacy BIOS systems, and EFI systems with Secure Boot enabled, GRUB is used, for EFI systems without Secure Boot, systemd-boot is used. Both are installed and configured to point to the ESPs.
GRUB in BIOS mode (--target i386-pc) is installed onto the BIOS Boot Partition of all selected disks on all systems booted with GRUB [7].
Synchronizing the content of the ESP with proxmox-boot-tool
proxmox-boot-tool is a utility used to keep the contents of the EFI System Partitions properly configured and synchronized. It copies certain kernel versions to all ESPs and configures the respective bootloader to boot from the vfat formatted ESPs. In the context of ZFS as root filesystem this means that you can use all optional features on your root pool instead of the subset which is also present in the ZFS implementation in GRUB or having to create a separate small boot-pool [8].
In setups with redundancy all disks are partitioned with an ESP, by the installer. This ensures the system boots even if the first boot device fails or if the BIOS can only boot from a particular disk.
The ESPs are not kept mounted during regular operation. This helps to prevent filesystem corruption to the vfat formatted ESPs in case of a system crash, and removes the need to manually adapt /etc/fstab in case the primary boot device fails.
proxmox-boot-tool handles the following tasks:
-
formatting and setting up a new partition
-
copying and configuring new kernel images and initrd images to all listed ESPs
-
synchronizing the configuration on kernel upgrades and other maintenance tasks
-
managing the list of kernel versions which are synchronized
-
configuring the boot-loader to boot a particular kernel version (pinning)
You can view the currently configured ESPs and their state by running:
# proxmox-boot-tool status
To format and initialize a partition as synced ESP, e.g., after replacing a failed vdev in an rpool, or when converting an existing system that pre-dates the sync mechanism, proxmox-boot-tool from proxmox-kernel-helper can be used.
|
|
the format command will format the <partition>, make sure to pass in the right device/partition! |
For example, to format an empty partition /dev/sda2 as ESP, run the following:
# proxmox-boot-tool format /dev/sda2
To setup an existing, unmounted ESP located on /dev/sda2 for inclusion in Proxmox VE’s kernel update synchronization mechanism, use the following:
# proxmox-boot-tool init /dev/sda2
or
# proxmox-boot-tool init /dev/sda2 grub
to force initialization with GRUB instead of systemd-boot, for example for Secure Boot support.
Afterwards /etc/kernel/proxmox-boot-uuids should contain a new line with the UUID of the newly added partition. The init command will also automatically trigger a refresh of all configured ESPs.
To copy and configure all bootable kernels and keep all ESPs listed in /etc/kernel/proxmox-boot-uuids in sync you just need to run:
# proxmox-boot-tool refresh
(The equivalent to running update-grub systems with ext4 or xfs on root).
This is necessary should you make changes to the kernel commandline, or want to sync all kernels and initrds.
|
|
Both update-initramfs and apt (when necessary) will automatically trigger a refresh. |
The following kernel versions are configured by default:
-
the currently running kernel
-
the version being newly installed on package updates
-
the two latest already installed kernels
-
the latest version of the second-to-last kernel series (e.g. 5.0, 5.3), if applicable
-
any manually selected kernels
Should you wish to add a certain kernel and initrd image to the list of bootable kernels use proxmox-boot-tool kernel add.
For example run the following to add the kernel with ABI version 5.0.15-1-pve to the list of kernels to keep installed and synced to all ESPs:
# proxmox-boot-tool kernel add 5.0.15-1-pve
proxmox-boot-tool kernel list will list all kernel versions currently selected for booting:
# proxmox-boot-tool kernel list
Manually selected kernels:
5.0.15-1-pve

Automatically selected kernels:
5.0.12-1-pve
4.15.18-18-pve
Run proxmox-boot-tool kernel remove to remove a kernel from the list of manually selected kernels, for example:
# proxmox-boot-tool kernel remove 5.0.15-1-pve
|
|
It’s required to run proxmox-boot-tool refresh to update all EFI System Partitions (ESPs) after a manual kernel addition or removal from above. |
Determine which Bootloader is Used
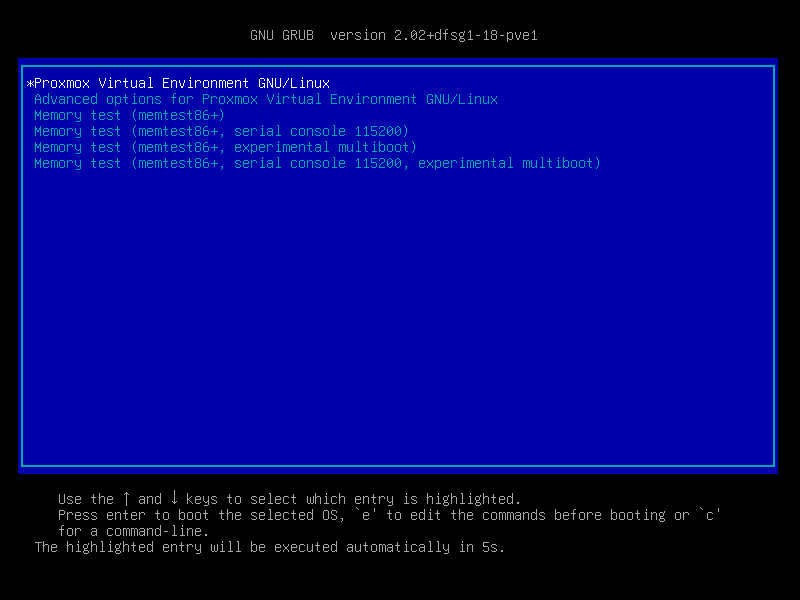
The simplest and most reliable way to determine which bootloader is used, is to watch the boot process of the Proxmox VE node.
You will either see the blue box of GRUB or the simple black on white systemd-boot.
Determining the bootloader from a running system might not be 100% accurate. The safest way is to run the following command:
# efibootmgr -v
If it returns a message that EFI variables are not supported, GRUB is used in BIOS/Legacy mode.
If the output contains a line that looks similar to the following, GRUB is used in UEFI mode.
Boot0005* proxmox [...] File(\EFI\proxmox\grubx64.efi)
If the output contains a line similar to the following, systemd-boot is used.
Boot0006* Linux Boot Manager [...] File(\EFI\systemd\systemd-bootx64.efi)
By running:
# proxmox-boot-tool status
you can find out if proxmox-boot-tool is configured, which is a good indication of how the system is booted.
GRUB
GRUB has been the de-facto standard for booting Linux systems for many years and is quite well documented [9].
Configuration
Changes to the GRUB configuration are done via the defaults file /etc/default/grub or config snippets in /etc/default/grub.d. To regenerate the configuration file after a change to the configuration run: [10]
# update-grub
Systemd-boot
systemd-boot is a lightweight EFI bootloader. It reads the kernel and initrd images directly from the EFI Service Partition (ESP) where it is installed. The main advantage of directly loading the kernel from the ESP is that it does not need to reimplement the drivers for accessing the storage. In Proxmox VE proxmox-boot-tool is used to keep the configuration on the ESPs synchronized.
Configuration
systemd-boot is configured via the file loader/loader.conf in the root directory of an EFI System Partition (ESP). See the loader.conf(5) manpage for details.
Each bootloader entry is placed in a file of its own in the directory loader/entries/
An example entry.conf looks like this (/ refers to the root of the ESP):
title    Proxmox
version  5.0.15-1-pve
options   root=ZFS=rpool/ROOT/pve-1 boot=zfs
linux    /EFI/proxmox/5.0.15-1-pve/vmlinuz-5.0.15-1-pve
initrd   /EFI/proxmox/5.0.15-1-pve/initrd.img-5.0.15-1-pve
Editing the Kernel Commandline
You can modify the kernel commandline in the following places, depending on the bootloader used:
The kernel commandline needs to be placed in the variable GRUB_CMDLINE_LINUX_DEFAULT in the file /etc/default/grub. Running update-grub appends its content to all linux entries in /boot/grub/grub.cfg.
The kernel commandline needs to be placed as one line in /etc/kernel/cmdline. To apply your changes, run proxmox-boot-tool refresh, which sets it as the option line for all config files in loader/entries/proxmox-*.conf.
A complete list of kernel parameters can be found at https://www.kernel.org/doc/html/v<YOUR-KERNEL-VERSION>/admin-guide/kernel-parameters.html. replace <YOUR-KERNEL-VERSION> with the major.minor version, for example, for kernels based on version 6.5 the URL would be: https://www.kernel.org/doc/html/v6.5/admin-guide/kernel-parameters.html
You can find your kernel version by checking the web interface (Node → Summary), or by running
# uname -r
Use the first two numbers at the front of the output.
Override the Kernel-Version for next Boot
To select a kernel that is not currently the default kernel, you can either:
-
use the boot loader menu that is displayed at the beginning of the boot process
-
use the proxmox-boot-tool to pin the system to a kernel version either once or permanently (until pin is reset).
This should help you work around incompatibilities between a newer kernel version and the hardware.
|
|
Such a pin should be removed as soon as possible so that all current security patches of the latest kernel are also applied to the system. |
For example: To permanently select the version 5.15.30-1-pve for booting you would run:
# proxmox-boot-tool kernel pin 5.15.30-1-pve
|
|
The pinning functionality works for all Proxmox VE systems, not only those using proxmox-boot-tool to synchronize the contents of the ESPs, if your system does not use proxmox-boot-tool for synchronizing you can also skip the proxmox-boot-tool refresh call in the end. |
You can also set a kernel version to be booted on the next system boot only. This is for example useful to test if an updated kernel has resolved an issue, which caused you to pin a version in the first place:
# proxmox-boot-tool kernel pin 5.15.30-1-pve --next-boot
To remove any pinned version configuration use the unpin subcommand:
# proxmox-boot-tool kernel unpin
While unpin has a --next-boot option as well, it is used to clear a pinned version set with --next-boot. As that happens already automatically on boot, invoking it manually is of little use.
After setting, or clearing pinned versions you also need to synchronize the content and configuration on the ESPs by running the refresh subcommand.
|
|
You will be prompted to automatically do for proxmox-boot-tool managed systems if you call the tool interactively. |
# proxmox-boot-tool refresh
Secure Boot
Since Proxmox VE 8.1, Secure Boot is supported out of the box via signed packages and integration in proxmox-boot-tool.
The following packages are required for secure boot to work. You can install them all at once by using the ‘proxmox-secure-boot-support’ meta-package.
-
shim-signed (shim bootloader signed by Microsoft)
-
shim-helpers-amd64-signed (fallback bootloader and MOKManager, signed by Proxmox)
-
grub-efi-amd64-signed (GRUB EFI bootloader, signed by Proxmox)
-
proxmox-kernel-6.X.Y-Z-pve-signed (Kernel image, signed by Proxmox)
Only GRUB is supported as bootloader out of the box, since other bootloader are currently not eligible for secure boot code-signing.
Any new installation of Proxmox VE will automatically have all of the above packages included.
More details about how Secure Boot works, and how to customize the setup, are available in our wiki.
Switching an Existing Installation to Secure Boot
|
|
This can lead to an unbootable installation in some cases if not done correctly. Reinstalling the host will setup Secure Boot automatically if available, without any extra interactions. Make sure you have a working and well-tested backup of your Proxmox VE host! |
An existing UEFI installation can be switched over to Secure Boot if desired, without having to reinstall Proxmox VE from scratch.
First, ensure all your system is up-to-date. Next, install proxmox-secure-boot-support. GRUB automatically creates the needed EFI boot entry for booting via the default shim.
If systemd-boot is used as a bootloader (see Determine which Bootloader is used), some additional setup is needed. This is only the case if Proxmox VE was installed with ZFS-on-root.
To check the latter, run:
# findmnt /
If the host is indeed using ZFS as root filesystem, the FSTYPE column should contain zfs:
TARGET SOURCE           FSTYPE OPTIONS
/      rpool/ROOT/pve-1 zfs    rw,relatime,xattr,noacl,casesensitive
Next, a suitable potential ESP (EFI system partition) must be found. This can be done using the lsblk command as following:
# lsblk -o +FSTYPE
The output should look something like this:
NAME   MAJ:MIN RM  SIZE RO TYPE MOUNTPOINTS FSTYPE
sda      8:0    0   32G  0 disk
├─sda1   8:1    0 1007K  0 part
├─sda2   8:2    0  512M  0 part             vfat
└─sda3   8:3    0 31.5G  0 part             zfs_member
sdb      8:16   0   32G  0 disk
├─sdb1   8:17   0 1007K  0 part
├─sdb2   8:18   0  512M  0 part             vfat
└─sdb3   8:19   0 31.5G  0 part             zfs_member
In this case, the partitions sda2 and sdb2 are the targets. They can be identified by the their size of 512M and their FSTYPE being vfat, in this case on a ZFS RAID-1 installation.
These partitions must be properly set up for booting through GRUB using proxmox-boot-tool. This command (using sda2 as an example) must be run separately for each individual ESP:
# proxmox-boot-tool init /dev/sda2 grub
Afterwards, you can sanity-check the setup by running the following command:
# efibootmgr -v
This list should contain an entry looking similar to this:
[..]
Boot0009* proxmox       HD(2,GPT,..,0x800,0x100000)/File(\EFI\proxmox\shimx64.efi)
[..]
|
|
The old systemd-boot bootloader will be kept, but GRUB will be preferred. This way, if booting using GRUB in Secure Boot mode does not work for any reason, the system can still be booted using systemd-boot with Secure Boot turned off. |
Now the host can be rebooted and Secure Boot enabled in the UEFI firmware setup utility.
On reboot, a new entry named proxmox should be selectable in the UEFI firmware boot menu, which boots using the pre-signed EFI shim.
If, for any reason, no proxmox entry can be found in the UEFI boot menu, you can try adding it manually (if supported by the firmware), by adding the file \EFI\proxmox\shimx64.efi as a custom boot entry.
|
|
Some UEFI firmwares are known to drop the proxmox boot option on reboot. This can happen if the proxmox boot entry is pointing to a GRUB installation on a disk, where the disk itself is not a boot option. If possible, try adding the disk as a boot option in the UEFI firmware setup utility and run proxmox-boot-tool again. |
|
|
To enroll custom keys, see the accompanying Secure Boot wiki page. |
Using DKMS/Third Party Modules With Secure Boot
On systems with Secure Boot enabled, the kernel will refuse to load modules which are not signed by a trusted key. The default set of modules shipped with the kernel packages is signed with an ephemeral key embedded in the kernel image which is trusted by that specific version of the kernel image.
In order to load other modules, such as those built with DKMS or manually, they need to be signed with a key trusted by the Secure Boot stack. The easiest way to achieve this is to enroll them as Machine Owner Key (MOK) with mokutil.
The dkms tool will automatically generate a keypair and certificate in /var/lib/dkms/mok.key and /var/lib/dkms/mok.pub and use it for signing the kernel modules it builds and installs.
You can view the certificate contents with
# openssl x509 -in /var/lib/dkms/mok.pub -noout -text
and enroll it on your system using the following command:
# mokutil --import /var/lib/dkms/mok.pub
input password:
input password again:
The mokutil command will ask for a (temporary) password twice, this password needs to be entered one more time in the next step of the process! Rebooting the system should automatically boot into the MOKManager EFI binary, which allows you to verify the key/certificate and confirm the enrollment using the password selected when starting the enrollment using mokutil. Afterwards, the kernel should allow loading modules built with DKMS (which are signed with the enrolled MOK). The MOK can also be used to sign custom EFI binaries and kernel images if desired.
The same procedure can also be used for custom/third-party modules not managed with DKMS, but the key/certificate generation and signing steps need to be done manually in that case.
Kernel Samepage Merging (KSM)
Kernel Samepage Merging (KSM) is an optional memory deduplication feature offered by the Linux kernel, which is enabled by default in Proxmox VE. KSM works by scanning a range of physical memory pages for identical content, and identifying the virtual pages that are mapped to them. If identical pages are found, the corresponding virtual pages are re-mapped so that they all point to the same physical page, and the old pages are freed. The virtual pages are marked as "copy-on-write", so that any writes to them will be written to a new area of memory, leaving the shared physical page intact.
Implications of KSM
KSM can optimize memory usage in virtualization environments, as multiple VMs running similar operating systems or workloads could potentially share a lot of common memory pages.
However, while KSM can reduce memory usage, it also comes with some security risks, as it can expose VMs to side-channel attacks. Research has shown that it is possible to infer information about a running VM via a second VM on the same host, by exploiting certain characteristics of KSM.
Thus, if you are using Proxmox VE to provide hosting services, you should consider disabling KSM, in order to provide your users with additional security. Furthermore, you should check your country’s regulations, as disabling KSM may be a legal requirement.