Setup Simple Zone With SNAT and DHCP
This guide demonstrates how to utilize Proxmox VE's software-defined network (SDN) to implement Source-NAT (SNAT), or masquerading, for providing internet access to guests within private networks
Installation
In order to use the automatic DHCP feature you need to additionally install dnsmasq. You can do this via the following command:
apt install dnsmasq
Additionally, you should disable the default dnsmasq service:
systemctl disable --now dnsmasq
Configuration
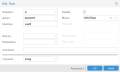
Navigate to 'Datacenter > SDN > Zones' and create a new Simple zone with an ID of your choice. For activating DHCP, also tick the 'automatic DHCP' option in the advanced settings. As IPAM we select pve, which is available by default in SDN. In order to use the IPAM features described below, you need to use the 'pve' IPAM.
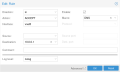
Navigate to the VNet panel to create a new VNet with an ID of your choice (vnet0 in our example). When creating the VNet, select the zone we created in the previous step.
In the same view, create a Subnet in the previously created VNet. This can be done by selecting the VNet and clicking 'Create' in the Subnet panel on the right-hand side. Enter a local Subnet of your choice (in our example 10.0.0.0/24). You also need to define an IP for the gateway, otherwise DHCP will not work (10.0.0.1 in our example). Tick the 'SNAT' option in order to enable SNAT for this VNet.
To use DHCP we also need to create a DHCP range for this Subnet. This can be done by switching to the Tab 'DHCP Ranges' in the Subnet creation dialog. I picked 10.0.0.50 and 10.0.0.200 as my start and end addresses for the DHCP range.
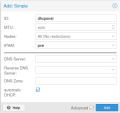
Zone Configuration
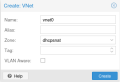
VNet Configuration
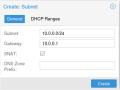
Subnet Configuration
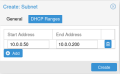
DHCP range configuration


Now that everything is set up, we need to apply the changes. This can be done by navigating to the SDN panel and clicking 'Apply'. Make sure that the network reload task finishes successfully. If it does complete without any errors or warnings you should be able to use your newly created VNet.
Firewall Setup
If you use the PVE firewall, you will also need to allow DHCP forwarding and DNS traffic on the VNet interface. Otherwise, your guests won't be able to contact dnsmasq for DHCP leases and DNS queries. To do so, add two rules to your datacenter firewall: one for DNS queries and one for DHCP forwarding. Both rules should use direction "in", action "ACCEPT", and the VNet name as the interface name (vnet0 in our example). You can use the "DNS" and "DHCPfwd" macros for each rule respectively.
For the DNS rule, you should additionally set the destination address to the gateway of the network. This allows only DNS traffic for the dnsmasq server. If you don't set it all DNS traffic will be allowed, which could be used to circumvent other firewall rules. DHCP cannot be restricted in the same manner, as it needs to be able to issue a broadcast message at first. Finally, mark both as enabled and save the rules. See the below screenshots for more information.
Rule to allow DHCP forwarding on vnet0
Rule to allow DNS traffic on vnet0


Container
Create a container with your desired settings. When you configure the network, select the VNet as your bridge and set IPv4 and / or IPv6 to DHCP depending on the subnets you configured.

When starting your CT you should now be able to see that your container got assigned its IP via DHCP. Verify that SNAT is working by pinging a domain outside your simple zone.
Virtual Machines
Create a virtual machine with your desired settings. When you configure the network, select the VNet as your bridge. You also need to make sure to configure your guest to use DHCP. Most operating systems default to using DHCP for network configuration, so usually you do not need to do anything.
When starting your VM you should now be able to see that your VM got assigned its IP via DHCP. Verify that SNAT is working by pinging a domain outside your simple zone.

IPAM
You can inspect the currently leased IPs in your Simple Zone by navigating to the IPAM tab in the SDN section. There you should now see entries for every VM and CT you created.

You can also edit and create new mappings in the IPAM via this interface. You need to restart the guest via the Proxmox Web UI or CLI in order for the changes to take effect. Restarting the guest from inside does not suffice.
Custom DNS
Dnsmasq also automatically provides DNS for the whole VNet and uses the DNS configuration of the host for that. If you want to configure a custom DNS server for the VNet, you need to set it in the Subnet configuration. This can be done by editing the file /etc/pve/sdn/subnets.cfg and setting the dhcp-dns-server configuration key. For our example configuration the file would then look like this:
subnet: dhcpsnat-10.0.0.0-24
	vnet vnet0
	dhcp-range start-address=10.0.0.50,end-address=10.0.0.200
	dhcp-dns-server x.x.x.x
	gateway 10.0.0.1
	snat 1