Shrink Qcow2 Disk Files
Over time a guest's *.qcow2 disk files can grow larger than the actual data stored within them, this happens because the Guest OS normally only marks a deleted File as zero, it doesn't gets actually deleted (performance reasons), so the underlying qcow2 file cannot differentiate between allocated and used and allocated but not used storage.
In order to shrink the *.qcow2 files you've two options, enable TRIM support or zero out all free space of the partitions contained within the guest and then reconvert the image with qemu-img.
IMPORTANT WARNING: Always have offsite backups ready, you never know!
Recommended Solution
The recommended version is to pass TRIM commands (known from SSDs) from the VM to the backing storage. This has the advantage that it works automatically, does not need to write the whole free parts of all disks to zero and must only be setup once.
PVE Configuration
Requirements:
- Thin-provisioned backing storage (qcow2 disk, thin-lvm, zfs, ...)
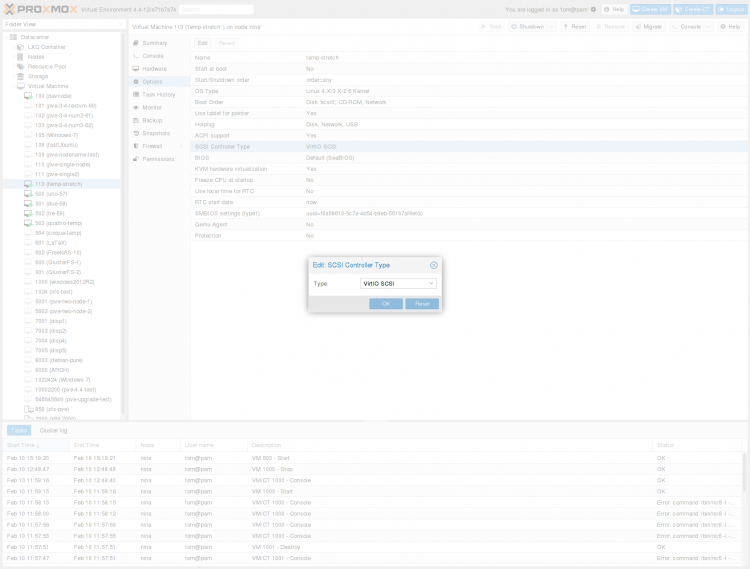
- Virtio-SCSI controller configured on guest.
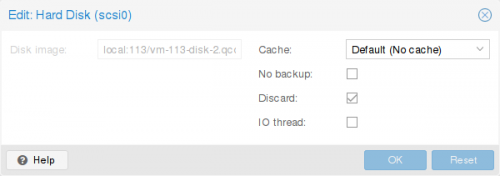
- Guest scsi* disks with the discard option enabled
- See Qemu trim/discard and virtio scsi for configuration details.
Linux Guest Configuration
Modern Linux guest systems can use the well known fstrim command to trim a device and free all unused storage on the underlying device:
fstrim -av
Many modern Linux distributions have already setup a timer or cron job which executes a TRIM about once a week.
Windows Guest Configuration
For those Windows versions which support TRIM (Win7/2008R2 and up should be supported, see this) you should not have to setup anything, Windows should periodically trigger a TRIM to the disks.
You can see if TRIM is enabled with:
fsutil behavior query DisableDeleteNotify
This should output 0 (zero) else set it with:
fsutil behavior set DisableDeleteNotify 0
To manually run TRIM on a drive you can run the following PowerShell command:
Optimize-Volume -DriveLetter {drive letter} -ReTrim -Verbose
Manual Solution
This solution is no longer necessary and is only needed on Windows XP and earlier and older Linux distributions that don't support fstrim.
Windows Guest Preparation
These steps are all performed within the Windows guest.
- Defragment your Windows guest's drives either by using the built in defragment program or a 3rd party one such as Defraggler or UltraDefrag.
- Zero out the free space either using SDelete (recommended) or Eraser (using British HMG IS5 (Baseline) (1 pass)).
Zero Using SDelete
- Download SDelete and save it somewhere on your system (eg.
C:\windows\system32\). - Run SDelete and zero free space:
sdelete -z
- If there is more than one partition, then for eg., drive E:\, use:
sdelete -z e:
Linux Guest Preparation
Use the following command to zero out your disk:
dd if=/dev/zero of=/mytempfile
# that could take a some time
rm -f /mytempfile
Shrink the Disk File
- Shut down the VM.
- Log into the Proxmox node and go to the VM's disk storage directory.
- IMPORTANT: Create a backup of your existing VM disk file:
cp image.qcow2 image.qcow2_backup
- Option #1: Shrink your disk without compression (better performance, larger disk size):
qemu-img convert -O qcow2 image.qcow2_backup image.qcow2
- Option #2: Shrink your disk with compression (smaller disk size, takes longer to shrink, performance impact on slower systems):
qemu-img convert -O qcow2 -c image.qcow2_backup image.qcow2
- Example: A 50GB disk file I shrank without compression to 46GB, but with compression to 25GB. Time to compress was almost twice as long as an uncompressed shrink.
- Boot your VM and verify all is working.
- When you verify all is well, it should be safe to either delete the backup of the original disk, or move it to an offline backup storage.

