Backup and Restore: Difference between revisions
m (→Backup) |
No edit summary |
||
| (27 intermediate revisions by 7 users not shown) | |||
| Line 1: | Line 1: | ||
<!--PVE_IMPORT_START_MARKER--> | |||
<!-- Do not edit - this is autogenerated content --> | |||
{{#pvedocs:vzdump-plain.html}} | |||
[[Category:Reference Documentation]] | |||
<pvehide> | |||
Backups are a requirement for any sensible IT deployment, and Proxmox VE | |||
provides a fully integrated solution, using the capabilities of each | |||
storage and each guest system type. This allows the system | |||
administrator to fine tune via the mode option between consistency | |||
of the backups and downtime of the guest system. | |||
Proxmox VE backups are always full backups - containing the VM/CT | |||
configuration and all data. Backups can be started via the GUI or via | |||
the vzdump command line tool. | |||
Backup Storage | |||
Before a backup can run, a backup storage must be defined. Refer to | |||
the Storage documentation on how to add a storage. A backup storage | |||
must be a file level storage, as backups are stored as regular files. | |||
In most situations, using a NFS server is a good way to store backups. | |||
You can save those backups later to a tape drive, for off-site | |||
archiving. | |||
Scheduled Backup | |||
Backup jobs can be scheduled so that they are executed automatically | |||
on specific days and times, for selectable nodes and guest systems. | |||
Configuration of scheduled backups is done at the Datacenter level in | |||
the GUI, which will generate a cron entry in /etc/cron.d/vzdump. | |||
Backup modes | |||
There are several ways to provide consistency (option mode), | |||
depending on the guest type. | |||
Backup modes for VMs: | |||
stop mode | |||
This mode provides the highest consistency of the backup, at the cost | |||
of a short downtime in the VM operation. It works by executing an | |||
orderly shutdown of the VM, and then runs a background Qemu process to | |||
backup the VM data. After the backup is started, the VM goes to full | |||
operation mode if it was previously running. Consistency is guaranteed | |||
by using the live backup feature. | |||
suspend mode | |||
This mode is provided for compatibility reason, and suspends the VM | |||
before calling the snapshot mode. Since suspending the VM results in | |||
a longer downtime and does not necessarily improve the data | |||
consistency, the use of the snapshot mode is recommended instead. | |||
snapshot mode | |||
This mode provides the lowest operation downtime, at the cost of a | |||
small inconstancy risk. It works by performing a Proxmox VE live | |||
backup, in which data blocks are copied while the VM is running. If the | |||
guest agent is enabled (agent: 1) and running, it calls | |||
guest-fsfreeze-freeze and guest-fsfreeze-thaw to improve | |||
consistency. | |||
A technical overview of the Proxmox VE live backup for QemuServer can | |||
be found online | |||
here. | |||
Proxmox VE live backup provides snapshot-like semantics on any | |||
storage type. It does not require that the underlying storage supports | |||
snapshots. Also please note that since the backups are done via | |||
a background Qemu process, a stopped VM will appear as running for a | |||
short amount of time while the VM disks are being read by Qemu. | |||
However the VM itself is not booted, only its disk(s) are read. | |||
Backup modes for Containers: | |||
stop mode | |||
Stop the container for the duration of the backup. This potentially | |||
results in a very long downtime. | |||
suspend mode | |||
This mode uses rsync to copy the container data to a temporary | |||
location (see option --tmpdir). Then the container is suspended and | |||
a second rsync copies changed files. After that, the container is | |||
started (resumed) again. This results in minimal downtime, but needs | |||
additional space to hold the container copy. | |||
When the container is on a local file system and the target storage of | |||
the backup is an NFS/CIFS server, you should set --tmpdir to reside on a | |||
local file system too, as this will result in a many fold performance | |||
improvement. Use of a local tmpdir is also required if you want to | |||
backup a local container using ACLs in suspend mode if the backup | |||
storage is an NFS server. | |||
snapshot mode | |||
This mode uses the snapshotting facilities of the underlying | |||
storage. First, the container will be suspended to ensure data consistency. | |||
A temporary snapshot of the container’s volumes will be made and the | |||
snapshot content will be archived in a tar file. Finally, the temporary | |||
snapshot is deleted again. | |||
snapshot mode requires that all backed up volumes are on a storage that | |||
supports snapshots. Using the backup=no mount point option individual volumes | |||
can be excluded from the backup (and thus this requirement). | |||
By default additional mount points besides the Root Disk mount point are | |||
not included in backups. For volume mount points you can set the Backup option | |||
to include the mount point in the backup. Device and bind mounts are never | |||
backed up as their content is managed outside the Proxmox VE storage library. | |||
Backup File Names | |||
Newer versions of vzdump encode the guest type and the | |||
backup time into the filename, for example | |||
vzdump-lxc-105-2009_10_09-11_04_43.tar | |||
That way it is possible to store several backup in the same | |||
directory. The parameter maxfiles can be used to specify the | |||
maximum number of backups to keep. | |||
Restore | |||
A backup archive can be restored through the Proxmox VE web GUI or through the | |||
following CLI tools: | |||
pct restore | |||
Container restore utility | |||
qmrestore | |||
Virtual Machine restore utility | |||
For details see the corresponding manual pages. | |||
Bandwidth Limit | |||
Restoring one or more big backups may need a lot of resources, especially | |||
storage bandwidth for both reading from the backup storage and writing to | |||
the target storage. This can negatively effect other virtual guest as access | |||
to storage can get congested. | |||
To avoid this you can set bandwidth limits for a backup job. Proxmox VE | |||
implements two kinds of limits for restoring and archive: | |||
per-restore limit: denotes the maximal amount of bandwidth for | |||
reading from a backup archive | |||
per-storage write limit: denotes the maximal amount of bandwidth used for | |||
writing to a specific storage | |||
The read limit indirectly affects the write limit, as we cannot write more | |||
than we read. A smaller per-job limit will overwrite a bigger per-storage | |||
limit. A bigger per-job limit will only overwrite the per-storage limit if | |||
you have ‘Data.Allocate’ permissions on the affected storage. | |||
You can use the ‘--bwlimit <integer>` option from the restore CLI commands | |||
to set up a restore job specific bandwidth limit. Kibit/s is used as unit | |||
for the limit, this means passing `10240’ will limit the read speed of the | |||
backup to 10 MiB/s, ensuring that the rest of the possible storage bandwidth | |||
is available for the already running virtual guests, and thus the backup | |||
does not impact their operations. | |||
You can use ‘0` for the bwlimit parameter to disable all limits for | |||
a specific restore job. This can be helpful if you need to restore a very | |||
important virtual guest as fast as possible. (Needs `Data.Allocate’ | |||
permissions on storage) | |||
Most times your storage’s generally available bandwidth stays the same over | |||
time, thus we implemented the possibility to set a default bandwidth limit | |||
per configured storage, this can be done with: | |||
# pvesm set STORAGEID --bwlimit KIBs | |||
Configuration | |||
Global configuration is stored in /etc/vzdump.conf. The file uses a | |||
simple colon separated key/value format. Each line has the following | |||
format: | |||
OPTION: value | |||
Blank lines in the file are ignored, and lines starting with a # | |||
character are treated as comments and are also ignored. Values from | |||
this file are used as default, and can be overwritten on the command | |||
line. | |||
We currently support the following options: | |||
bwlimit: <integer> (0 - N) (default = 0) | |||
Limit I/O bandwidth (KBytes per second). | |||
compress: <0 | 1 | gzip | lzo> (default = 0) | |||
Compress dump file. | |||
dumpdir: <string> | |||
Store resulting files to specified directory. | |||
exclude-path: <string> | |||
Exclude certain files/directories (shell globs). | |||
ionice: <integer> (0 - 8) (default = 7) | |||
Set CFQ ionice priority. | |||
lockwait: <integer> (0 - N) (default = 180) | |||
Maximal time to wait for the global lock (minutes). | |||
mailnotification: <always | failure> (default = always) | |||
Specify when to send an email | |||
mailto: <string> | |||
Comma-separated list of email addresses that should receive email notifications. | |||
maxfiles: <integer> (1 - N) (default = 1) | |||
Maximal number of backup files per guest system. | |||
mode: <snapshot | stop | suspend> (default = snapshot) | |||
Backup mode. | |||
pigz: <integer> (default = 0) | |||
Use pigz instead of gzip when N>0. N=1 uses half of cores, N>1 uses N as thread count. | |||
pool: <string> | |||
Backup all known guest systems included in the specified pool. | |||
remove: <boolean> (default = 1) | |||
Remove old backup files if there are more than maxfiles backup files. | |||
script: <string> | |||
Use specified hook script. | |||
stdexcludes: <boolean> (default = 1) | |||
Exclude temporary files and logs. | |||
stopwait: <integer> (0 - N) (default = 10) | |||
Maximal time to wait until a guest system is stopped (minutes). | |||
storage: <string> | |||
Store resulting file to this storage. | |||
tmpdir: <string> | |||
Store temporary files to specified directory. | |||
Example vzdump.conf Configuration | |||
tmpdir: /mnt/fast_local_disk | |||
storage: my_backup_storage | |||
mode: snapshot | |||
bwlimit: 10000 | |||
Hook Scripts | |||
You can specify a hook script with option --script. This script is | |||
called at various phases of the backup process, with parameters | |||
accordingly set. You can find an example in the documentation | |||
directory (vzdump-hook-script.pl). | |||
File Exclusions | |||
this option is only available for container backups. | |||
vzdump skips the following files by default (disable with the option | |||
--stdexcludes 0) | |||
/tmp/?* | |||
/var/tmp/?* | |||
/var/run/?*pid | |||
You can also manually specify (additional) exclude paths, for example: | |||
# vzdump 777 --exclude-path /tmp/ --exclude-path '/var/foo*' | |||
(only excludes tmp directories) | |||
Configuration files are also stored inside the backup archive | |||
(in ./etc/vzdump/) and will be correctly restored. | |||
Examples | |||
Simply dump guest 777 - no snapshot, just archive the guest private area and | |||
configuration files to the default dump directory (usually | |||
/var/lib/vz/dump/). | |||
# vzdump 777 | |||
Use rsync and suspend/resume to create a snapshot (minimal downtime). | |||
# vzdump 777 --mode suspend | |||
Backup all guest systems and send notification mails to root and admin. | |||
# vzdump --all --mode suspend --mailto root --mailto admin | |||
Use snapshot mode (no downtime) and non-default dump directory. | |||
# vzdump 777 --dumpdir /mnt/backup --mode snapshot | |||
Backup more than one guest (selectively) | |||
# vzdump 101 102 103 --mailto root | |||
Backup all guests excluding 101 and 102 | |||
# vzdump --mode suspend --exclude 101,102 | |||
Restore a container to a new CT 600 | |||
# pct restore 600 /mnt/backup/vzdump-lxc-777.tar | |||
Restore a QemuServer VM to VM 601 | |||
# qmrestore /mnt/backup/vzdump-qemu-888.vma 601 | |||
Clone an existing container 101 to a new container 300 with a 4GB root | |||
file system, using pipes | |||
# vzdump 101 --stdout | pct restore --rootfs 4 300 - | |||
</pvehide> | |||
<!--PVE_IMPORT_END_MARKER--> | |||
[[Category: HOWTO]] | [[Category: HOWTO]] | ||
Revision as of 09:24, 16 July 2019
Contents
Backups are a requirement for any sensible IT deployment, and Proxmox VE provides a fully integrated solution, using the capabilities of each storage and each guest system type. This allows the system administrator to fine tune via the mode option between consistency of the backups and downtime of the guest system.
Proxmox VE backups are always full backups - containing the VM/CT configuration and all data. Backups can be started via the GUI or via the vzdump command-line tool.
Backup Storage
Before a backup can run, a backup storage must be defined. Refer to the storage documentation on how to add a storage. It can either be a Proxmox Backup Server storage, where backups are stored as de-duplicated chunks and metadata, or a file-level storage, where backups are stored as regular files. Using Proxmox Backup Server on a dedicated host is recommended, because of its advanced features. Using an NFS server is a good alternative. In both cases, you might want to save those backups later to a tape drive, for off-site archiving.
Scheduled Backup
Backup jobs can be scheduled so that they are executed automatically on specific days and times, for selectable nodes and guest systems. See the Backup Jobs section for more.
Backup Modes
There are several ways to provide consistency (option mode), depending on the guest type.
- stop mode
-
This mode provides the highest consistency of the backup, at the cost of a short downtime in the VM operation. It works by executing an orderly shutdown of the VM, and then runs a background QEMU process to backup the VM data. After the backup is started, the VM goes to full operation mode if it was previously running. Consistency is guaranteed by using the live backup feature.
- suspend mode
-
This mode is provided for compatibility reason, and suspends the VM before calling the snapshot mode. Since suspending the VM results in a longer downtime and does not necessarily improve the data consistency, the use of the snapshot mode is recommended instead.
- snapshot mode
-
This mode provides the lowest operation downtime, at the cost of a small inconsistency risk. It works by performing a Proxmox VE live backup, in which data blocks are copied while the VM is running. If the guest agent is enabled (agent: 1) and running, it calls guest-fsfreeze-freeze and guest-fsfreeze-thaw to improve consistency.

On Windows guests it is necessary to configure the guest agent if another backup software is used within the guest. See Freeze & Thaw in the guest agent section for more details.
A technical overview of the Proxmox VE live backup for QemuServer can be found online here.
|
|
Proxmox VE live backup provides snapshot-like semantics on any storage type. It does not require that the underlying storage supports snapshots. Also please note that since the backups are done via a background QEMU process, a stopped VM will appear as running for a short amount of time while the VM disks are being read by QEMU. However the VM itself is not booted, only its disk(s) are read. |
- stop mode
-
Stop the container for the duration of the backup. This potentially results in a very long downtime.
- suspend mode
-
This mode uses rsync to copy the container data to a temporary location (see option --tmpdir). Then the container is suspended and a second rsync copies changed files. After that, the container is started (resumed) again. This results in minimal downtime, but needs additional space to hold the container copy.
When the container is on a local file system and the target storage of the backup is an NFS/CIFS server, you should set --tmpdir to reside on a local file system too, as this will result in a many fold performance improvement. Use of a local tmpdir is also required if you want to backup a local container using ACLs in suspend mode if the backup storage is an NFS server.
- snapshot mode
-
This mode uses the snapshotting facilities of the underlying storage. First, the container will be suspended to ensure data consistency. A temporary snapshot of the container’s volumes will be made and the snapshot content will be archived in a tar file. Finally, the temporary snapshot is deleted again.
|
|
snapshot mode requires that all backed up volumes are on a storage that supports snapshots. Using the backup=no mount point option individual volumes can be excluded from the backup (and thus this requirement). |
|
|
By default additional mount points besides the Root Disk mount point are not included in backups. For volume mount points you can set the Backup option to include the mount point in the backup. Device and bind mounts are never backed up as their content is managed outside the Proxmox VE storage library. |
VM Backup Fleecing
When a backup for a VM is started, QEMU will install a "copy-before-write" filter in its block layer. This filter ensures that upon new guest writes, old data still needed for the backup is sent to the backup target first. The guest write blocks until this operation is finished so guest IO to not-yet-backed-up sectors will be limited by the speed of the backup target.
With backup fleecing, such old data is cached in a fleecing image rather than sent directly to the backup target. This can help guest IO performance and even prevent hangs in certain scenarios, at the cost of requiring more storage space.
To manually start a backup of VM 123 with fleecing images created on the storage local-lvm, run
vzdump 123 --fleecing enabled=1,storage=local-lvm
As always, you can set the option for specific backup jobs, or as a node-wide fallback via the configuration options. In the UI, fleecing can be configured in the Advanced tab when editing a backup job.
The fleecing storage should be a fast local storage, with thin provisioning and discard support. Examples are LVM-thin, RBD, ZFS with sparse 1 in the storage configuration, many file-based storages. Ideally, the fleecing storage is a dedicated storage, so it running full will not affect other guests and just fail the backup. Parts of the fleecing image that have been backed up will be discarded to try and keep the space usage low.
For file-based storages that do not support discard (for example, NFS before version 4.2), you should set preallocation off in the storage configuration. In combination with qcow2 (used automatically as the format for the fleecing image when the storage supports it), this has the advantage that already allocated parts of the image can be re-used later, which can still help save quite a bit of space.

|
On a storage that’s not thinly provisioned, for example, LVM or ZFS without the sparse option, the full size of the original disk needs to be reserved for the fleecing image up-front. On a thinly provisioned storage, the fleecing image can grow to the same size as the original image only if the guest re-writes a whole disk while the backup is busy with another disk. |
CT Change Detection Mode
Setting the change detection mode defines the encoding format for the pxar archives and how changed, and unchanged files are handled for container backups with Proxmox Backup Server as the target.
The change detection mode option can be configured for individual backup jobs in the Advanced tab while editing a job. Further, this option can be set as node-wide fallback via the configuration options.
There are 3 change detection modes available:
| Mode | Description |
|---|---|
Default |
Read and encode all files into a single archive, using the pxar format version 1. |
Data |
Read and encode all files, but split data and metadata into separate streams, using the pxar format version 2. |
Metadata |
Split streams and use archive format version 2 like Data, but use the metadata archive of the previous snapshot (if one exists) to detect unchanged files, and reuse their data chunks without reading file contents from disk, whenever possible. |
To perform a backup using the change detecation mode metadata you can run
vzdump 123 --storage pbs-storage --pbs-change-detection-mode metadata
|
|
Backups of VMs or to storage backends other than Proxmox Backup Server are not affected by this setting. |
Backup File Names
Newer versions of vzdump encode the guest type and the backup time into the filename, for example
vzdump-lxc-105-2009_10_09-11_04_43.tar
That way it is possible to store several backup in the same directory. You can limit the number of backups that are kept with various retention options, see the Backup Retention section below.
Backup File Compression
The backup file can be compressed with one of the following algorithms: lzo [1], gzip [2] or zstd [3].
Currently, Zstandard (zstd) is the fastest of these three algorithms. Multi-threading is another advantage of zstd over lzo and gzip. Lzo and gzip are more widely used and often installed by default.
You can install pigz [4] as a drop-in replacement for gzip to provide better performance due to multi-threading. For pigz & zstd, the amount of threads/cores can be adjusted. See the configuration options below.
The extension of the backup file name can usually be used to determine which compression algorithm has been used to create the backup.
.zst |
Zstandard (zstd) compression |
.gz or .tgz |
gzip compression |
.lzo |
lzo compression |
If the backup file name doesn’t end with one of the above file extensions, then it was not compressed by vzdump.
Backup Encryption
For Proxmox Backup Server storages, you can optionally set up client-side encryption of backups, see the corresponding section.
Backup Jobs
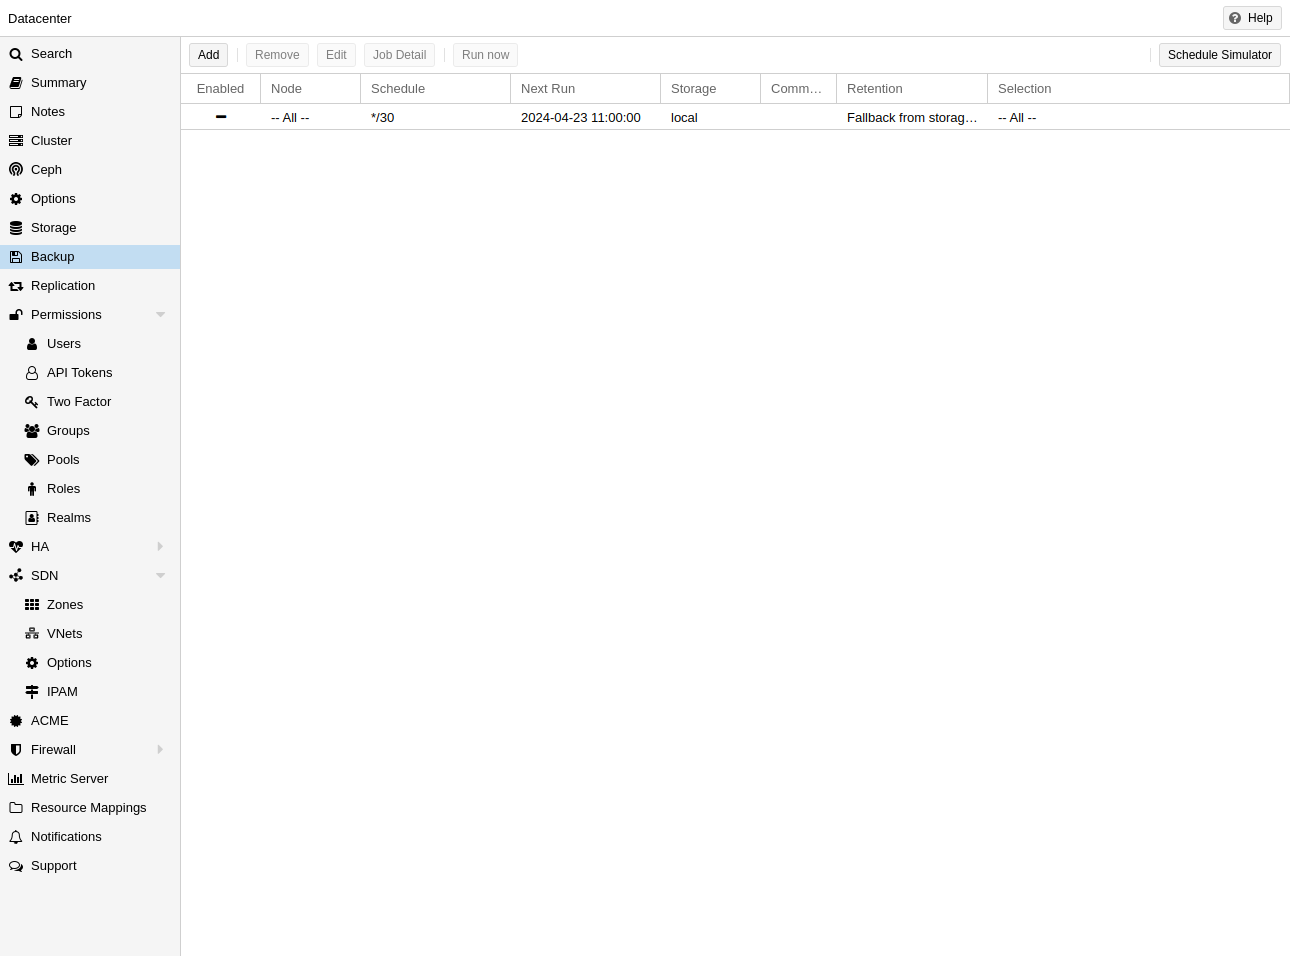
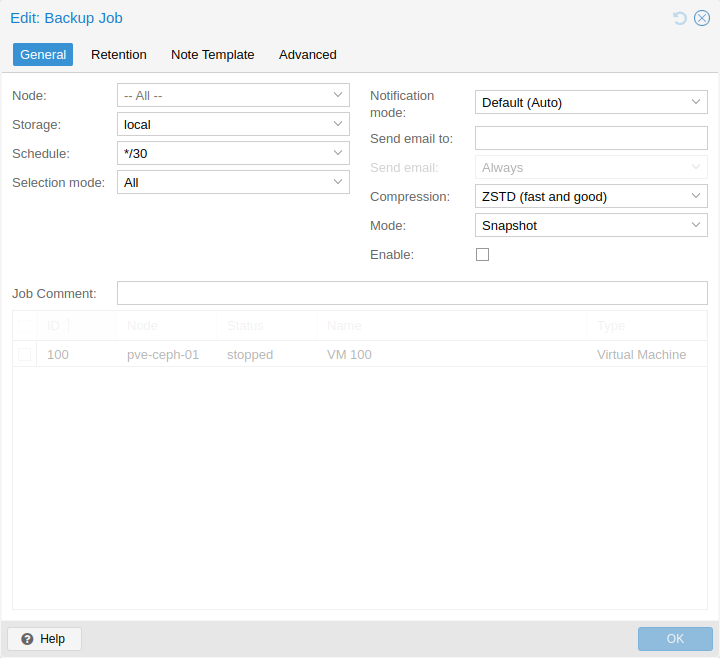
Besides triggering a backup manually, you can also setup periodic jobs that backup all, or a selection of virtual guest to a storage. You can manage the jobs in the UI under Datacenter → Backup or via the /cluster/backup API endpoint. Both will generate job entries in /etc/pve/jobs.cfg, which are parsed and executed by the pvescheduler daemon.
A job is either configured for all cluster nodes or a specific node, and is executed according to a given schedule. The format for the schedule is very similar to systemd calendar events, see the calendar events section for details. The Schedule field in the UI can be freely edited, and it contains several examples that can be used as a starting point in its drop-down list.
You can configure job-specific retention options overriding those from the storage or node configuration, as well as a template for notes for additional information to be saved together with the backup.
Since scheduled backups miss their execution when the host was offline or the pvescheduler was disabled during the scheduled time, it is possible to configure the behaviour for catching up. By enabling the Repeat missed option (in the Advanced tab in the UI, repeat-missed in the config), you can tell the scheduler that it should run missed jobs as soon as possible.

There are a few settings for tuning backup performance (some of which are exposed in the Advanced tab in the UI). The most notable is bwlimit for limiting IO bandwidth. The amount of threads used for the compressor can be controlled with the pigz (replacing gzip), respectively, zstd setting. Furthermore, there are ionice (when the BFQ scheduler is used) and, as part of the performance setting, max-workers (affects VM backups only) and pbs-entries-max (affects container backups only). See the configuration options for details.
Backup Retention
With the prune-backups option you can specify which backups you want to keep in a flexible manner.
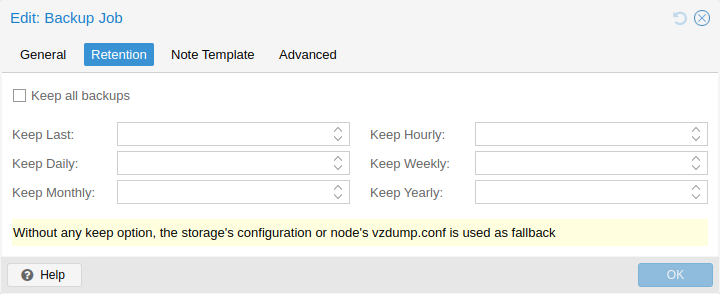
The following retention options are available:
- keep-all <boolean>
-
Keep all backups. If this is true, no other options can be set.
- keep-last <N>
-
Keep the last <N> backups.
- keep-hourly <N>
-
Keep backups for the last <N> hours. If there is more than one backup for a single hour, only the latest is kept.
- keep-daily <N>
-
Keep backups for the last <N> days. If there is more than one backup for a single day, only the latest is kept.
- keep-weekly <N>
-
Keep backups for the last <N> weeks. If there is more than one backup for a single week, only the latest is kept.
|
|
Weeks start on Monday and end on Sunday. The software uses the ISO week date-system and handles weeks at the end of the year correctly. |
- keep-monthly <N>
-
Keep backups for the last <N> months. If there is more than one backup for a single month, only the latest is kept.
- keep-yearly <N>
-
Keep backups for the last <N> years. If there is more than one backup for a single year, only the latest is kept.
The retention options are processed in the order given above. Each option only covers backups within its time period. The next option does not take care of already covered backups. It will only consider older backups.
Specify the retention options you want to use as a comma-separated list, for example:
# vzdump 777 --prune-backups keep-last=3,keep-daily=13,keep-yearly=9
While you can pass prune-backups directly to vzdump, it is often more sensible to configure the setting on the storage level, which can be done via the web interface.
Prune Simulator
You can use the prune simulator of the Proxmox Backup Server documentation to explore the effect of different retention options with various backup schedules.
Retention Settings Example
The backup frequency and retention of old backups may depend on how often data changes, and how important an older state may be, in a specific work load. When backups act as a company’s document archive, there may also be legal requirements for how long backups must be kept.
For this example, we assume that you are doing daily backups, have a retention period of 10 years, and the period between backups stored gradually grows.
keep-last=3 - even if only daily backups are taken, an admin may want to create an extra one just before or after a big upgrade. Setting keep-last ensures this.
keep-hourly is not set - for daily backups this is not relevant. You cover extra manual backups already, with keep-last.
keep-daily=13 - together with keep-last, which covers at least one day, this ensures that you have at least two weeks of backups.
keep-weekly=8 - ensures that you have at least two full months of weekly backups.
keep-monthly=11 - together with the previous keep settings, this ensures that you have at least a year of monthly backups.
keep-yearly=9 - this is for the long term archive. As you covered the current year with the previous options, you would set this to nine for the remaining ones, giving you a total of at least 10 years of coverage.
We recommend that you use a higher retention period than is minimally required by your environment; you can always reduce it if you find it is unnecessarily high, but you cannot recreate backups once they have been removed.
Backup Protection
You can mark a backup as protected to prevent its removal. Attempting to remove a protected backup via Proxmox VE’s UI, CLI or API will fail. However, this is enforced by Proxmox VE and not the file-system, that means that a manual removal of a backup file itself is still possible for anyone with write access to the underlying backup storage.
|
|
Protected backups are ignored by pruning and do not count towards the retention settings. |
For filesystem-based storages, the protection is implemented via a sentinel file <backup-name>.protected. For Proxmox Backup Server, it is handled on the server side (available since Proxmox Backup Server version 2.1).
Use the storage option max-protected-backups to control how many protected backups per guest are allowed on the storage. Use -1 for unlimited. The default is unlimited for users with Datastore.Allocate privilege and 5 for other users.
Backup Notes
You can add notes to backups using the Edit Notes button in the UI or via the storage content API.
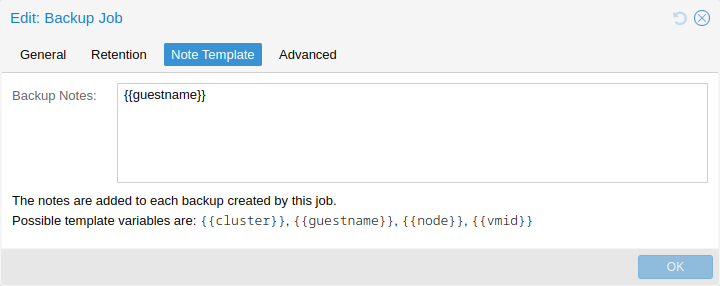
It is also possible to specify a template for generating notes dynamically for a backup job and for manual backup. The template string can contain variables, surrounded by two curly braces, which will be replaced by the corresponding value when the backup is executed.
Currently supported are:
-
{{cluster}} the cluster name, if any
-
{{guestname}} the virtual guest’s assigned name
-
{{node}} the host name of the node the backup is being created
-
{{vmid}} the numerical VMID of the guest
When specified via API or CLI, it needs to be a single line, where newline and backslash need to be escaped as literal \n and \\ respectively.
Restore
A backup archive can be restored through the Proxmox VE web GUI or through the following CLI tools:
- pct restore
-
Container restore utility
- qmrestore
-
Virtual Machine restore utility
For details see the corresponding manual pages.
Bandwidth Limit
Restoring one or more big backups may need a lot of resources, especially storage bandwidth for both reading from the backup storage and writing to the target storage. This can negatively affect other virtual guests as access to storage can get congested.
To avoid this you can set bandwidth limits for a backup job. Proxmox VE implements two kinds of limits for restoring and archive:
-
per-restore limit: denotes the maximal amount of bandwidth for reading from a backup archive
-
per-storage write limit: denotes the maximal amount of bandwidth used for writing to a specific storage
The read limit indirectly affects the write limit, as we cannot write more than we read. A smaller per-job limit will overwrite a bigger per-storage limit. A bigger per-job limit will only overwrite the per-storage limit if you have ‘Data.Allocate’ permissions on the affected storage.
You can use the ‘--bwlimit <integer>` option from the restore CLI commands to set up a restore job specific bandwidth limit. KiB/s is used as unit for the limit, this means passing `10240’ will limit the read speed of the backup to 10 MiB/s, ensuring that the rest of the possible storage bandwidth is available for the already running virtual guests, and thus the backup does not impact their operations.
|
|
You can use ‘0` for the bwlimit parameter to disable all limits for a specific restore job. This can be helpful if you need to restore a very important virtual guest as fast as possible. (Needs `Data.Allocate’ permissions on storage) |
Most times your storage’s generally available bandwidth stays the same over time, thus we implemented the possibility to set a default bandwidth limit per configured storage, this can be done with:
# pvesm set STORAGEID --bwlimit restore=KIBs
Live-Restore
Restoring a large backup can take a long time, in which a guest is still unavailable. For VM backups stored on a Proxmox Backup Server, this wait time can be mitigated using the live-restore option.
Enabling live-restore via either the checkbox in the GUI or the --live-restore argument of qmrestore causes the VM to start as soon as the restore begins. Data is copied in the background, prioritizing chunks that the VM is actively accessing.
Note that this comes with two caveats:
-
During live-restore, the VM will operate with limited disk read speeds, as data has to be loaded from the backup server (once loaded, it is immediately available on the destination storage however, so accessing data twice only incurs the penalty the first time). Write speeds are largely unaffected.
-
If the live-restore fails for any reason, the VM will be left in an undefined state - that is, not all data might have been copied from the backup, and it is most likely not possible to keep any data that was written during the failed restore operation.
This mode of operation is especially useful for large VMs, where only a small amount of data is required for initial operation, e.g. web servers - once the OS and necessary services have been started, the VM is operational, while the background task continues copying seldom used data.
Single File Restore
The File Restore button in the Backups tab of the storage GUI can be used to open a file browser directly on the data contained in a backup. This feature is only available for backups on a Proxmox Backup Server.
For containers, the first layer of the file tree shows all included pxar archives, which can be opened and browsed freely. For VMs, the first layer shows contained drive images, which can be opened to reveal a list of supported storage technologies found on the drive. In the most basic case, this will be an entry called part, representing a partition table, which contains entries for each partition found on the drive. Note that for VMs, not all data might be accessible (unsupported guest file systems, storage technologies, etc…).
Files and directories can be downloaded using the Download button, the latter being compressed into a zip archive on the fly.
To enable secure access to VM images, which might contain untrusted data, a temporary VM (not visible as a guest) is started. This does not mean that data downloaded from such an archive is inherently safe, but it avoids exposing the hypervisor system to danger. The VM will stop itself after a timeout. This entire process happens transparently from a user’s point of view.
|
|
For troubleshooting purposes, each temporary VM instance generates a log file in /var/log/proxmox-backup/file-restore/. The log file might contain additional information in case an attempt to restore individual files or accessing file systems contained in a backup archive fails. |
Configuration
Global configuration is stored in /etc/vzdump.conf. The file uses a simple colon separated key/value format. Each line has the following format:
OPTION: value
Blank lines in the file are ignored, and lines starting with a # character are treated as comments and are also ignored. Values from this file are used as default, and can be overwritten on the command line.
We currently support the following options:
- bwlimit: <integer> (0 - N) (default = 0)
-
Limit I/O bandwidth (in KiB/s).
- compress: <0 | 1 | gzip | lzo | zstd> (default = 0)
-
Compress dump file.
- dumpdir: <string>
-
Store resulting files to specified directory.
- exclude-path: <array>
-
Exclude certain files/directories (shell globs). Paths starting with / are anchored to the container’s root, other paths match relative to each subdirectory.
- fleecing: [[enabled=]<1|0>] [,storage=<storage ID>]
-
Options for backup fleecing (VM only).
- enabled=<boolean> (default = 0)
-
Enable backup fleecing. Cache backup data from blocks where new guest writes happen on specified storage instead of copying them directly to the backup target. This can help guest IO performance and even prevent hangs, at the cost of requiring more storage space.
- storage=<storage ID>
-
Use this storage to storage fleecing images. For efficient space usage, it’s best to use a local storage that supports discard and either thin provisioning or sparse files.
- ionice: <integer> (0 - 8) (default = 7)
-
Set IO priority when using the BFQ scheduler. For snapshot and suspend mode backups of VMs, this only affects the compressor. A value of 8 means the idle priority is used, otherwise the best-effort priority is used with the specified value.
- lockwait: <integer> (0 - N) (default = 180)
-
Maximal time to wait for the global lock (minutes).
- mailnotification: <always | failure> (default = always)
-
Deprecated: use notification targets/matchers instead. Specify when to send a notification mail
- mailto: <string>
-
Deprecated: Use notification targets/matchers instead. Comma-separated list of email addresses or users that should receive email notifications.
- maxfiles: <integer> (1 - N)
-
Deprecated: use prune-backups instead. Maximal number of backup files per guest system.
- mode: <snapshot | stop | suspend> (default = snapshot)
-
Backup mode.
- notes-template: <string>
-
Template string for generating notes for the backup(s). It can contain variables which will be replaced by their values. Currently supported are {\{\cluster}}, {\{\guestname}}, {\{\node}}, and {\{\vmid}}, but more might be added in the future. Needs to be a single line, newline and backslash need to be escaped as \n and \\ respectively.
Requires option(s): storage - notification-mode: <auto | legacy-sendmail | notification-system> (default = auto)
-
Determine which notification system to use. If set to legacy-sendmail, vzdump will consider the mailto/mailnotification parameters and send emails to the specified address(es) via the sendmail command. If set to notification-system, a notification will be sent via PVE’s notification system, and the mailto and mailnotification will be ignored. If set to auto (default setting), an email will be sent if mailto is set, and the notification system will be used if not.
- pbs-change-detection-mode: <data | legacy | metadata>
-
PBS mode used to detect file changes and switch encoding format for container backups.
- performance: [max-workers=<integer>] [,pbs-entries-max=<integer>]
-
Other performance-related settings.
- max-workers=<integer> (1 - 256) (default = 16)
-
Applies to VMs. Allow up to this many IO workers at the same time.
- pbs-entries-max=<integer> (1 - N) (default = 1048576)
-
Applies to container backups sent to PBS. Limits the number of entries allowed in memory at a given time to avoid unintended OOM situations. Increase it to enable backups of containers with a large amount of files.
- pigz: <integer> (default = 0)
-
Use pigz instead of gzip when N>0. N=1 uses half of cores, N>1 uses N as thread count.
- pool: <string>
-
Backup all known guest systems included in the specified pool.
- protected: <boolean>
-
If true, mark backup(s) as protected.
Requires option(s): storage - prune-backups: [keep-all=<1|0>] [,keep-daily=<N>] [,keep-hourly=<N>] [,keep-last=<N>] [,keep-monthly=<N>] [,keep-weekly=<N>] [,keep-yearly=<N>] (default = keep-all=1)
-
Use these retention options instead of those from the storage configuration.
- keep-all=<boolean>
-
Keep all backups. Conflicts with the other options when true.
- keep-daily=<N>
-
Keep backups for the last <N> different days. If there is morethan one backup for a single day, only the latest one is kept.
- keep-hourly=<N>
-
Keep backups for the last <N> different hours. If there is morethan one backup for a single hour, only the latest one is kept.
- keep-last=<N>
-
Keep the last <N> backups.
- keep-monthly=<N>
-
Keep backups for the last <N> different months. If there is morethan one backup for a single month, only the latest one is kept.
- keep-weekly=<N>
-
Keep backups for the last <N> different weeks. If there is morethan one backup for a single week, only the latest one is kept.
- keep-yearly=<N>
-
Keep backups for the last <N> different years. If there is morethan one backup for a single year, only the latest one is kept.
- remove: <boolean> (default = 1)
-
Prune older backups according to prune-backups.
- script: <string>
-
Use specified hook script.
- stdexcludes: <boolean> (default = 1)
-
Exclude temporary files and logs.
- stopwait: <integer> (0 - N) (default = 10)
-
Maximal time to wait until a guest system is stopped (minutes).
- storage: <storage ID>
-
Store resulting file to this storage.
- tmpdir: <string>
-
Store temporary files to specified directory.
- zstd: <integer> (default = 1)
-
Zstd threads. N=0 uses half of the available cores, if N is set to a value bigger than 0, N is used as thread count.
tmpdir: /mnt/fast_local_disk
storage: my_backup_storage
mode: snapshot
bwlimit: 10000
Hook Scripts
You can specify a hook script with option --script. This script is called at various phases of the backup process, with parameters accordingly set. You can find an example in the documentation directory (vzdump-hook-script.pl).
File Exclusions
|
|
this option is only available for container backups. |
vzdump skips the following files by default (disable with the option --stdexcludes 0)
/tmp/?*
/var/tmp/?*
/var/run/?*pid
You can also manually specify (additional) exclude paths, for example:
# vzdump 777 --exclude-path /tmp/ --exclude-path '/var/foo*'
excludes the directory /tmp/ and any file or directory named /var/foo, /var/foobar, and so on.
|
|
For backups to Proxmox Backup Server (PBS) and suspend mode backups, patterns with a trailing slash will match directories, but not files. On the other hand, for non-PBS snapshot mode and stop mode backups, patterns with a trailing slash currently do not match at all, because the tar command does not support that. |
Paths that do not start with a / are not anchored to the container’s root, but will match relative to any subdirectory. For example:
# vzdump 777 --exclude-path bar
excludes any file or directory named /bar, /var/bar, /var/foo/bar, and so on, but not /bar2.
Configuration files are also stored inside the backup archive (in ./etc/vzdump/) and will be correctly restored.
Examples
Simply dump guest 777 - no snapshot, just archive the guest private area and configuration files to the default dump directory (usually /var/lib/vz/dump/).
# vzdump 777
Use rsync and suspend/resume to create a snapshot (minimal downtime).
# vzdump 777 --mode suspend
Backup all guest systems and send notification mails to root and admin. Due to mailto being set and notification-mode being set to auto by default, the notification mails are sent via the system’s sendmail command instead of the notification system.
# vzdump --all --mode suspend --mailto root --mailto admin
Use snapshot mode (no downtime) and non-default dump directory.
# vzdump 777 --dumpdir /mnt/backup --mode snapshot
Backup more than one guest (selectively)
# vzdump 101 102 103 --mailto root
Backup all guests excluding 101 and 102
# vzdump --mode suspend --exclude 101,102
Restore a container to a new CT 600
# pct restore 600 /mnt/backup/vzdump-lxc-777.tar
Restore a QemuServer VM to VM 601
# qmrestore /mnt/backup/vzdump-qemu-888.vma 601
Clone an existing container 101 to a new container 300 with a 4GB root file system, using pipes
# vzdump 101 --stdout | pct restore --rootfs 4 300 -